Wednesday, May 11, 2011

Google's Help Forums

This article introduces Google's Help Forums: these are the main way of getting support for non-paid products. The forum for Blogger is particularly strong.

Update:

Google introduced a new Product Help Forum in mid-March 2012.   Read more about this...

The old help forums are still available read-only.

The new help-group can be reached from Blogger.com:  choose help from the gear-wheel menu at the top right of the screen.

The following material is kept for historical purposes only:   it is no longer current.


How are Google's Help tools organised? 


For each "product" (Blogger, AdSense, Custom-Search, Maps, etc etc) Google has as set of Help Articles, and a Help Forum.


Generally the link to these is at the top right hand corner of the screen.


The Help forum's are particularly useful if you've searched for the solution to something and cannot find it, or if you want some tips about how to approach something.


Help forum features:


Each product's Help Forum includes:
  • A left hand column, where you can switch between the forum and articles, and where you can Post a Question
  • A middle column which shows the Discussion Categories, or the most recent questions if you've chosen a category.
  • The right hand column highlights some of the most popular discussions.


When you initially browse through the questions in the Forum, you'll notice that many of them are written with bad spelling and/or grammar, or seem to be asking incredibly basic questions.   But don't be discouraged:  many Google users have English as a second (third, etc) language, and many do a lot of texting (moderate amounts of txt-spk are allowed in these forums, unlike many others).  And some are very, very new to blogging and don't seem to have read the help files yet.


And there are some very helpful people, who at times give absolutely brilliant answers - for example, this one about how to get your blog noticed by search-engines.


Hints for using the help-forums


Help-forums only survive long term if people give good answers as well as ask questions.   Every time you ask a question, browse through and find 2-3 not-yet-answered questions that you know the answer to, and post answer them.   Doing this:
  • creates good karma,
  • gets your post count up, and
  • frees up the more experienced people to answer other, harder, questions (like yours!)


Always include your blog's URL (www.YOUR-BLOG-NAME.blogspot.com) and your location (ie the city and country you are in) with your question: it makes answering questions much easier.


Be as specific as you can:   say what you were doing when an error message appeared, and what you're wanting to achieve.


Related Articles:


Blogger and other Google products

Blogger and non-Google products

Understanding Google accounts

Setting up AdSense on your blog
Read more > Google's Help Forums

Stop malicious use of your AdSense account ID

AdSense's Allowed Sites feature, is an important safeguard for any blogger who is worried that others may try to mis-use their AdSense account and/or get them in to trouble.

The article is written with Blogspot users in mind, but the advice applies to ANY AdSense publishers.

Overview:

By Андрей! (Own work) [Public domain],
via Wikimedia Commons
Previously, I've described setting up Adsense in Blogger, and putting AdSense ads right inside your posts.

The way that AdSense works with web-browsers, any person, or computer, can look at the source-code for you page (eg with the View / Page Source menu-option in Firefox), and see what your AdSense publisher ID is.   If they're clever or malicious enough they could potentially put ads with your publisher-id onto sites that don't meet AdSense's program guidelines (eg ones that encourage readers to click the ads).  And then they could report "you", and get you banned from AdSense for doing this.

Luckily, AdSense has the Allowed Sites feature to combat this.  Basically, you enter the  URLs (ie names) of sites you own, and only earnings from only those sites will be recorded in your account.  You aren't held responsible for any other sites where your publisher-id is used.


How to turn Allowed Sites on:

Log in to AdSense (www.google.com/adsense/)

Inside AdSense:
  1. In the Home tab, choose Account Settings from the left-hand navigation list.
  2. Scroll down to the Access and Authorisation section (currently at the bottom of the page)
  3. Click the edit link, beside Sites authorised to show ads
  4. Make sure that Only allow certain sites to display ads for my account is ticked
  5. Enter the list of sites that you own in the Authorised Sites list
    (for each one, just enter the "naked domain", ie foo.com, not www.foo.com)
  6. Click Save at the bottom of the section.


What do do next:

If you put your AdSense ads on any other blog or websites in the future, you do need to remember to add them to the Allowed Sites list.

Also, along with allowed-sites list, AdSense shows a list of non-allowed, websites (blogs and others) that have also tried to use your Publisher-id.   Check this occasionally, in case you've forgotten to add a new blog/website to the list, or in case you'e added a feature (eg the Translate this page widget) that effectively creates one.  The list is only updated weekly, so sites will still be on it for up to a week after you've allowed them.  However the Allow feature works immediately.


Related Articles:


Setting up Adsense in Blogger

Putting AdSense ads right inside your posts.

Blocking categories of AdSense ads from your Blog

Putting an AsSense-enabled custom search engine in your blog
Read more > Stop malicious use of your AdSense account ID

Tuesday, May 10, 2011

Renault Sandero 2012

Nosso mercado fica cada vez mais interessante a cada ano. Antigamente as categorias de compactos eram apenas duas aqui e na Europa, pequenos e médios. Mas os tempos passaram, e trouxeram motivos diversos como defasagem de alguns modelos, outros reposicionados na gama da marca, preferência por modelos regionais ou mesmo carros de dimensões diferentes, nosso mercado ficou muito mais variado. E o Sandero é um exemplo desta variedade.
Renault Sandero 2012Primeiro os médios se dividiram em médios e premium, como Citroën C3 e Fiat Punto, e depois os pequenos passaram a ser de entrada (como Chevrolet Celta e Fiat Uno) e da nova categoria, os “espaçosos”. É o caso de VW Fox, Chevrolet Agile e do Sandero, que recebe um face-lift para resistir à concorrência.

Derivado do Logan, o hatch surgiu em 2008 tentando aliar o espaço enorme e o preço baixo do modelo de origem a um desenho mais amigável, e logo deslanchou nas vendas. E agora ele recebe retoques leves mas interessantes. Como a frente redesenhada, que buscou inspiração nos Renault europeus mais recentes para conseguir um visual bem jovial e até esportivo. Ou a traseira com tampa do porta-malas e lanternas levemente retocados.

A versão Stepway ganhou algumas novidades externas a mais, como os apliques de plástico preto nos parachoques e lanternas fumê. O interior dos Sandero recebeu poucas mas ótimas melhorias. Assim como no sedã os vidros elétricos ganharam comandos nas portas em vez do console central, existem novas opções de revestimentos, e segundo a marca o isolamento acústico melhorou.

O único ponto “não alto” é que a parte mecânica ficou intacta. Nem novos motores nem câmbio automático, mas com uma bem-vinda redução de preços: o Sandero permanece com o 1.0 16v nas versões Authentique (R$ 28.700) e Expression (R$ 31.300), 1.6 8v nesta (R$ 33.600) e na Privilège (R$ 40.400), e 1.6 16v na Stepway (R$ 42.600), todos flex.

Read more > Renault Sandero 2012

Getting the HTML code to put a picture into your blog

You can use the Post Editor to get the HTML code that you need to put a picture into your sidebar (or header or footer, or anywhere else a gadget can go).


Overview


The Picture gadget is the normal tool for adding a picture to your blog's sidebar.

But there are times when you want more control over the picture size or behaviour.  Eg, you may want to have two pictures very close to each other and guarantee that they're the same size.   To do this, you need to get the HTML code for the picture, and then put it into your blog.  Fortunately, Blogger's Post-editor make it very easy to do this without writing the code yourself.


Using the Post Editor to generate the HTML for a picture


1  Start a new Post  (you're not ever going to publish this:  it's just a work-area)

2  Don't enter any text:   just use the Picture icon on the toolbar to add a picture.   Blogger will prompt you to upload the picture, or to choose it from a Picasa-web-album, or to enter its URL:  add the picture the way that you usually would.

3  Switch to Edit HTML mode   (called HTML in Blogger-2011)
This will show you the HTML code for displaying the picture, as it is set to display in the Post (depending on the picture-settings you've chosen, it may be centered or right/left aligned, and the size may vary).

Copy the HTML.

5  Switch back to Compose Mode, called Compose in Blogger-2011), so you don't get confused the next time you edit a post.

Return to the list of posts:  you may be asked if you want to leave the page without saving - the answer is Yes.  Or you may have a new draft-status post, which you can delete.

You can now paste the HTML code that you copied into into an HTML/Javascript gadget, or anywhere else that you may need it - even into another post that you are editing in a separate window.


Related Articles: 


Stopping pictures on your blog from being "clickable"

What are Picasa-web-albums?

Finding the URL of a picture that's stored in Picasa-web-albums)

Inserting a Picture into a blog Post.

Putting 3rd party HTML into your blog

Center-align the gadgets on your blog

Hosting pictures outside of Google / Picasa

Inserting a picture into your blog as a gadget
Read more > Getting the HTML code to put a picture into your blog

Monday, May 9, 2011

Copying all the posts from one blog to another

This article is about how to copy all the posts from one blog to another, using Blogger.  There is a separate article about copying individual posts, or pages, from one blog to another.

Overview:


New Holland tractor with NH 850TL front loaderTo copy all the Posts from one blog to another, you need to export them from the first blog, and import the file that was created into the second file.

Any Pages (see The Difference between Posts and Pages) in the first blog, need to be moved individually, because pages aren't currently included in the export file.

If you want to totally replace the contents of the destination blog with the contents of the source blog, then you should delete the existing posts from the destination blog before you import the file.  (Delete posts by going tothe Posting / Edit Posts screen, and pressing the Delete button that is beside the post.   Don't delete the entire blog, or you will lose access to the URL).


Follow these steps to copy all posts from one blog to another:


1  Log in to Blogger.

2  Go to the export tab:
In the pre-Sept-2011 Blogger (ie the "old" interface) this is the  Settings / Basics tab.   OR
In the post-Sept-2011 Blogger (ie the "new" interface) this is the  Settings / Other tab.


3  Click on Export Blog.

Export-blog window on the old Blogger interface:
the new interface looks a little different, but has the same links

3a  If you are using the new interface, click Download Blog on the confirmation message window:


4  Your computer will download a file.   For Windows users, it will probably be put in the My Documents / Downloads file.  Or system may use another place, or may ask you where to put it.   Whatever happens, you will need to know where this file is saved to.

5  Open the blog that you want to move the posts to
(You may need to log out and in again, or perhaps just switch to different browser or tab)

Delete (using Posting / Edit Posts) any Posts that are already there, but which you don't want in the refreshed blog.

6  Go to Settings > Basics (old interface) or Settings > Other (new interface) again. This time, click Import Blog.  When the box opens, choose the exported file that you made earlier, and enter the security-text.
Import file selection screen in the new interface:
the old version of Blogger is very similar.

7  Choose whether or not to automatically publish all imported posts.  
Only tick the box if you DO want the posts automatically imported.   If you don't tick it, the posts will be loaded, but with have status of Draft, so won't be visible by readers until you publish them.

8  Click Import Blog.

Check that the import worked successfully, by looking at the blog, and also at the list of posts under Edit Posts:  are the right number of posts there, do they have the right labels etc.


Results:


IMG redCowRoadworks4586All the posts from the source blog will be copied to the destination blog.

Many of the post characteristics will be the same as in the original blog.  This includes:  

  • title
  • post contents
  • published-date and time
  • label(s)
  • post-author.


Any comments from the source blog will also be copied over - sometimes it takes a few hours for the links for them to be re-establshed properly.

The URL for each post will be based on the URL of the blog you have imported them into and the publication-date that the posts had in the source blog - for example:
www.YourNewBlogName.blogspot.com /2009/05/name-based-on-post-title.html

Any internal links in the blog will still point to the post in the old blog
For example this link points to a popular article in Blogger-HAT.  
If I export-and-imported this post into a new blog, the link would still point to the same place, ie the post in Blogger-HAT - not to the post in the new blog.

Any pictures, videos etc in the old blog will still be in the same place that they were in (Picasa-web-albums, YouTube, Google Videos etc).

If you have imported more than the number of posts that Blogger allows per day (currently 50 I think) then to make any more posts today you will need to complete the captcha-test (ie entering the letters in the funny-shaped word).   This will go away approximately 24 hours after you last enter more that the maximum-posts-per-day.


Importing to the same blog:


If you try to import posts into the same blog that you exported them from, Blogger will not import any posts, and give you an error message.  

If you do want to do this (eg to create a duplicate set of posts), then do the export, change some small detail of the original posts title or date/time, and then do the import.


Related Articles:


The Difference between Posts and Pages

Moving individual posts, or pages, from one blog to another

Converting Posts into Pages

Moving some posts form one blog to another 

Deleting blogs and blog-posts
Read more > Copying all the posts from one blog to another

Why RSS / Subscribe to Posts is important for your blog

This article explains why an RSS feed is important to bloggers, and some options for making it available.

Overview

Previously, I've described how to hide the Subscribe to Posts (atom) link that appears that the bottom of the screen on all Blogger's standard templates.

This is a sensible thing to do, because the link:
  • is ugly, 
  • is hard to find (except for hardened Blogger users who know what they're looking for), and 
  • uses words ("atom") that don't mean much to many readers, especially ones who don't use Blogger.
But providing an RSS feed for your blog is A Very Good Thing to do, and there are many ways of doing it which don't involve that link.


Why is an RSS feed a good thing?

When websites were invented, people found that it took a lot of time to visit all their favourite sites regularly just to check for any changes.   It was frustrating for sites that don't change often.  It was hard to spot changes in big sites.   And web-site owners realised that some people simply wouldn't remember to check back anyway.

A few approaches were created to solve this problem.  One is RSS ("really simple syndication"), which is based on the idea that
  • Websites are set up so that every time they are updated, they "publish a feed" of what's new, and
  • People who are interested in websites use "feed reader" software to check if the sites they are interested in have new material, and
  • Feed aggregator tools sit in the middle and keep track of what websites have published and what sites individual people are interested in what updates they have read so far.
Blogs that are made with Blogger are really just another type of website, so to work with RSS they needed a way to "publish a feed" of new material when posts are added.

The approach that Google originally used for Blogger involves "Atom" format.  The "Subscribe to Posts (atom)" link that appears on the bottom of most Layout and Designer templates is saying
 "Here's a link for your feed-reader to use, in our Atom format".
This works, but as I've said, it's ugly and not so obvious for non-Blogger-users.  The rules used to publish feeds on the internet have developed over time and different ways of organising the data in "feeds" (eg Atom 2.0, XML) have been adopted.  And website publishers have begun to look for more features in their feeds and in the statistics they get about who reads them.

Blogger also has a a Subscription-links gadget, which has buttons to let users subscribe to either your Posts or your Comments.  Recently I've had difficulty with this gadget:   I can add it, but it doesn't actually show up on my blog.   I've reported this via the Something-is-broken section of Blogger Help Forum, but not found a solution.


Alternatives:

cute picture of an anthropomorphic rabbit
The simplest alternative to the "Subscribe to posts (atom)" link is to make something else on your website that points to the same place as that link, but looks more obvious.
For example, you could use a cute picture of a rabbit, or even some text like "Follow this blog in RSS".

All you need to do is find the RSS feed address for your blog, and link it to this picture or text.

But although this gives your readers access to your feed, it does nothing for you.


A better alternative is to use a tool like Feedburner.


This takes your blog's "raw" feed and delivers it to subscribers in the format your specify - and also offers a number of other features including tools to
and many more.

Other alternatives?

There are other products that can be used to do similar things.

But Feedburner was purchased by Googe in 2007 (according to Wikipedia), so it's now part of the Google family of products.   Until I find some feature that I need but it doesn't have, I'm not likely to explore other tools, simply because it's often easier to use products from the same toolset.  

Your mileage may vary.  But if you're interested click here to find out about getting started with Feedburner.


Related Articles: 


Adding an RSS feed icon to your blog

Giving your blog an email subscription option, using Feedburner

How to hide the Subscribe to Posts (atom) link

Finding the RSS feed address for your blog.

Blocking categories of AdSense ads from your blog
Read more > Why RSS / Subscribe to Posts is important for your blog

Sunday, May 8, 2011

Setting up Google Analytics for your blog

This article shows how to add Google Analytics to your blog.

Google Analytics and Blogger

Google Analytics is one option if you want more detailed statistics about your blog than you can get from Blogger's Stats tab.  It provides more features than most bloggers need, but it can be handy to use it from the beginning anyway, so that you have historical data when you do eventually want more detailed statistics.

It works by running a small script each time that a person views a screen from your blog:  this reads some information about the person, their computer and what content they looked at, and adds it to a statistical database that you (and Google) can get reports from.  It only collects data (number of visits, length of time spent, etc) from when the script is installed into your blog.  Initially you had to install the code yourself, but a change that Blogger made in October 2011 made this a lot easier.

Now, to install it into your blog, you simply have to:
  • Set up a profile for your blog in Analytics
  • If your blog uses Dynamic Views or has a Mobile template enabled (*)  (either all the time, or as an option):  put the Web Property ID you get assigned in Analytics into your blog's options, AND
  • Put the tracking code into your template, AND
  • Save the changes that you have made to your profile  (be careful - it's easy to forget this step!)

(*)  At the time of writing (15 Oct 2011) the help materials weren't 100% clear about the status of mobile templates.   My best guess is that you should install the Web-Property-ID anyway, just in case.   But I will update this article if I find any more information.


How to set up an Analytics profile:

1   Log in to Analytics, using the Google account that you want to do reporting from.    (If you're already logged in to Google when you go to that page, you may need to click the blue Access Analytics button).

This doesn't have to be the same account that owns or even has administrator rights to the blog that's being analysed - so long as you can figure out how to copy some code from Analytics into the blog.)   Personally, I keep my Analytics statistics in the same account that I use for AdSense and AdWords.


2   From the Analytics Settings tab, choose Add New Profile  (currently it's a link on the right hand side of the page)

3   Choose Add a Profile for a new domain  
(I'm assuming that anyone reading this article doesn't already have a profile to be extending.)


4   Enter the name of your blog (including the www at the beginning of the URL), and press Continue

In the next steps, you need to copy two different items from this screen.   So it's best if you leave this open, and switch to another screen to continue.


Putting the Web Property ID into your options:

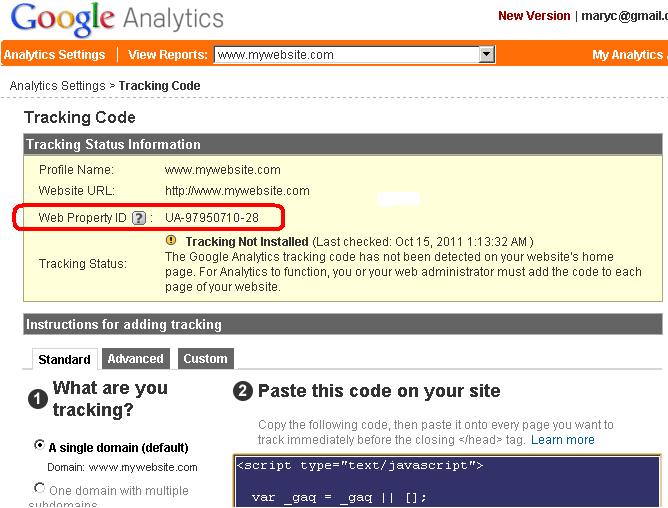
5   Copy the Web-property-id from the top section of the screen:

6   Add ito your blog:

In Blogger-2011 (ie the new interface):

  • Go to Settings > Other
  • At the bottom of the screen, you will find a field for Google Analytics account number - paste the value you copied into this field
  • Click Save Settings at the top of the screen

(NB  If your screen is like mine, it will be hard to see the field - due to the "subtle" screen design that Blogger have chosen.   But it is there, and may show up better if you tilt your screen a little.)

In Blogger-pre-2011 (ie the old interface)

  • Go to Settings > Basic
  • Two thirds of the way down the screen, you will find a field for Google Analytics account number - paste the value you copied into this field
  • Click Save Settings at the bottom of the screen


How to add the Analytics code to your site

Analytics is used by many people running websites built with all sorts of tools, so the standard installation instructions are very general:
Copy the following code, then paste it onto every page you want to track immediately before the closing </head> tag

The Previous Instructions given by Analytics:
The detailed instructions link in Analytics leads to the appropriate section in the Analytics help-centre.  At one stage, this had a link to Blogger-specific instructions, but this seems to be gone.   But I'm pretty sure that it said to find the  <body> tag and paste the code from Analytics immediately after it.   This still works, but it's harder to describe now, because some templates put other content in the body statement, and you need to locate the place after the angle-bracket ">" that closes the <body statement.

Searching the help-centre for "blogger" shows various articles, including some that tell you to put the code into your template just before the closing </head> statement.    Some of these remind you to download a full copy of your template before making changes to it - and none of them warn you about the disadvantages of editing your template.


Another Alternative:
An alternative suggested by Google engineers in some places is to install the tracking code into a HTML/Javascript gadget - this is Option 1 in ways to install 3rd party HTML into your blog.

A major advantage of this approach is that your statistics won't be interrupted if you change templates:  remember that changing templates keeps your gadgets (though it sometimes moves them around), but deletes any template changes that you have made.

You do need to decide where to put the gadget:  it doesn't actually show anything on the screen (except perhaps a small space that looks blank to your readers), but visitors to your will be "counted" when the gadget runs:  if your blog page takes a long time to load, and your gadget is in the footer, then visitors who don't wait for the entire page to load before clicking away won't be counted.  Personally, I like to put the gadget immediately under the Blog Posts gadget, like this:

Blogger Page Elements design screen, with area under the Blog Posts gadget highlighted

IMPORTANT:  Don't forget to press the orange Save button after your have shifted the gadget to where you want it to go.


After the code is installed, it takes a little time (maybe even 24 hours) for tracking to start.   Once it's started, you can get reports by selecting the profile from the View Reports drop-down in the Analytics application.


Related Articles: 


Advantanges and disadvantages of editing your template.

Planning changes to your blog's template

Advertising on your Blog:  some things to consider

How the data in Blogger is organised

Blogs, bloggers and Blogger, Post, Pages and Screens - some basic concepts

AdSense and AdWords - understanding the difference
Read more > Setting up Google Analytics for your blog
 
 
Copyright © blog
Blogger Theme by Blogger Designed and Optimized by Tipseo