Showing posts with label Pictures. Show all posts

Wednesday, February 13, 2013

What is Creative-Kit, and how to use it

This article describes Creative Kit, which is a photo-editing tool for enhancing pictures in your Picasa-web and Google+ albums.


A little history: Picasa, Picnik and Creative Kit


In 2002, a company called Lifescape created a program called Picasa, which people could use to manage photos on their PC.

Google purchased this in 2004 and then integrated it with web-storage, linked to a person's Google account, to make Picasa-web-albums: see Understanding Picasa and Picasa-web-albums for more information about how they work together with Blogger.

Picasa has some photo-editing functions (cropping, red-eye removal, sharpening, lightening, making collages, etc).  Useful, far easier to use than Photoshop - but without features that some people wanted. So in 2010, Google integrated a photo-editing tool from Picnik, a small company that was offering a subscription-based photo hosting and editing service.

Picnik's editor did some cooler things than Picasa, (applying visual effects, watermarks, etc).   The tool  had some serious fans, and a quirky culture which saw them show messages like "packing the lunch" "watching the flowers", "chasing butterflys" while Picnik was loading.  The type of messages that are funny the first few times, but quickly get tedious. And people using Picnik via Piscasa-web-albums often found that it was very slow.

In 2012:
  • Picnik announced that they were closing down their separate photo hosting service, and moving the product to Google+.
  • Google's announced that they were were closing Picnik, and using Picnik's engineers to “continue creating photo-editing magic across Google products."   (ref:  closure announcement).

Today, the original Picnik photo-hosting-and-editing service is most definitely closed.

The Picnik photo editor has been either replaced with or re-badged as "Creative Kit", and is available through Google+.  They may have intended to make it available through Picasa-web-albums too - but as I noted in previously, this feature isn't working. Possibly this is about selling additional storage space:   Picasa-web-albums are available to any Google account, while Google+ Photos is only available to named individuals.   So each person can have lots of Google / Picasa accounts (with free storage on each one), but only one account Google+ account.


How to access Creative Kit today


To start creative Kit, so you can edit a photo with it:
  • Go to Google+, and log in to your Google account that has Google-Plus enabled.
  • Go to your Photos page (which may be on the left-sidebar, or under the More tab on the left sidebar if your screen is small)
  • Go into an album, and open the photo you want to edit.
  • On the menu at the top of the screen, click the Edit button.


This opens the photo inside a window with photo-editing tools. The screen just looks like another set of options within Google-Plus, but actually you are now inside Creative Kit, and you can use it to edit your photo.


When you are finished editing, choose the Save button from the top-left hand side. This give you an option to apply your changes to the current file, or to save a new copy of the file.
  • If you choose Replace then any places (eg blog-posts) that link to the existing photo will now link to the edited photo.
  • If you choose Save a new copy then your existing file is not changed and a new copy of the file will be made in the same folder as the existing one but with a slightly different name.

If you upload pictures into your blog-posts inside Blogger, then the picture files are stored in Picasa-web-albums LINK. If you have Google+ enabled for your account, then you can access these photos directly through either Picasa-web-albums or through Google+, even if you have not linked your blog and your Google+ profile. So you can use the Creative-kit method of editing these pictures, even if you didn't load them via Google+.


What features are available in Creative Kit

At one point Picnik used a "fremium" approach: Basic features were free for everyone to use for free, while people needed to sign up and pay a subscription to use the Premium ones. This has changed, though,and now features are are all free.

At the time of writing, the features include:

Basics

  • Black and White
  • Bocal B&W
  • Boost
  • Soften

Camera

  • Lomo-ish
  • Holga-ish
  • HRD-ish
  • CinemaScope
  • Orton-ish
  • 1960s

Colours:

  • Tint
  • Vibrance
  • Duo-Tone
  • Heat Map 2.0
  • Cross-Process

Touchup

  • Blemish Fix
  • Shine-be-Gone
  • Airbrush
  • Sunless Tan

Google Plus Exclusives

  • Daguerreotype
  • Reala 400
  • Green Fade
  • Magenta Fade
  • Polaroid* Plus
  • Sun Aged


Troubleshooting / Where to get help

Creative Kit uses Adobe Flash Player. If Creative Kit doesn't work inside Google+, try installing a newer version of Flash Player.

If that doesn't help, try:
  • Clearing your cache
  • Clearing Flash shared objects
    These are data files are created by the Creative Kit on your computer, like cookies.  To clear them, go to Abobe's Flash Player help web site.
    The Settings Manager that you see is not just an image; it's the actual Flash Player Settings Manager. Scroll through the list of sites and select www.picnik.com and www.gstatic.com.

    Click the Delete Website button for each, and confirm the deletion.

    Open the Global Storage Settings Panel. Check both of the following boxes:
    - Allow third-party Flash content to store data on your computer.
    - Store common Flash components to reduce download times.

    Once you've cleared your local shared objects, clear your browser cache again.
  • Using a different browser, eg Chrome or Firefox.
  • Disabling ad-blocker or flash-blocking extensions

For more assistance, there is a Creative Kit help-centre in Google:
https://plus.google.com/100432630524345907101#100432630524345907101/posts


Is Creative Kit just Picnik with a new name?

Most probably: the controls and features are very similar, and the press-releases seem to tie up. There is one screen that names both while the photo-editor is loading in Google+>Pictures.

But on the other hand there's no official confirmation either, and there are some product differences. It's possible that Google's engineers were simply inspired by the former Picnik colleagues to create similar controls, and that the underlying photo-editing tool is different. Who knows.

What we do know is that many of the much-loved Picnik features are available in Creative-Kit, provided you're willing to load your photos to a Google+ account.


TL;DR

You can edit a photo in Creative Kit by uploading it to your Google+ account, then choosing the Edit button when you are viewing it.

This may be the same Picnik photo editor that was available in Picasa-web-albums until 2012. Or it may not. Either way it lets you crop, re-colour, apply lots of filters etc for free.

Don't want to put your photos into Google+? Bad luck, there's no other way to use Creative Kit / Picnik on them at the moment. Find another on-line editor instead.


Related Articles:


Creative-kit works with pictures accessed through Google+, but not Picasa-web-albums

Adding a picture to a blog post

Introducing Picasa vs Picasa-web-albums
Read more > What is Creative-Kit, and how to use it

Tuesday, December 18, 2012

How to find free pictures for your blog, using Creative-Commons search

This article describes the Creative Commons search tool, which you can use to look for pictures, videos, music etc that are available for other people to use under a Creative Commons license.


What is Creative Commons

Stick-man holding up a Creative-Commons-search logo, while thinking about some images he wants to find
Previously I've described how copyright applies to bloggers, how you can protect your blog-content from copyright theives, and what you can do if they take you work anyway.

The focus in that series was looking after your own rights.

But rights always come with responsibilities. The details vary by country, but in general you cannot just copy other people's recent work without their permission - in the same way that they cannot copy yours.

Some people, though, are happy to give other people permission to use their work, often with certain conditions (eg you must including an attribution link to the creator).

Creative Commons is an easy, legal way for creators to give permission for things they create to be used by other people. It is a framework which offers "licenses" that creators (writers, artists, composers, poets, etc) can apply to their work to say that other people can make copies, and what conditions apply  (eg non-commercial use, only if you attribute me, etc)

To use it, authors, artists, etc don't need to register their work. Instead, they go to the Creative Commons website and get code / text to put with their published work to show what rules apply.

Then they can publish or upload their pictures, writing etc anywhere they want, and by linking to the licence the work is as protected as anything on the internet can be.


How to find pictures & music that are Creative Commons licensed


Creative Commons have a very useful search tool, found at http://search.creativecommons.org

This is not a search engine. Instead it is a front-end-tool that lets you choose:
  • The keywords you want to search for (the search words)
  • The type of license that you need (use for commercial purposes - yes or no, modify, adapt, build upon - yes/no)
  • Which of the file host/search services to use (eg flickr, Google, Open clip art library - etc)


screen where you can enter creative commons search parameter values


Once you have entered the search options, click on the source that you want to look in, and you are  taken to that site and shown the results of the search-query and options you entered.

For example, when I entered:
  • "Christmas"
  • Commercial allowed (because I wanted to make a picture to use in Blogger-HAT, where I have advertising)
  • Changes allowed (because I wanted an image that I could use as the basis for another one, rather than exactly as it is now)

and clicked on Fotopedia, I was shown:

screen showing three Christmas-themes photos from Fotopedia, and their tools for changing pictures per screen and re-use options


From here I could use the search tools in Fotopedia to refine my image-search and find just the right picture that I could use to represent a Christmas carol worksheet on my blog.


What sources are included

Today, the sources that are linked to from Creative Commons search are:
  • Eurpoeana - media
  • Flickr - pictures
  • Fotopedia - pictures
  • Google web - web search results
  • Google images - pictures
  • Jamenda - music
  • Open Clip Art Library - images
  • SpinXpress - media
  • Wikimedia Commons - media
  • YouTube - video
  • Pixabay - images
  • ccMixter - music
  • SoundCloud - music


It wouldn't surprise me if this list grow/shrinks, as sites become more or less useful as sources of public-domain or creative-commons-licensed materials.


Things to watch out for

Creative Commons cannot guarantee that the results of searches that start in their tools will always be available for re-use: source systems may change their approach, items may be mis-tagged, content owners may change their mind, etc. So they recommend that you should always click-through to the original image in the source site, and double-check the license and attribution requirements there.

Also, some sites may allow you to link directly to the copy of the image on their site. this can be a lot quicker than making your own copy, uploading it and included it in your blog.  But doing this means that the image will not be used as the thumbnail-image for your post. And if the picture is ever removed from the original site - or its web-site address there changes - then the link in your blog will not work any more.


Related Articles:


Bloggers and Copyright - an overview

Protecting your blog-contents from copyright theft

Taking action when someone has used your copyright materials

Thumbnail images - a picture to summarise each post

Adding a picture to Blogger
Read more > How to find free pictures for your blog, using Creative-Commons search

Sunday, October 7, 2012

Creative Kit photo editor works in Google+, if not in Picasa

This Quick-Tip is about using the Creative Kit, which has been giving me grief recently when I tried to use it from Picasa-web-albums.

For ages, I've occasionally used the photo-editor in Picasa-web-albums (the online version of Picasa) to edit photos that I've already uploaded, and want to change without changing the URL.   This editor was originally Picnik - until Google sold that product and replaced it with Creative Kit a while ago.

This has sometimes been slow, which was annoying, but I put up with it because it was just so useful.

But recently it stopped working totally:  it would load, the progress-bar would get about half-way along the screen, and then hang, with a message:
We noticed Picnik is loading slowly. It’s possible waiting
may solve this issue. If you’re still having trouble:
[t1]   Click for Assistance»

Waiting never solved the problem for me (trust me, I tried), so eventually I tried the help-link, which went to this Picnik help page.

After following lots of the instructions, I finally found this helpful line in the Adope Flash Player re-installation instructions:
If you are using the Google Chrome browser, Adobe® Flash® Player is built-in but has been disabled. To enable Flash Player, follow the steps in this TechNote

Which sounded hopeful - it's only recently that I've switched to use Chrome all the time, so maybe this was the problem.   But it didn't help - despite what they said, Flash was enabled in my setup.

Eventually, it occurred to me that since I have a Google Plus profile, my albums are now accessible via the Plus interface too.   So I went there, chose Photos, found the album, opened a photo, chose creative kit ... held my breath for a few seconds ... and the editor opened up and worked nicely.

I'd still like to get this working from Picasa, because it just looks so much nicer from the small screen that I use a lot of the time.   Suggestions are very welcome!


PS   Thanks to Hardeep of Widget Craft who used the picture that I'd made as the thumbnail picture for How to Edit Your Blogger Template in one of his articles, and thus inspired me to start putting my own name onto the image files I make.
Read more > Creative Kit photo editor works in Google+, if not in Picasa

Thursday, September 20, 2012

How to put pictures into unusual shapes, using PowerPoint

This article explains how to put a picture that is one shape (a "square peg") inside an image of another shape (a "round hole" - or star, elipse, octagon, etc) - using Microsoft PowerPoint.

Original title:   How to put a square peg into a round hole - in pictures


Wooden clothes peg in a customized rectangle with rounded corners.
Recently, I've been using PowerPoint to make the thumbnail image for my posts. This means that I own the copyright of the pictures, so can share them without worrying about copyright issues.

One approach I've used is to find an interesting copyright-free picture that is related to the theme of the post, and then put it inside a shape that adds some visual interest or has some words along side it.  Another thing that I'm going to try is using multiple pictures in this way to make a more-interesting-than-usual collage.


How to put a picture inside a shape

NB PowerPoint commands are based on Office 2007 and 2010 - but the same principles most-likely apply in other versions where the commands may be slightly different.


1   Get your image file, and save it somewhere on your computer.

A wide range of picture-file formats are supported by PowerPoint:  in the 2007 version this includes as shown in this list:

2     In PowerPoint, make a blank side (Home > Layout > Blank)

3     Then add a shape (Insert > Shapes, click on the shape you want)


Intially, the shape with have the fill-colour and border that are the current default values. But you can change this, which is what we are going to do.


4    Right-click on the shape, and choose Format Shape from the pop-up menu


5    In the Fill tab, choose Picture or Texture Fill, then click the File button and navigate to the image file you got in step 1, and click OK.


6   Make sure that the portion of the picture that you want to show is in the picture:  to start with the shape is centered on the middle of the picture.

Change this using the Offsets to move the shape to the left or right over the image.   You can make the offsets positive or negative as shown.

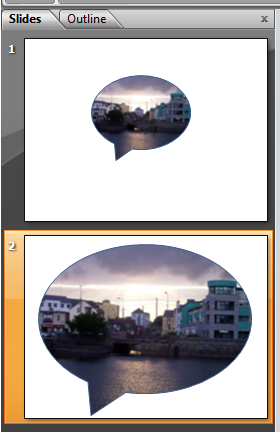
You can monitor the results of different settings in PowerPoints slide thumbnails (on the left hand side, if you have it showing), or by dragging the pop-up menu to a different place in the screen so that you can see the shape itself.


Job Done - at this point, you have an image that is cropped to the shape that you chose - now you just have to put it into your blog.


Using the picture


There are (at least) three ways to get the shape-cropped-picture from PowerPoint into your blog.

I usually copy the item from PowerPoint, and then paste it into a picture editor (Paintbrush etc), manually.   This is an old-fashioned approacb - but it lets me adjust the size and position of the image, and save it (usually a .png) with a file-name that describes the image really well which is good for mating the blog come up in search results (SEO).   The this picture can be inserted into a post just like any other picture.

Another option is to choose File > Save As from Powerpoint, and choose to save the slides in an image format, eg JPEG which can also be inserted into a post in the usual way.  You are likely to be asked whether to put all the slides in one image, or to make one image per slide. Usually, it would be best to make one image per slide - but I don't use this method because the image that is created is the size of the whole slide, rather than just the pictures on it.

A third option is to display the PowerPoint file as a slideshow. This isn't something that I'd do for only one shaped image, but may be relevant in some situations.


Adjusting the size and quality of the picture


One thing that you don't have any control of inside PowerPoint is the zoom level of the inserted picture.

If you make the shape larger, it doesn't show a larger proportion of the picture. Instead, it just shows the existing picture in a larger size, as you can see in the slides shown here.

I suspect that if you want to zoom in to a particular area of the image file, the only approach is to edit the picture in another tool, crop out the bit that you do not want to show, and only keep the part that you want to include inside your shape.

However PowerPoint does have some limited control over the contrast and brightness of the picture, from the Picture tab of the Format Shape window.


Can you do this in other tools?  Why PowerPoint?


Yes, you can.

Photoshop, and similar commercial tools almost certainly have features like this, and I'm certain that GIMP (like a public-domain, less powerful version of Photoshop) and Inkscape (another public-domain image program which is more focussed on scalable-vector-graphics and objects than on pixels) also have these features.

So why use PowerPoint?   In short, its (relatively) cheap and many people have access to it already.   It's also very easy to learn, compared to the other packages, and what you learn is likely to apply to lots of tasks and not just in making pictures for your blog.


Related Articles:


Putting a picture into a blog-post

Post.thumbnail and post.summary - ways of describing blog posts

Showing a PowerPoint slideshow in Blogger

Copyright, blogs and Blogger/Google
Read more > How to put pictures into unusual shapes, using PowerPoint

Thursday, May 3, 2012

Use Image Search to research picture ownership

If someone shared a cool photo with you on Facebook or Pinterst, you might want to write a blog post about it.

The post will be a lot more interesting if you can actually include the image. But you're not allowed to put copyright material onto your blog without permission - and how do you know if the picture that was shared with your is copyright or not, and who owns it.

Google Image Search may be part of the answer. Find out about it.

It won't tell you if a picture is definitely avaiable or not - but it gives you information from you can make some judgements based on when it first appeared, and what sort of web-sites it has appeared on..

Remember - although you're not allowed to publish copyright material, you will only get "caught" if a copyright owner spots something on your blog and takes action by filing a DMCA report. There are a great many items which are fine to share, even though they're not technically in the public domain, because no one is actively claiming ownership - and image search gives a way of validating ownership claims made by chancers.
Read more > Use Image Search to research picture ownership

Crop and re-size photos stored in PIcasa, without HTML

Some very interesting info from David of Blogger Xpertise about controlling the display of photos from Picasa by manipulating the URL.   What he's found is nothing that we couldn't do with HTML, but I have a feeling that it might point to some other possibilities using Picasa's URLs.   Ref:   http://blogxpertise.blogspot.com/2012/05/tip-automatically-cropping-square-and.html
Read more > Crop and re-size photos stored in PIcasa, without HTML

Friday, January 20, 2012

Picnik is ending on 19 April 2012

The first list of Google application retirements for 2012 includs Picnik, a photo editing tool that was accessible via Picasa-web-albums (and perhaps from other places too) - it was an effective, though slow, way of adding a watermark to pictures.

I'm sure that PWA has a replacement tool for doing this ... don't have time to research what it is right now.
Read more > Picnik is ending on 19 April 2012

Friday, December 2, 2011

Custom Search can include images in results

Custom Search has a new option to have search results that are images.  

If you have existing Google custom search engines on your blog and want have the image search feature, you need to edit each CSE and

  • turn the image-search-option on 
  • generate the code
  • re-install it into your blog.


I probably won't bother, as my blogs aren't image-intensive.   But I can see that this will be a big thing for some people.
Read more > Custom Search can include images in results

Tuesday, November 29, 2011

Linking a picture in your post to a website

This article shows how to change a picture in your blog, so that when it is clicked, it opens another blog post, or even a totally different website.


Clicking pictures in your posts 

Previously I've described how to put a picture into a blog post.

By default, when a picture in your post is clicked, the file that is used to load the picture is opened, in a new window and at its original size.   This can encourage readers to steal photos that don't belong to them, so I've also described how to stop pictures in your blog from being "clickable".

But sometimes you may want to set a picture up so that clicking it opens up a different post, or even a whole different website.

How to change where a picture is linked to:

Add the picture into your post in the usual way.

Note where in the post your picture is - you may want to put some temporary marker-text (text that doesn't appear anywhere else, eg ZZZ) just before or after it, so make it easier to find.

Look at the HTML behind your post
  • Pre-Sept-2011-Blogger:  Click Edit HTML in the top-right of the editor window 
  • Post-Sept-2011-Blogger:  Click HTML in the top-left of the editor window

Find the code for your picture   (Hint - use the find-feature in your browser, eg Ctrl/f in Chrome to look for the marker-text if you used some).   It will look something like this:
<a href="http://4.bp.blogspot.com/tkoGx2454hA/s1600-h/Inserting+a+picture.gif" imageanchor="1" style="margin-left: 1em; margin-right: 1em;"><img border="0" src="https://blogger.googleusercontent.com/img/b/R29vZ2xl/AVvXsEh-ufFKAr0d1qmq9aW1KZfNNsv-AbPNBP0y739vGFE5k_qh3d0L2VvpYad99hacIJ43NVQtcwTW5ABdd4rba9DLBlzz0RABme-IMzdy28SvaiCwDB_-1EG6oqf4kDwZfgylWifcOKtc5it5/s400/Your-picture-file-name.gif" />&nbsp;</a>

Notice the part in bold, ie the href="CONTENTS"

Replace this with the URL that you would like your readers to go to when they click on the picture.
For example, if you want them to be taken to Google to do a search, the code would look like:
<a href="www.google.com" imageanchor="1" style="margin-left: 1em; margin-right: 1em;"><img border="0" src="https://blogger.googleusercontent.com/img/b/R29vZ2xl/AVvXsEh-ufFKAr0d1qmq9aW1KZfNNsv-AbPNBP0y739vGFE5k_qh3d0L2VvpYad99hacIJ43NVQtcwTW5ABdd4rba9DLBlzz0RABme-IMzdy28SvaiCwDB_-1EG6oqf4kDwZfgylWifcOKtc5it5/s400/Your-picture-file-name.gif" />&nbsp;</a>

By default, clicking the picture will take your visitor to the link you give in the same window.   But if you would like it to open in a new window, add target="_blank" to the code too, like this:
<a href="THE URL TO GO TO" target="_blank" imageanchor="1" style="margin-left: 1em; margin-right: 1em;"><img border="0" src="https://blogger.googleusercontent.com/img/b/R29vZ2xl/AVvXsEh-ufFKAr0d1qmq9aW1KZfNNsv-AbPNBP0y739vGFE5k_qh3d0L2VvpYad99hacIJ43NVQtcwTW5ABdd4rba9DLBlzz0RABme-IMzdy28SvaiCwDB_-1EG6oqf4kDwZfgylWifcOKtc5it5/s400/Your-picture-file-name.gif" />&nbsp;</a>

Go back to Compose mode (so you don't get confused next time you edit a post)

Remove the marker text, if you used any.


Some more things to think about:  

Nuvola actions undoWill your readers realise that they should click the picture?   Unless it says "click me", some of them won't - and if they're used to Blogger, they may just expect to see a larger version of your photo.   So it might be a good idea to add a caption, or even some instructions in your blog to tell them to click the picture.

Also while you're editing the code, you might also like to add some alt-text to your picture link too, to make your blog more friendly for readers who use screen-reading tools, and for search engines / SEO.


What you will see:

At some times in the past, when you added a link a picture and then hovered over the picture in the post editor, your would see a double-row of in-post editing options:
  • one row had the usual options for editing pictures (which lets you set the picture size, alignment and caption)
  • one row had the usual options for editing links (with options to go-to, change and remove the link.

Today, as I'm writing this post using the new-interface editor, I can only see one row of options in hyperlinked pictures - so I need to edit the HTML again if I want to change or remove the link.


But it's quite possible that this is a mistake and that you can see the two rows of options in the old-interface editor, and that it will be added back to the new one too.    Fingers crossed.


What your readers will see:

When you readers look at a picture that you have linked to somewhere, it will seem just the same as any other picture.

For example, the picture to the right of this paragraph looks just like the one one at the top of the article.  But when someone clicks on it ...

Go on, click this one yourself, to see what happens!


(Acknowledgement: public domain image from Wikimedia Commons)


Related Articles:


Adding a picture to your blog

Making your blog friendly for search engines and screen-reader software

Stopping pictures from being able to be clicked

Aligning text and pictures in blog-posts

Integrating Picasa and Blogger
Read more > Linking a picture in your post to a website

Monday, May 30, 2011

Putting a picture on your blog as a Gadget

You can put a picture anywhere in your Blogger blog that you can insert a gadget - and you can make it link to a post in your blog or to any other website.

The Picture gadget

Dry dock in Claddagh Basin
A very simple way to put a picture into your blog is to use a Picture gadget.   This is a tool that Blogger provides to make is easy to add a picture that shows up an all pages and is linked to somewhere.

Often gadgets (sometimes called widgets or page elements) are put on the sidebar - but in many blogger templates they can go almost anywhere.


Follow these steps to add a picture gadget:

1  Make sure you know where the original picture is and that you have copyright permission to use it.

2  Copy the location (URL or file system full path-name) of the picture - and remember whether it's on your computer, or on the internet.  
(This article tells you how to find the URL of a picture that's already stored in Picasa.   To find the URL of a picture on the internet, you can often right-click on it and choose "copy image location")

3  In Blogger, follow the usual Add a Gadget procedure, and choose the Picture gadget from the list of options.

4  In the Configure-Image box, enter the options you want for your picture.   These include:

  • The title for the Gadget,
  • The caption for the picture
    (the small words that go underneath it, usually explaining it, or where it came from),
  • What should happen when a reader clicks the picture - put this into the Link field
  • Where to find the picture
    (ie the file-location that you copied in step 2)
  • Whether to re-size (ie shrink) the picture to fix the space in the sidebar in your current template.

5 Press Save.

6  If necessary, drag-and-drop the new gadget to the place where you want the picture to go, and press Save.

  
What your visitors see:

People who visit your blog in a web-browser, will see the picture, in the place where you put the gadget.  However pictures are not supported gadgets for dynamic view templates, so it won't be see if you use one of these.

Also, people who see your blog through an RSS reader, or by receiving emailed updates don't see any gadgets, so they will not see the picture.  

If you entered a value for Link, your visitor's browser leaves your blog and goes to the Link location:  with the Picture gadget, then there is no way to make this open a new window.   If you want to do so, then use an HTML gadget instead, get the code for the picture, and put target = "_blank"   into it:, so the code looks something like: 
<a href="YOUR LINK" imageanchor="1" style="margin-left: 1em; margin-right: 1em;" target = "_blank"><img border="0" src="YOUR PICTURE LOCATION" /></a>


Related Articles:


Options for putting pictures into your blog

Copyright, blogs and bloggers

Picasa and Blogger - an overview

Getting the HTML to add a picture to your blog

Finding a picture's location in Pisasa-web-albums

Finding the URL of a picture stored in Flickr

Showing a PowerPoint presentation in your blog

Why RSS / Subscribe to Posts is important for bloggers

Following a blog by email
Read more > Putting a picture on your blog as a Gadget

Saturday, May 21, 2011

Putting a slideshow from Picasa into your blog

This article is about how to put a Picasa slideshow into your blog, using Picasa's slideshow tool.   

It also looks at the security issues that may be involved in doing this, and suggests some ways around these.

Picasa, Albums and Slideshows:

Previously I've explained what Picasa is and how it is used by Blogger as the default place to store uploaded pictures.

You can also use Picasa in more complicated ways.  You can put a set of pictures in a separate "album" (Picasa's word for a user-defined group of photos), and it will give you the HTML code to use to show these photos in your blog (or any other website).  


There are two ways of doing this:
  • Link to the album:  clicking on the link takes your visitor away from your website and into Picasa-web-albums, where they can use the PWA tools to look through the pictures
  • Link to a slideshow:   this scrolls through the photos that are in the album at the time, right inside your website.  Here's an example of a slideshow:


This article is a step-by-step guide to the second option, is showing a Picasa-web-album in your Blogger as a slideshow.    A similar approach will work for other websites, thought the details will vary slightly.


How to insert your slideshow:

Go to Picasa Web Albums (http://picasaweb.google.com/home), and log in with the Google account that owns (or you want to own) the album.
  1. Check that you have already uploaded the album you want from your PC to Picasa-web-albums.
    (and if you haven't, go back to Picasa and upload it now)
  2. Choose an album by clicking on it.
    The album view opens, showing you a thumbnail of all the photos in it on the left of the screen. On the right of the screen, there is a sidebar of useful tools.
  3. Under the Edit drop-down (the one in the album, not the edit menu in the browser), check that Visibility is set to either "Anyone with the Link" or "Public on the web"
  4. Click on "Link to this Album"  (currently it's in a small font, 3/4 of the way down the right-hand sidebar - this may change if Picasa changes its interface)
  5. Click on "Embed Slideshow"  (currently this shows up underneath "Link ... " - and only AFTER you've clicked link...)
    This opens a new dialog box, over the top of your current browser window.


  6. Fill in the details you want
    (slideshow size, whether or not to show captions and to autoplay the slides, etc)
  7. Copy the HTML from the box at the bottom of the left hand-side (the one labelled "Copy and paste ..."
  8. Go to Blogger and log in with a Google account that has rights to edit the the blog - note that this doesn't need to be the same account that owns the Picasa album.
  9. You can put the code that you copied into your blog in the same way you would adding any other 3rd party HTML to it.

What you see in the Post Editor:

If you put the slideshow into a blog-post, the the way that the post-editor currently works with code means that the slideshow is not visible while you are editing the post.   This means it's easy to accidentally over-write or delete the code.

One way around this is to put some "marker text" before and after it.

For example, I've put in <hr /> and <blockquote> </blockqoute> statements before and after the code just underneath this paragraph.   While I'm in the editor, all I can see is a pair of parallel lines, with nothing between them.   But (because you're visiting the blog after it's published) you can see a slideshow in between.


This makes the code look like:

<blockquote>
<hr />
<embed flashvars="host=picasaweb.google.com&amp;hl=en_US&amp;feat=flashalbum&amp;RGB=0x000000&amp;feed=https%3A%2F%2Fpicasaweb.google.com%2Fdata%2Ffeed%2Fapi%2Fuser%2F105223767362417288786%2Falbumid%2F5439615839989953921%3Falt%3Drss%26kind%3Dphoto%26authkey%3DGv1sRgCK7yg5XUpNHZtAE%26hl%3Den_US" height="192" pluginspage="http://www.macromedia.com/go/getflashplayer" src="https://picasaweb.google.com/s/c/bin/slideshow.swf" type="application/x-shockwave-flash" width="288"></embed>
<br />
<hr />
</blockquote>


What your visitors see - and can access:

The steps above puts a slideshow of the photos in the album at the current time into your blog post.

You can use the examples above to get an idea of how these slideshows work:  they have next, play / pause, and previous buttons, and you can toggle captions on/off.   The top example has auto-play ON, while the second one has it OFF.

On important thing to note:   when your visitors click on the slideshow itself (anywhere but on previous / play / next buttons), they are taken to the place in Picasa-web-albums where the album is.
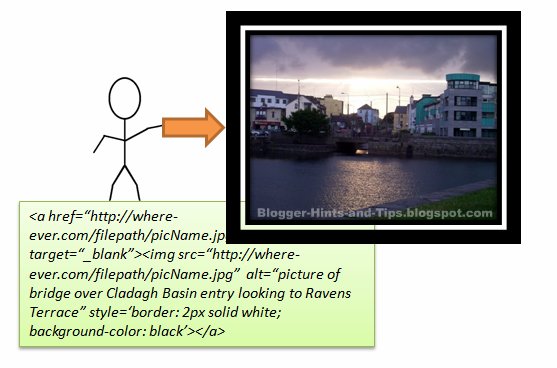
From here, they can get to ANY other albums owned by the same Google account that are either Public or Visible to Anyone With the Link.

This may or may not be a problem for you - but it's something that you should be aware of.  It certainly was a problem for me initially, and I had to go and get a slideshow in a Google account with no personal pictures to make the examples in this post.   

If you are not willing to live with this level of security, then I suspect (am yet to confirm) that using the RSS feed provided by Picasa with Blogger's own slideshow gadget may be a better approach.   This will only work in places where you can put a gadget - although it may be possible to use a 3rd party service that converts a feed into Javascript to make code that can be put inside a post.    Or totally different solution is to put your pictures into a PowerPoint slideshow and display it in your blog.


Related Articles: 


Picasa & Blogger - Part 1, What is Picasa?

Picasa & Blogger - Part 2, Options for linking Picasa into your Blog

Showing a PowerPoint presentation as a slideshow in your blog

Putting 3rd party HTML into your blog
Read more > Putting a slideshow from Picasa into your blog

Thursday, May 19, 2011

Hosting pictures outside of Google/Picasa

This article is about how to use pictures stored outside of Picasa-web-albums in your blog. It also looks at the risks and issues you might face if you do this


Where does Blogger usually store pictures

When you put a picture into a blog post, it is usually stored in Picasa-web-albums, the on-line part of Google's photo management tools.

For example, the picture at the start of this article was uploaded from my desktop, and so is stored in a folder in the Picasa-web-albums associated with my Google account.

I can see it here in the album:


Alternatives to Picasa-web-albums:

There are many other on-line photo storage and sharing options, eg Photobucket, flickr - and you can even use Google Docs which can now store files of all types.

For example, this photo (creative commons licensed, with no known copyright restrictions) is stored in flickr

To insert it into the post, I:

  • Used the standard Picture icon on Post Editor toolbar in Blogger, and chose the "from URL" option, and pasted in the URL


But because the photo is hosted elsewhere (in this case in flickR), it is not put into Picasa-web-albums.

Instead the code for it points to the location in flickR where it's found:
<div class="separator" style="clear: both; text-align: center;">
<a href="http://farm4.static.flickr.com/3309/3291223203_acbcce9483_m.jpg" imageanchor="1" style="clear: right; float: right; margin-bottom: 1em; margin-left: 1em;"><img border="0" src="http://farm4.static.flickr.com/3309/3291223203_acbcce9483_m.jpg" /></a></div>
Hosting photographs elsewhere is one way to work around the size restrictions which Google has placed on Picasa-web-albums accounts.   (Another is to link you blog to your Google + account).

You do need to make sure that the security options for the account and/or album that they're placed are set up so that at least anyone with the link is able to read the files.

Be aware that a photo that is stored outside of Picasa-web-albums cannot be used as the thumbnail for your post:   if all the illustrations in a post are stored elsewhere, then the post simply will not have a thumbnail.


Risks and Issues:

Disappearing Photos:
When you don't control the files that pictures are in, there is a risk that the pictures might "disappear" if whoever is hosting them (flickR in the above example) decides to move them or even just change the structure of their URLs.

There is, of course, the same risk with PWA, but since you need to be signed in to put a file into Picasa, Google knows that it's yours and can email you and let you know about upcoming changes.  flickR, on the other hand, has no record my setting up an URL to the photo, so cannot give me any warning.

Integration:
Picasa/Google have various tools for showing slideshows in blogs.  The specific features that any photo-sharing tool has change from time to time, but by using the tools from Google there is more chance that the will definitely work well with other Google tools, like Blogger.


Related Articles: 


Applying copyright protection to your blog

Putting HTML from a 3rd party into your blog

Putting a slideshow into a Blogger post

Picasa - a basic introduction

Understanding post.thumbnail, the picture used to summarise a post

Creating a button that links to your blog.
Read more > Hosting pictures outside of Google/Picasa

Tuesday, May 10, 2011

Getting the HTML code to put a picture into your blog

You can use the Post Editor to get the HTML code that you need to put a picture into your sidebar (or header or footer, or anywhere else a gadget can go).


Overview


The Picture gadget is the normal tool for adding a picture to your blog's sidebar.

But there are times when you want more control over the picture size or behaviour.  Eg, you may want to have two pictures very close to each other and guarantee that they're the same size.   To do this, you need to get the HTML code for the picture, and then put it into your blog.  Fortunately, Blogger's Post-editor make it very easy to do this without writing the code yourself.


Using the Post Editor to generate the HTML for a picture


1  Start a new Post  (you're not ever going to publish this:  it's just a work-area)

2  Don't enter any text:   just use the Picture icon on the toolbar to add a picture.   Blogger will prompt you to upload the picture, or to choose it from a Picasa-web-album, or to enter its URL:  add the picture the way that you usually would.

3  Switch to Edit HTML mode   (called HTML in Blogger-2011)
This will show you the HTML code for displaying the picture, as it is set to display in the Post (depending on the picture-settings you've chosen, it may be centered or right/left aligned, and the size may vary).

Copy the HTML.

5  Switch back to Compose Mode, called Compose in Blogger-2011), so you don't get confused the next time you edit a post.

Return to the list of posts:  you may be asked if you want to leave the page without saving - the answer is Yes.  Or you may have a new draft-status post, which you can delete.

You can now paste the HTML code that you copied into into an HTML/Javascript gadget, or anywhere else that you may need it - even into another post that you are editing in a separate window.


Related Articles: 


Stopping pictures on your blog from being "clickable"

What are Picasa-web-albums?

Finding the URL of a picture that's stored in Picasa-web-albums)

Inserting a Picture into a blog Post.

Putting 3rd party HTML into your blog

Center-align the gadgets on your blog

Hosting pictures outside of Google / Picasa

Inserting a picture into your blog as a gadget
Read more > Getting the HTML code to put a picture into your blog

Saturday, January 22, 2011

Putting text and pictures side-by-side in blog posts

This article is about lining up text and pictures side-by-side in your posts - and about how to add a "break" so that some text goes beside a picture and some goes underneath it.

The post editor's picture menu:

When you have put a picture into a post  in Blogger, (either using the Insert-picture option on the toolbar, or by adding the HTML for it some other way), the Post Editor gives you options for picture size, and for aligning the picture to the left, right or centre. 

You cab see these options by clicking on the picture.  This opens a "mini-menu" under the picture, like this:


This one mini-menu has options for:
SizeOptions are small, medium, large, extra-large, and original-size
Alignment:Options are left, right and centre (default is center)
Caption:Add caption, and Remove
Properties:Where you can add the hover-title and alternative-text for the picture
Remove:Taking the photo totally out of the post


The alignment options:

When you first add a picture, the alignment is set to "center".

Choosing Left or Right moves puts the picture to the far side of the post and, if the picture isn't as wide as the window it's being displayed in, the text that was after the picture fills up the space on the other side - like this:


Stopping all the text from flowing around the picture:

Many bloggers want to have pictures left or right aligned, and to have some words showing beside the picture.

But they also want to control what text is shown beside the picture, and what text doesn't start until underneath it.   Many people spend a long time putting extra lines into their posts, so that the text and pictures are set up in a way that's "just right" - and then they're disappointed when they publish the post and their hard work is all lost, because the screen is wider and more text fits into the area beside the picture.

There is a very easy way  to control this.  You just need to edit the HTML that is behind the post.  Luckily, this is very easy to do:

1  Put some place-holder or "marker text" where you want the flowing-text to stop.
(eg BREAK HERE  or  XXXXX  - use some words that won't be anywhere else in the post)


I've made it bold and with a yellow background to make it show up in the picture - but I don't recommend that you do this, because it makes it harder to find and replace exactly the correct text later on.

2  Choose the HTML option (top left or top right of the post-editor screen, depending on which version of blogger you are using).

Find the place-holder text
(hint:  use your browser's search function - in Firefox, it's Edit > Find)

Replace the place-holder text with this code:
<div class="separator" style="clear: both;"> </div>
5  Choose the Compose tab  (to get back to the regular post-editor screen).  The text after where the marker text was is now underneath the picture - and it will be there when you publish the post, too, no matter what size of screen your reader has.


Troubleshooting:


Extra blank lines:

At the bottom-left of the post-editor, there is a link for Post-Options.  Clicking this opens an options panel, where you can choose what effect line-breaks (ie pressing the "enter" key) have.   I always put it on "Use <br /> tags", so that I can put extra empty lines into the HTML to make it easier to read.   If it's on "Press Enter for line breaks", then each extra line put into the HTML will also show up in the Compose-mode view, and in the final post.

Editor versions:

The pictures and instructions in this article are based on Blogger's "updated" post editor, not the old one.  The technique will work in the old editor too, but things may look a little different.


Related Articles:


Stopping pictures on your blog from being "clickable"

Getting the HTML code to put a picture into your blog

Putting HTML from elsewhere into your blog

Telling Google about the pictures in your blog

Inserting a picture into a blog post

Applying hover-text to pictures

Tools for applying copyright protection to your blog
Read more > Putting text and pictures side-by-side in blog posts

Tuesday, December 21, 2010

Telling Google, and visually-impaired people, about the pictures in your blog

This article is about why and how to attach keywords and related text to the pictures in your blog posts.  This is helpful for both search engine optimisation (SEO), and for making your blog accessible to people who use screen-reader software.

Pictures and your blog

Blogger has a set of tools for putting pictures into your blog, including several options for putting images into posts or gadgets. 

In most cases, the other content in each post provides enough information for Google's indexing tools to know what the post is aobut.

But if your blog mainly has photos, your posts may not have enough key words to get properly indexed.  And even if the image-indexing tools do some auto recognition, a description of a picture written by a human being  will almost always be better.

Also, if your blog-viewers may include visually impaired people or others who use screen-reader software, you need to think about how well your content will work for them:  if you put key information inside images but not in the text, then they won't be able to get this information in any way.

These two good reasons for adding "alternate text" to your pictures - and there may be more.

What's even better is that Blogger now has a tool for to make it easy to fix this.


How to add captions and alt-text to your pictures


Add the picture to your Post.

In Compose mode, float your most over the picture.   This will show the picture-editing-toolbar, like this:


Choose the Properties option.

This opens a dialog box where you can enter

  • A title - this is shown when a visitor hovers their mouse over the picture
  • Alt text - this is kept in the background, and only displayed to people who (for whatever reason) cannot see the picture.


What your readers will see


People who read your blog on line, either with a standard browser or an RSS feed reader, won't see anything different, until they hover over the photo.   When they hover, they will see the text you put into the Title field.


People who read your blog in their email (because you've offered a subscribe-by-email option) may see the alt text instead of the picture, depending on what setting they have in their email system.


People who use screen reader software will have the text that you added read out to them in the usual way that their software works.

And most importantly, search engines will see the text you added, and hopefully the will use it in indexing your post.


Other Alternatives:


Picasa and Picasa-web-albums captions can be included in slideshows (provided you don't use the Blogger gadget), but aren't included with individual pictures. 
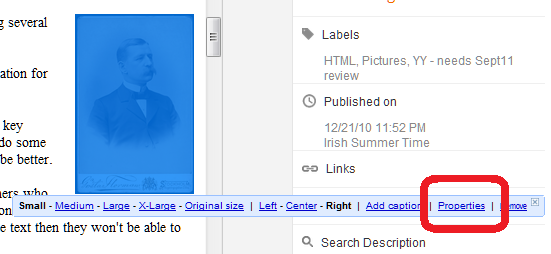
And the Post and Pages editor also has an Add Caption option on the photo toolbar, although I only recommend using  if you're comfortable editing HTML, because it puts the picture into a table, and so to move it inside the post you need to edit the code, not just drag-and-drop it.


Related Articles:


Tools for putting pictures into your blog

Addingng a Picasa slideshow to your blog

Tools for applying copyright protection to your blog

Why RSS/Subscribe to Posts is important for your blog.

Adding a subscribe-by-email option to your blog
Read more > Telling Google, and visually-impaired people, about the pictures in your blog

Wednesday, November 24, 2010

Stopping pictures on your blog from being "clickable"

This article is about how to stop people who read your blog from clicking on a picture and seeing a full-size copy of it.


Currently, if you put a picture into a blog post using the Picture toolbar item, and someone reading your blog clicks on that picture, then the person sees a full-size copy of the picture.   There is no universal setting that you can apply to stop this happening, or even an easy way to stop it for specific pictures.

But you can stop it for each picture in a post by editing the HTML that is behind the post and removing the href part of the picture statement.   If you're not sure what that means, read on.


Making a picture "unclickable"


1  Put the picture into your post in the usual way.

2  Find some unique text that is immediately before (or after) the picture - you will use this to locate the HTML for the picture among all the other HTML used to make up your post.
Sometimes, I put "XXX" or some other marker text (ie text that isn't used anywhere else in the post) just before it  (and take it out again afterwards too!).

3  Click HTML - it's a tab at the top corner of the Post Editor window.

Find the unique text (use your browser's Find tool, eg Edit > Find in Firefox)  

5  Then find the HTML-code for the picture which will be just before (or after) that.    It looks something like this (some settings may be different in yours):
<div class="separator" style="clear: both; text-align: center;">
<a href="https://blogger.googleusercontent.com/img/b/R29vZ2xl/AVvXsEjfecHPsGfszoxGJS4hFS8MtDJyLIfLUsdnB_wOOxuyHrUIpsEvt44JZmDX0lQ_taPis8JSbEngcJX78ib5l0Z2RyJB-KOWvvTL0V0QgfOZy2lRD4ffA_VkOLf1ohlSFab53zOoBZ9eH7bv/" imageanchor="1" style="margin-left: 1em; margin-right: 1em;"><img border="0" height="235" src="https://blogger.googleusercontent.com/img/b/R29vZ2xl/AVvXsEjfecHPsGfszoxGJS4hFS8MtDJyLIfLUsdnB_wOOxuyHrUIpsEvt44JZmDX0lQ_taPis8JSbEngcJX78ib5l0Z2RyJB-KOWvvTL0V0QgfOZy2lRD4ffA_VkOLf1ohlSFab53zOoBZ9eH7bv/" width="400" /></a></div>
That looks hard to read.   But if you break it down, it becomes something like:
<div class="separator" style="clear: both; text-align: center;">
<a

href="THE URL THAT THE USER IS TAKEN TO IF THEY CLICK ON THE PICTURE"

imageanchor="1" style="margin-left: 1em; margin-right: 1em;"
>
<img
border="0"
src="THE URL WHERE THE SOURCE PICTURE IS READ FROM"
/>

</a>
</div>

NB  provided you've selected "Use <br /> tags" under Edit HTML Line Breaks, then you can add extra new-lines, to make the code easier to read.

6  To make the final picture unable to be clicked, you need to remove the part of the HTML code that says:   
href="THE URL THAT THE USER IS TAKEN TO IF THEY CLICK ON THE PICTURE"

So that the eventual code for the picture looks like:
<a

imageanchor="1" style="margin-left: 1em; margin-right: 1em;"
>
<img
border="0"
src="THE URL WHERE THE SOURCE PICTURE IS READ FROM"
/>

</a>

Job Done!

At this point, you might Publish your post, or you might want to edit it some more - for example by adding alt-text or a title to the pictures, or by showing your pictures in a slideshow.

Either way, I recommend switching back to Compose mode now (using the Compose button at the top right of the editor), so that you don't get confused the next time you edit a post.


Related Articles:


Putting a picture into a blog post

Telling Google and visibly-impaired people about the pictures in your blog

Tools for applying copyright protection to your blog

Hosting pictures outside of Google/Picasa

Creating a button that links to your blog
Read more > Stopping pictures on your blog from being "clickable"
 
 
Copyright © blog
Blogger Theme by Blogger Designed and Optimized by Tipseo