Showing posts with label Statistics. Show all posts

Monday, May 6, 2013

Setting up Google Analytics so it gets AdSense data from more than one blog or website

This article is about setting up Google Analytics on your blog in a way that includes data for AdSense clicks and behaviour.


Google Analytics and Blogger.

fixing missing adsense data in google analytics when you have more than one blog or website
Analytics is Google's tool for measuring website performance:   how many visitors, how long do they stay for, what pages do they look at - and if you use AdSense, where are your earnings coming from. It's a major step up from Blogger's Statistics displays, and has far more details eg where the visitors came from, what browser they are using.

When people first started using Analytics with Blogger, they followed the standard Analytics instructions to edit their template and add the tracking code to it.

However if they switched to use a different template, the tracking code was lost unless they remembered to re-install it - and many people didn't remember.

So some Google engineers started telling people to put the code into an HTML/Javascript widget instead, because widgets are kept through template changes.

This worked well, until mobile templates were introduced. By default, mobile templates don't show HTML-Javascript gadgets. And while this can be changed, it involves editing your template (so brings back the "what if the template is changed" issue) - and it relies on the mobile-visitors using devices that run  Javascript.

So Blogger added a field to the Settings tab where you can enter the Google Analytics profile ID for the blog:   GreenLava over at BloggerSentral wrote an excellent post about using this, including how to
check if your existing template has the code needed to make use of this new field.

But recently I've noticed that while setting up Analytics this way collected data about visitor numbers, it doesn't always get data about AdSense (eg how many ad-impressions, what page do "clicks" come from, what were the keywords, what browser were getting the AdSense clicksetc). In fact, this data has been missing for all but one of my blogs recently.    So I did some investigation and found that this is deliberate - but that you can fix it.


Getting AdSense data from Analytics


If you only have one blog, and you have linked your AdSense and Analytics profiles,- and possibly(*) you have put AdSense ad units in your blog by getting the ad-code from AdSense and adding it as code
then you should be seeing AdSense data in your Analytics account.

To check, log in to Analytics and check the Reporting > Standard reports > Content panel:   when you expand it there should be a line for AdSense, and when you click that line some data should appear in the middle report panel (assuming your blog has some non-ad-blocked visitors).

But if you have more than one blog or website, then AdSense data is only put into Analytics for the one that is identified as "primary" in your Analytics profile. (For me, this is was the first blog that I added AdSense to.)

To get AdSense data in Analytics for more than one site, you need to get t tracking code-snippet for non-primary website from Analytics (see below), and install it in your blog. As before, there are two choices for doing this:


(*) I'm not 100% sure if AdSense units that were added from Blogger's Add-a-gadget wizard report data through Analytics. This support article from Google implies that they might not - but I haven't been able to verify it either way (yet).


How to get the AdSense tracking code for non-primary websites and blogs


Log in to Analytics with the Google account that owns your AdSense profile, and in which you have linked AdSense and Analytics.


Click on the Admin tab in the top right hand corner of any page.


Click on Accounts List (if you aren't already there).


Click the name of the Account you want the tracking code for (if you have more than one account).


Click the Data Sources tab, and then the AdSense sub-tab (underneath Data Sources).


Under Secondary Analytics properties, find the name of the profile associated with the blog/site that you want to make the code-snippet for.


Click the Code Snippet link to the right of the chosen profile name.


Copy the code that is shown, and install it to your blog the same way you would install any other 3rd party code - but remember the points above about the consequences of the different ways of adding it.


Repeat this for any other blogs, except your primary one, which you want Analytics to track AdSense data for.


Related Articles:


Adding a HTML-Javascript gadget to your blog

How to edit your Blogger template

Showing gadgets on mobile templates

AdSense and AdWords - what's the difference

Setting up AdSense for your blog
Read more > Setting up Google Analytics so it gets AdSense data from more than one blog or website

Wednesday, February 1, 2012

Country-specific Blogspot URL may affect your earnings - and other things too

This week, Blogger announced they are redirecting blogspot.com blogs to country specific URLs.

This means that when someone in India looks at http://blogger-hints-and-tips.blogspot.com/, they will actually be directed to http://blogger-hints-and-tips.blogspot.in - and similarly for other countries, so far I know it's been applied to Australia and New Zealand too.

This is likely to have affects on other products:

AdSense:

If you have protected your AdSense ID from malicious use (and really, you should if you care about it), then you will find some new entries in your unauthorised sites list:   I just went into mine and authorised
  • blogger-hints-and-tips.blogspot.com.au 
  • blogger-hints-and-tips.blogspot.in
  • blogger-hints-and-tips.blogspot.co.nz
and I expect to be doing some more as it rolls out further.   

If I didn't do this, then any advertising "clicks" from people visiting via country-specific-URLs won't be counted.

(Interestingly, I tried using the authorise link beside the unauthorized links on the Home > Account settings page.   It said it worked, but those sites weren't actually added to my authorized list.  I had to add them to the Authorized list and click Save myself.)

Analytics:

I'm not sure yet if this has an impact on statistics gathered with Analytics.   Maybe not - my overall visitor numbers aren't down, and the Visitors > Map overlay tool shows that I've had 79 visits from India today.   

I do have some more checks in mind, but these will take a while to do - comments from anyone who has  investigated are very welcome.


3rd party statistics packages:

I don't know for sure, but would be surprised if this doesn't affect the stats gathered by SiteMeter, StatCounter, et al - at least in the short term.


Search


The way to check that you've got a canonical statement in your template is to 
  1. View the blog itself  (ie not the template, and not the posts)
    - eg I looked at www.blogger-hints-and-tips.blogspot.com in my browser, while I was logged off of Blogger.
  2. Look at the source code   (in Chrome, I get to it through the "wrench" in the top right corner, then Tools > View Source - or by using Ctrl / u)
  3. Check that this line is showing somewhere:    
    <link href='http://yourURL.blogspot.com' rel='canonical'/> 
If that line isn't in your source code, then the quickest fix is to either change to a newer template, or edit your template and add it just underneath the <head> statement.


That's all I can think of for now ... but I have a hunch there's more.    Will post again if I find more issues.
Read more > Country-specific Blogspot URL may affect your earnings - and other things too

Monday, December 19, 2011

How long does it take your average blog-page to load?

If you use Google Analytics on your blog, then you can get data about how fast your pages(*) load. This is seen in the the Site Speed report which was turned on for all users in mid November

Analytics have now published more information about what it contains, too.

Blogger users can't control some of the items that are shown (redirection time, domain lookup time, server connection time, server response time) - although you may like to keep an eye on them if you are concerned about whether the Blogger platform is suitable your blog/website.

But we do have a lot of control over page(*) download time. This is impacted by the size of our posts (especially the picutres and videos), and by the widgets that we use.

How much difference  page-load speed makes to you and your visitors (how many pages they view, and how likely they are to come back) depends on your niche and how impatient they are.

As with lots of web-statistics, there are no hard-and-fast rules. I recommend keeping an eye out for change.

  • For example, if adding a widget adds one second to your average load time, but there is no change to visitor numbers or pages per visit, you probably don't have an issue.
  • But if it adds 0.5 seconds and pages/visitor decreases by 50%, you might need to think about whether the widget is worth it, or whether you need to do something like only display it on the home page.


(*) These "pages" are not the same as so-called "pages" in Blogger: read more about the difference. LINK
Read more > How long does it take your average blog-page to load?

Sunday, November 13, 2011

Changing the tracking ID for an Amazon Associates widget

You can change the tracking ID for an Amazon associates widget, even after the widget is created and in use on your site.

Tracking Amazon widget performance

Widgets (aka gadgets) from Amazon Associates can be used to display certain content from Amazon on your blog / website.   Some of them are fixed format, while others (eg the MP3 widget) let you select a range of items from Amazon's stock to display.

In two of my blogsites, I use Amazon MP3 widgets to include snippets of songs that my readers might be interested in, without breaking any copyright laws.

If Amazon sells more than one version of a song, then I put in quite a bit of time choosing which specific version to include, so that a variety of styles are shown - this makes it more likely that my readers will see something that they like.

Because there are two sites, I set up two tracking-ids within my Amazon Associates account, one for each site, and use these to know how many of my Amazon visitors have come from each site.  This will let me analyse the performance of each site as they grow.


Problem:  assigning the tracking ID

When you create a new widget on Amazon, the tracking ID that is assigned to the widget is the one that is selected when you start the widget-creation process. There is no way to change the tracking ID part way through the process.

Changing it on the left sidebar resets the widget-creation process back to the beginning, so you have to start again.  This isn't much of a problem if you're just getting the Amazon code for a simple gadget with no selection or maybe a context sensitive one.  But it's extremely frustrating if you've spent 15 mintues carefully choosing exactly which versions to a song to include.


Editing the tracking ID after the widget is created:

Recently I discovered that it is possible to change the tracking-id, and other features too, after the widget has been created.   To do this:

1  Log in to Amazon  (either .com, or whichever one you are working with) and go into the Associates section

2  Choose Widgets from the top menu.  This changes the contents of the left-sidebar to show items relating to widgets.

3  Choose My Widgets.  This opens a screen where you can change of the details of the widget, including the name and the tracking ID - and has a button that you can use to Edit the widget contents, and one where you can get the the code for the widget.

4  Choose the item(s) that you want to update, change them

5  Save the change.


There is no need to change the code that is on your blog or website:  the tracking ID, name, etc are stored in Amazon, not in the code.


What you and your readers see:

The tracking ID has no effect of what your reader see - unless they're beign particularly eagle-eyed when they look at the URL that is generated when they click on the widget.

But it means that when someone visits Amazon, as a result of clicking on the play or buy buttons, the visit and the credit for any qualifiying purchased that they make are given to you using the tracking-ID that you chose.


Related Articles:


Getting product and widget link code from Amazon

Amazon Associates and blogger - an overview

Copyright, blogs and bloggers

Amazon integration is with Amazon.com only

Stop malicious use of your Google AdSense id
Read more > Changing the tracking ID for an Amazon Associates widget

Tuesday, November 1, 2011

"Old" Analytics interface will end in January 2012.

The "old" Google Analytics interface is going to be "sunset" in January 2012. fyi, "sunset" usually means "turned off".

(These days, I use a netbook quite often, so I really hope they have the problems with small screen sizes not displaying properly sorted out by then.)
Read more > "Old" Analytics interface will end in January 2012.

Sunday, July 17, 2011

Timezones at a glance: what's the time in your readers' country?

This article describes why timezone matters for bloggers, and has a picture comparing the time in the major areas of the world throughout the day.

What time is it for your readers?

Gnome globe current eventPreviously I've described how to plan changes to your blog in private.  But at the end of the planning, you still need to implement the changes in a way that causes your readers as little disruption as possible.

One approach is to use a statistical tool (eg Google Analytics) to see where your readers come from, and then  choose a time when the majority are probably asleep (or working, or whatever makes them unavailable to look at your blog) to make the changes.   It can be challenging to find a time that suits everyone, though, especially if you have on-line visitors from several timezones.

Also, if  your blog offers follow-by-email or has a feed set up with Feedburner, then one of the options you can set in Feedburner is the time that your daily email to subscribers is sent out:  depending on your blog's niche you may want your email to be hitting people's inboxes either first thing in the morning (professional blogs), or late afernoon / early evening (personal blogs).


Comparing time zones with a picture:

There are many, many time-zone calculators on the internet:  typically they tell you the time right now in two different places (your and one other), and the difference between the time in each place and GMT.  However this leaves you with some calculations to do if you need to compare several time zones, or if you want to think about very different times of the day.  

An alternative approach is to draw the day in color-coded three-hour slots, like this::


Then you can use a table that summarises the time-zone in different areas of the world like this:

time zone comparison chart - lines up GMT / Europe, the Americas, Asia, and Pacific on one comparative table


Of course it's not possible to show every country like this, or to take account of daylight savings time (which operates in different months in different countries).   But hopefully the countries shown will give you an idea of different parts of the world, and the time in each one of them.

To use the chart, find your country and read up and down the table and get a rough idea of the time in different parts of the world, at the different times in your day.

For example, if you're in the east of America, and you have a lot of readers in South America and Asia, you can see that when your time is 9pm, theirs is roughly midnight (South America)  and 9am-noon (Asia).


A more sophisticated approach?

Gnome-face-embarrassedIf you have installed Google Analytics, then Google keeps data about each person who visits your blog, including the time of day that they arrived.

You can access this through the Analytics application   .. and I'll try to write about this in some detail when I remember exactly how to find the time-of-visit statistics.


Related Articles:


Setting up Google Analytics for your blog

Plan changes to your blog - in private

Follow-by-email - an easy way to set up email subscriptions

Getting started with Feedburner

Copyright, Blogs and Bloggers

Showing a presentation on your website / blog as a slideshow
.
Read more > Timezones at a glance: what's the time in your readers' country?

Sunday, May 8, 2011

Setting up Google Analytics for your blog

This article shows how to add Google Analytics to your blog.

Google Analytics and Blogger

Google Analytics is one option if you want more detailed statistics about your blog than you can get from Blogger's Stats tab.  It provides more features than most bloggers need, but it can be handy to use it from the beginning anyway, so that you have historical data when you do eventually want more detailed statistics.

It works by running a small script each time that a person views a screen from your blog:  this reads some information about the person, their computer and what content they looked at, and adds it to a statistical database that you (and Google) can get reports from.  It only collects data (number of visits, length of time spent, etc) from when the script is installed into your blog.  Initially you had to install the code yourself, but a change that Blogger made in October 2011 made this a lot easier.

Now, to install it into your blog, you simply have to:
  • Set up a profile for your blog in Analytics
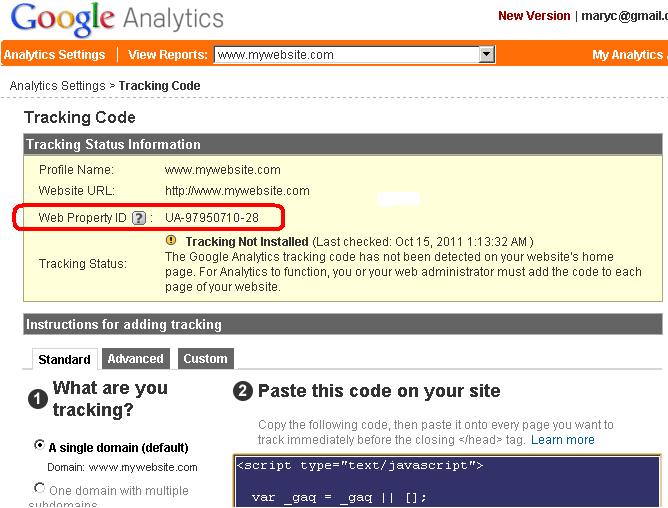
  • If your blog uses Dynamic Views or has a Mobile template enabled (*)  (either all the time, or as an option):  put the Web Property ID you get assigned in Analytics into your blog's options, AND
  • Put the tracking code into your template, AND
  • Save the changes that you have made to your profile  (be careful - it's easy to forget this step!)

(*)  At the time of writing (15 Oct 2011) the help materials weren't 100% clear about the status of mobile templates.   My best guess is that you should install the Web-Property-ID anyway, just in case.   But I will update this article if I find any more information.


How to set up an Analytics profile:

1   Log in to Analytics, using the Google account that you want to do reporting from.    (If you're already logged in to Google when you go to that page, you may need to click the blue Access Analytics button).

This doesn't have to be the same account that owns or even has administrator rights to the blog that's being analysed - so long as you can figure out how to copy some code from Analytics into the blog.)   Personally, I keep my Analytics statistics in the same account that I use for AdSense and AdWords.


2   From the Analytics Settings tab, choose Add New Profile  (currently it's a link on the right hand side of the page)

3   Choose Add a Profile for a new domain  
(I'm assuming that anyone reading this article doesn't already have a profile to be extending.)


4   Enter the name of your blog (including the www at the beginning of the URL), and press Continue

In the next steps, you need to copy two different items from this screen.   So it's best if you leave this open, and switch to another screen to continue.


Putting the Web Property ID into your options:

5   Copy the Web-property-id from the top section of the screen:

6   Add ito your blog:

In Blogger-2011 (ie the new interface):

  • Go to Settings > Other
  • At the bottom of the screen, you will find a field for Google Analytics account number - paste the value you copied into this field
  • Click Save Settings at the top of the screen

(NB  If your screen is like mine, it will be hard to see the field - due to the "subtle" screen design that Blogger have chosen.   But it is there, and may show up better if you tilt your screen a little.)

In Blogger-pre-2011 (ie the old interface)

  • Go to Settings > Basic
  • Two thirds of the way down the screen, you will find a field for Google Analytics account number - paste the value you copied into this field
  • Click Save Settings at the bottom of the screen


How to add the Analytics code to your site

Analytics is used by many people running websites built with all sorts of tools, so the standard installation instructions are very general:
Copy the following code, then paste it onto every page you want to track immediately before the closing </head> tag

The Previous Instructions given by Analytics:
The detailed instructions link in Analytics leads to the appropriate section in the Analytics help-centre.  At one stage, this had a link to Blogger-specific instructions, but this seems to be gone.   But I'm pretty sure that it said to find the  <body> tag and paste the code from Analytics immediately after it.   This still works, but it's harder to describe now, because some templates put other content in the body statement, and you need to locate the place after the angle-bracket ">" that closes the <body statement.

Searching the help-centre for "blogger" shows various articles, including some that tell you to put the code into your template just before the closing </head> statement.    Some of these remind you to download a full copy of your template before making changes to it - and none of them warn you about the disadvantages of editing your template.


Another Alternative:
An alternative suggested by Google engineers in some places is to install the tracking code into a HTML/Javascript gadget - this is Option 1 in ways to install 3rd party HTML into your blog.

A major advantage of this approach is that your statistics won't be interrupted if you change templates:  remember that changing templates keeps your gadgets (though it sometimes moves them around), but deletes any template changes that you have made.

You do need to decide where to put the gadget:  it doesn't actually show anything on the screen (except perhaps a small space that looks blank to your readers), but visitors to your will be "counted" when the gadget runs:  if your blog page takes a long time to load, and your gadget is in the footer, then visitors who don't wait for the entire page to load before clicking away won't be counted.  Personally, I like to put the gadget immediately under the Blog Posts gadget, like this:

Blogger Page Elements design screen, with area under the Blog Posts gadget highlighted

IMPORTANT:  Don't forget to press the orange Save button after your have shifted the gadget to where you want it to go.


After the code is installed, it takes a little time (maybe even 24 hours) for tracking to start.   Once it's started, you can get reports by selecting the profile from the View Reports drop-down in the Analytics application.


Related Articles: 


Advantanges and disadvantages of editing your template.

Planning changes to your blog's template

Advertising on your Blog:  some things to consider

How the data in Blogger is organised

Blogs, bloggers and Blogger, Post, Pages and Screens - some basic concepts

AdSense and AdWords - understanding the difference
Read more > Setting up Google Analytics for your blog

Tuesday, April 26, 2011

Using Google Analytics to get statistics about AdSense performance on your blog

This article is about how to set up your blog so it collects data about your AdSense performance, using Google Analytics.

Google Analytics and AdSense


Recently, I described options for installing Google Analytics into blogs made with Blogger.

If you have decided to use Analytics, and you are also a Google AdSense publisher (ie person who has AdSense ads on your blog), then you probably want to take one more step, so that you can get statistics about AdSense on your blog from the Analytics tools.


Installing the extra code


After you have created a profile in Analytics, and installed the Analytic settings into your blog, go back to the Analytics Settings tab in Google Analytics.

If you have left the profile, find it and click Edit Profile (currently this is on the right of the screen).

The Profile screen that opens has sections for
  • Main Website Profile Information
  • Goals
  • Filters Applied to Profile
  • Users with Access to Profile
Currently the edit action for each section is in the right hand corner of the heading for the section.   

Click Edit in the title for the Main Website Profile Information section.

At the bottom of the screen, tick Yes, this profile should receive AdSense data

When you tick the button, a window with some code opens.   Copy the code.

Press the Save Changes button  (currently bottom left of the screen.

Install the code you into your blog either in the header or in a HTML/Javascript gadget.

What you and your readers will see


Installing this script has no effect on what your readers see.

But when you go into Analytics and look at any detailed report page, you will find that the AdSense Revenue tab will start to have data in it.   Currently the statistics that are reported are (even if there was no revenue) are:
  • AdSense Revenue
  • The number of AdSense ads that were clicked.
  • AdSense Page Impressions ie the count of of pages displaying AdSense ads that were viewed
  • AdSense CTR, ie the ratio of AdSense ads clicked to ad pages viewed.
  • AdSense eCPM, ie the estimated revenue from AdSense per thousand ad page views (assuming that future viewers and advertisers behave in a similar way to the previous one).

Data is only collected from the time that you installed the code into your blog:  Google does not collect it (at least not in a form that's accessible to you) until you ask them to.

Detailed advertising performance data is only available through Analytics for AdSense:  it's not available for the Google Affiliate Network and most certainly not for competing ad-services like Chitika.


Related Articles:


Installing Google Analytics for your blog

Advertising on your Blog:  some things to consider

AdSense and AdWords - understanding the difference

Putting Chitika ads into your blog

Understanding Google accounts

Adsense: how to stop malicious use of your AdSense account
Read more > Using Google Analytics to get statistics about AdSense performance on your blog

Sunday, December 5, 2010

Encourage new subscribers by enabling Feedburner's FeedCount button

This article is about how to add the FeedCount icon, which shows viewers how many subscribers your FeedBurner feed has, and lets them subscribe themselves.   The information is targeted at Blogger users, but most of it applies to anyone who uses Feedburner.

What is a FeedCount icon:


Previously I've explained how to create a Feedburner feed for your blog and how to add a Subscribe to my feed icon, and how to use Feedburner to provide an email subscription option.

Feedburner also provides another tool that you can use to let people sign up for your blog.  This is the FeedCount icon, which shows the number of people who are currently subscribed to your RSS feed.

This is useful because of the "social proof" that it provides:  people are more likely to sign up for something once they see that other people have also signed up.


How to add a FeedCount icon to you blog:


Log in to Feedburner, using the Google account that owns the feed.

Click on the name of the feed you want to provide a subscription tool for.

Choose the Publicize tab.

Choose the FeedCount option, from the left navigation bar.

Set the options for your button:
  • Static or animated (I recommend static, because things that flick unnecessarily are annoying)
  • Font colour for the background
  • Font color for the text

At the bottom of the screen, click the Activate button.

Either
OR
  • Choose Blogger from the drop down list beside "use as a widget in", and click Go

    This takes you to a Blogger screen where you can choose which blog you want to add the gadget to (if your current login has more than one), and what title to use for it. 

    When this is done, click Add Widget

    This takes you to the Design > Layout tab, where you can drag-and-drop the widget to wherever you want it.  

Note:  if you want to re-generate the button at a later time with different colour or style options, just choose the options and click Save (which is at the bottom of the screen where Activate was originally).


What your readers see:


Your readers will see an item, wherever you put it, that looks like this:


It shows a count of the current number of subscribers to your Feedburner feed.

When someone clicks on it, they are taken to a screen where they choose which feed-reader software they want to use to subscribe to your site.


Related Articles:


How to create a Feedburner feed for your blog

Using Feedburner to give your blog a Subscribe by Email option

Adding 3rd party HTML to your blog

Why RSS / Subscribe to Posts is important to your blog

Displaying a gadget only on the home page

FeedFlare lets you add social tools to your Feedburner feeds
Read more > Encourage new subscribers by enabling Feedburner's FeedCount button
 
 
Copyright © blog
Blogger Theme by Blogger Designed and Optimized by Tipseo