Saturday, April 3, 2010

Get Dilbert for your Blog

This article is about how to get the Official Dilbert widget for your blog.

A 3rd party widget?

Normally, I don't recommend 3rd party widgets:  far too many are involve giving some hacker access to your blog.

But I trust some eg, Amazon.    And of course Dilbert - though I still don't think it's a good idea to give him your Google password.   Read on to see how to insert the code without doing so.


Follow these steps:

Go to    http://widget.dilbert.com/

Choose the size you want
The Dilbert cartoon in my sidebar is 160x300 - but if your blog is about any aspect of office politics, you may want a larger one, eg 400x300 - if you like, you could even put it above your post area and show it on the home page only, so people come back every day to look at it!)

Click on "Click here for today's strip" on the chosen size.

Click Grab-it on the top right corner of that strip.

DON'T click on the Blogger icon in the window that opens:  I trust Dilbert - butl not enough to give him my Google account password!

Click on Copy (to the right or perhaps just about the embed code in the window that opens)

Go to your blog, and add the HTML code to it.


Related Articles: 


Show a gadget on the home page only.

Understanding Google accounts

Adding 3rd party HTML to your blog

Centering gadgets on your blog

Advertising and Blogger - some things to consider
Read more > Get Dilbert for your Blog

Wednesday, March 31, 2010

Jump Breaks are Useful even if you only show one Post per Screen

This article explains why it is useful to put jump-breaks into your post, even if normally you only show one Post on each "page" (ie screen).


Overview

Jump breaks are a feature that lets you show only the top portion of a post to start with:  if the reader wants to see the rest of the contents, they need to click on a "show me more" link, which expands to show the whole post.

Google have described adding "After the jump" breaks to posts, and the various factors involved in using them.

I'd never bothered with them, because on almost all of my blogs, I only show one Post per Screen.

However I recently realised that it is worthwhile putting them in anyway:  if only one Post is showing, they won't have any affect.  But there are some screens where they are helpful.


Not all Screens are Like the Main Screen

(NB  Until Google introduced Pages, I would have said Posts and Pages:  now, I say Posts and Screens:  a Post is one item that you publish, a Screen is a collection of them.   Most of the Google Help documentation still talk about Pages in this way - but it's confusing, because of the static-pages feature getting the same name.)

The main screen is that one that is opened when a reader goes to your blog for the first time, or when they select an article (eg from the archive gadget) and go to it.

However there are various other types of screen too.   For example:
  • The Labels gadget displays all (or a group of) the labels that you have given to posts.  

    When a reader clicks on a label in this gadget, the Screen displays a list of Posts that have this label.
  • The Archive gadget displays the dates that posts have been made on

    When a reader clicks on a time-period (eg month, week) in this gadget, the Screen displays a list of Posts that were posted in this time.

In these Screens, more than one Post is displayed (no matter what setting you have for Posts per Page).   And if your Posts have jump-breaks near the top, then this list looks a lot more like a list, so is a lot easier for your readers to use.   (You can see an example of this by clicking here - this will show you a list of all the posts in this blog about Facebook, for example)


Using a Post Template

I now have a template for new posts, because this makes it so much easier to structure articles in the same way, which makes them better for readers.

The Jump-break, which shows in Compose mode, makes a useful distinction between the article summary at the top (more about why this is useful later - that article's not finished yet!) and everything else after the break.


AdSense

If you are an AdSense publisher, then Google have said that there are some AdSense ads which  are cost-per-view, not cost-per-click, but that advertisers are only interested in having them showing when a reader first looks at the page.  Google have a way of calculating whether a specific advertisement is "above the break" or not.   We don't know what the rule for this is, but my guess is that this may include asking whether the ad is above or below a jump-break.  


Related Articles: 


Using Labels to categorise your posts

Setting up AdSense on your blog

Giving your blog a homepage

Setting the date for a post

The difference between Posts and Pages.
#
Read more > Jump Breaks are Useful even if you only show one Post per Screen

Monday, March 29, 2010

Types of Blogger template

This article is about the types of template that apply to your Blogger blog, and how you can work out what type of template you have. 

What types of template does Blogger have:

Puppeter templateBlogger users templates to know how to structure your blog:   all template-types except the new Dynamic-view templates allow you a lot of freedom to customise how your blog looks.

Ttemplates are the "framework" that Blogger uses to let us do this, but still offer the features that a blogging platform provides.
Currently, each blog made with Blogger has:
  • One post template:
    There is only one type of post template, adn it is edited from Layout > Blog Posts - and not customisable apart from this
  • One design template:  
    This template may be one of four different types:  Dynamic, Designer, Layout and Custom.  

Also, each template may have a mobile template, which is used only when someone views the blog using a mobile device (eg smartphone).   A blog only has a mobile template if this has been enabled for it (on the Template screen).

When you have looked at a few blogger options, you will begin to recognise the different types of templates, just from the way blogs made with them look on screen.    The following sections describe the types of design templates (which include Designer templates, just to be confusing), and show you how to tell if your blog is using them.

There is also a very quick way to find out the name of your template - often knowing the name will let a Blogger Helper understand what the problem is, and so make suggestions about how to fix it.


The Custom Template:
The first design template that Blogger had was a custom template - and there are still some blogs with these today.

With a custom template, the only way to change the layout of your blog is to edit the HTML;  there are no widgets, and no drag-and-drop editor for positioning things.


How to work out if you have a Custom template:

Post-Sept 2011 Blogger (aka the new interface):  
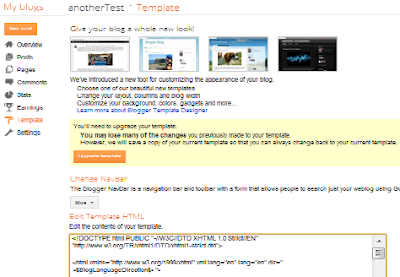
If you go into the Template tab, and the first thing you see is "Give your blog a whole new look!", and at the bottom of the screen there is an area called "Edit Template HTML", then your blog is using a Classic template.

Pre-Sept 2011 Blogger (aka the old interface):  
If your menu options include "Template", but don't include "Layout", then you have a Custom template.


Layout Template:
The Layout template was the next to be introduced.   It includes the Page Elements editor and the idea of Gadgets (previously called Widgets and Page Items).  This was a great improvement because it let blogger users move items around their design by drag-and-drop, instead of by editing HTML.

These templates (Minima, Rounders, ....) were a great step forward in the early 21st century, but web-technology has moved on.     They are no longer available to choose in the new Blogger interface, but  can still be selected in the old interface.

How to work out if you have a Layout template:

Post-Sept 2011 Blogger (aka the new interface):  
Go to the Templates tab, and choose Customize.   If there is no template name given underneath "Live on Blog", and no template selected in the area to the right, then you have a Layout template.


Pre-Sept 2011 Blogger (aka the old interface):  
Go to the Design tab and choose Template Designer.
If the Background and Layout tabs (down the left hand side) have message like "Not applicale for this template", then you have a Layout template.


Designer Templates
Designer templates were introduced in early 2010, when the Template Designer was first available in Blogger in Draft.    They provide a far wider range of basic designs, and far more options for choosing the number of columns, column width, background images,footer structure, colour scheme, etc.

How to work out if you have a Designer Template:

Post-Sept 2011 Blogger (aka the new interface):  
Go to the Templates tab, and choose Customize.   If there is a template name under "Live on Blog", and it is not from the names under Dynamic Views on the right, then you have a designer template.


Pre-Sept 2011 Blogger (aka the old interface):  
Go the Design tab and choose Template Designer.   
If you have options to change the column structure, then you have a Designer template.


Dynamic Templates:
Dynamic view templates were first introduced in April 2011.  They are quite different from the other template types, because they rely on your RSS feed as the content source, and have a number of different viewing options, and actions like adding a gadget are quite different from other templates.  Some dynamic templates use each post's thumbnail picture as the main navigation tool.

How to work out if you have a Dynamic Template:


Post-Sept 2011 Blogger (aka the new interface):  
Go to the Templates tab, and choose Customize.   If there is a template name under "Live on Blog", and it is from the names under Dynamic Views on the right, then you have a designer template.

Also, if you go into the Widths sub-tab, you will see a message "Not applicable for this template.


Pre-Sept 2011 Blogger (aka the old interface):  
Go to the Design tab.   If there is a template name under "Live on Blog", and it is from the names under Dynamic Views on the right, then you have a designer template.
Also, if you go into the Widths sub-tab, you will see a message "Not applicable for this template.


Related Articles: 


Editing your Blog's Template:  Advantanges and Disadvantages

Seven Simple Steps to a Snazzy new-look Blog (moving to a designer template).

Finding out the name of your blog's template

What is RSS?

Post.thumbnail - an image to summarise each post

Adding a gadget to a dynamic-view template
Read more > Types of Blogger template

Volvo C30 2010

Volvo C30 2011Enquanto a Europa recebe o face-lift do modelo em 2009, o Brasil veio receber o novo C30 apenas agora. Entretanto, além do visual rejuvenescido, o compacto ganhou um abatimento no preço, vindo agora a R$ 79.990, o que pode reforçar ainda mais sua fama de carro de imagem.

Como na maioria das mudanças deste tipo, o C30 ganhou frente totalmente nova, seguindo as últimas tendências da marca, mas teve as laterais inalteradas, e sua traseira recebeu um leve redesenho. Por outro lado, a parte mecânica permaneceu sem novidades, trazendo como opções de motor o 2.0 16v de 145 cv e o 2.5 turbo de 230 cv, com câmbio manual de cinco marchas, semi-automático de seis e dupla embreagem, ou o automático Geartronic, de cinco.

Volvo legítimo, o C30 jamais poderia deixar a desejar no pacote de segurança. Desde as versões básicas ele traz diversos airbags e uma infinidade de controles eletrônicos, dentre eles os de estabilidade e tração. Das cinco versões do modelo, três vêm com o motor 2.0: a básica, com câmbio manual de cinco marchas por R$ 79.990, a S, que traz melhor pacote de itens e o câmbio de seis marchas por R$ 86.990, e a automática, por R$ 91.990, todas com rodas de 16 polegadas.

As versões equipadas com o motor turbinado sempre trazem rodas aro 17 e o câmbio automático, custando a comum R$ 109.990 e a mais equipada Top vindo por R$ 119.990. Todos os C30 têm 13 opções para a cor da carroceria e cinco para a cor do spoiler inferior.

Read more > Volvo C30 2010

Creating a Shadow Blog

This article is about how to make a "shadow blog" - one that has the same structure as our real one, but less content, and which used only for testing.   

Overview

By Jérôme from Rouen, FRANCE
(5+6+7+8+9+10+11+12)
 [CC-BY-SA-2.0 (www.creativecommons.org/licenses/by-sa/2.0)],
via Wikimedia Commons
Sometimes, before you make a major change to a blog (or even a minor change to a popular one), you will want to test it before applying it to your blog.

You may even want to go one step further than getting your posts right before you publish them, and actually test the "look" of posts before you put them into your main blog.  (After you have got your post complete in your shadow-blog, you can copy the HTML from the shadow to the main blog, so that the formatting etc is all carried over:   See How to copy an individual post for details)


A shadow blog has is a place where you can do this.   It has
  • The same structure as your real one, and
  • Just enough content so that you can do some changes and test if they're working properly:  generally two or three more posts than the maximum you show on any on a screen is enough.

To make a shadow blog, you need to
  • Create a new, private, blog with the same base template as your existing blog
  • Copy your existing template into it, and 
  • Copy some of your existing posts into it.


Detailed Instructions:

1  Make a blog to work with:

Find out what template your existing blog is using

In your existing blog, download a copy of your template.   (See the first part of Editing your template, if you're unsure how to do this.)

Save the downloaded file somwhere (remember where, you'll need it below).

Go to the Dashboard, and click Create a Blog.  Give it a name and URL like "testing-YOURBLOGNAME"

When Blogger asks which template to use, choose your current template, (if it's on the list shown), or just any template.

After the blog has been created, press Start Blogging, and then go to the Settings / Basic tab:   Set "Add your blog to our listings?" and "Let search engines find your blog?" to No   (since this blog is just for your testing).

Go to Layout / Pick New Template   (or to Layout / Designer Template if your existing blog has a designer template), and choose the same template that your existing blog has.

Go to the Templates tab, and choose Backup/Restore.

Click Choose File, and navigate to the downloaded template that you made earlier.


2  Get some posts to test with:

Choose whether to import all your existing posts into the testing blog, or just copy some individual posts

Any links in your posts won't be re-directed, so when you are testing, you will find that clicking any internal links in your posts will take you back to your main blog. If you are moving all posts, you could avoid this by opening the export file with a text-editor, and doing a fine/replace to change the main blog's URL to the testing blog's URL in any links.


Related Articles: 


Import all your existing posts

Copy an individual post.

What template does your blog use?

Editing your template

Polish your posts before you publish them to the world
Read more > Creating a Shadow Blog

Saturday, March 27, 2010

Making a Custom Map in Google Maps

This article is about creating custom maps using Google maps.  It supports another article about putting maps into Blogger.  But the techniques apply whenever you want to generate a Google map of your own, and embed it into a web-site etc.


Custom Maps vs regular Google Maps:

Google Maps already lists vast numbers of road, rivers, buildings, businesses etc.  And these are being added to all the time.

Very often, you can simply search for what you want, and Google Maps will show it to you.  For example, searching for "Empire State Building" shows a map, with links to the building itself, and several surrounding businesses - like this.


But sometimes, the location you want is not already be in Google Maps.

If the place is "yours" then you can either register it through the Local Business Centre.  But if it's not appropriate for you to own the Google Places listing, or if you want to show multiple places on the same picture, it may be better to create a Custom Map.

Also, Custom Maps are the tool to use if you want to show routes:  for example, one of my blog-sites has about 30 custom maps that show the routes taken by local bus services.


How to create a Google custom map:


1  Go to Google maps (http://maps.google.com/)


2  Sign in
The same google account that you use for blogger is probably the best one to use.  And if you've already signed in to blogger, you may find that you're already signed in.


3  Make a new map
Go to My Maps (link on the left, near the top), and then Create a New Map.


4  Add your content
Put in placemarks, shapes and lines - both along roads and not.   You may like to use different colours for places that you have been to, vis places you're still planning to visit.

This page is good for learning how to edit maps:   http://maps.google.com/support/bin/answer.py?hl=en&answer=62843


Tip:   If you're putting in lines along roads, don't do one long line that shows the whole route.   If you do, and something goes wrong with it, then you have to delete the whole line and start again.   Instead, draw smaller parts of the line, and make up the overall route from them.


5  Save your map
Your map will auto-save as you make editing changes.  Beware of this - it means that mistakes you make get saved quite quickly, too).  When you have finished, press Save or Done one last time, just to be sure.


6  Exit and re-start Google Maps
In the same browser window, go into another google application (I usually use News, because the link is right beside Maps in the very top left of the screen).  Then go back into Maps.


7  Check your map
Open My-Maps, and then the map that you just created.   Check it's ok.

I've added this step from bitter experience!   Sometimes, especially with lines drawn along roads, Google Maps seems to add some extra bits that you didn't put in, and which don't show on the map when you're editing it initially.


What next:

After you have created a custom map, you may want to share it by putting it into a blog (or other website).

Or you may just use it for yourself, or send links of it to other people.


Related Articles: 


Putting a custom Google Map into your blog

Adding a Picasa slideshow to Blogger

HTML commands to put a picture and text side-by-side
Read more > Making a Custom Map in Google Maps

Friday, March 26, 2010

Honda Accord EX 2.0

Honda Accord EX 2.0 O luxuoso sedã chega à linha 2010 com o mesmo visual, mas traz uma novidade interessante: a troca da versão básica LX pela topo EX, mas agora com o motor 2.0, combinação que chega por R$ 99.800 pra fazer companhia à outra EX, esta com motor V6 e que permanece inalterada no topo da gama.

A troca de versões pode parecer estranha, mas a LX se ressentia de um pacote de equipamentos muito básico (nem computador de bordo trazia), o que a deixava nada atrativa em comparação com a concorrência, como o novo Ford Fusion. Por outro lado, a EX já impressiona desde o exterior, oferecendo faróis especiais, ponteira cromada do escapamento e rodas de liga leve de 16 polegadas.

Seu pacote de acessórios foi realmente melhorado em relação à LX, agora vindo com ar-condicionado dual-zone, bancos e volante revestidos em couro, sistema de som que usa a tela do computador de bordo, e quanto à segurança, airbag duplo e freios com ABS e EBD, entre outros itens. O motor 2.0 16v i-VTEC oferece 156 cv, sempre vindo com câmbio automático de cinco marchas.

Read more > Honda Accord EX 2.0
 
 
Copyright © blog
Blogger Theme by Blogger Designed and Optimized by Tipseo