Showing posts with label Maps. Show all posts

Tuesday, June 4, 2013

How to access your Google Custom Maps after migrating to the new Google Maps

This QuickTip is about how to access your existing Google Custom Maps, once you have started using the new Google Maps interface being introduced in mid 2013.


quick-tips logo
Google is now offering the opportunity to migrate to new Google maps.  (ref: http://googlesystem.blogspot.com/2013/05/the-new-google-maps-now-available.html)

However one disadvantage is that "My Places", which includes Google Custom Maps, is not part of the new Google Maps interface.

At the moment, you can temporarily switch to the old interface by clicking the "options" icon in the black navigation bar and
  • Selecting "My Places" OR
  • Clicking the "classic maps" link.

Or you can get to them by navigating to https://www.google.com/maps/myplaces

From here you can see and edit your existing Google Custom Maps, but you cannot create new ones. To do that, you need to use Google Maps Engine Lite - which was announced recently.
Read more > How to access your Google Custom Maps after migrating to the new Google Maps

Tuesday, April 23, 2013

Introducing Maps Engine Lite - a better tool for customizing maps

This article is an introduction to Google's Maps Engine Lite, which is a tool for creating custom maps.


What is Google Maps Engine Lite


In late March 2013, Google announced a beta (ie late-stage test) of Maps Engine Lite - and now it is available from the main Google Maps interface, without the word "beta" in sight.

This is a web application to let you "Create powerful custom maps", and it has more features than the current  "My Maps" custom-map editor in Google Maps, which I've used until now to put certain maps into one of my blogs.

You can access it at: https://mapsengine.google.com/

Once you have signed in to a Google account, you can either view/edit an existing map that you have make with Maps Engine Lite or which has been shared with you in MEL, or create a new one.


How to create a custom map using Maps Engine Lite


Click on the New Map button from the front screen, or the New map link from the manage-files folder (top left side of the screen).

Use the arrow beside Base Map to choose the style that you want applied: this covers both what is shown, and the colour scheme. At the moment the options are:
  • Map (ie ordinary - like regular Google maps)
  • Satellite
  • Terrain
  • Light Political
  • Mono City
  • Simple Atlas
  • Light Landmass
  • Dark Landmass
  • Whitewater


Add places to the map by:

Drawing them - You add things to the map with the Placemark and line or shape-drawing tools.  These are similar to those for Google Custom Maps, though they're now separate into two items.

or

Importing them - from either CSV/Excel files or you existing Google Custom Maps - see http://support.google.com/mapsengine/?p=lite_addplaces for details about what is possible.


You can separate the map into multiple layers, and you have access to Google Maps regular search feature: search-results are placed on non-permanent "search" layer, and you can select a result, right click on it and Save it to the map you are currently editing.


While editing the map, you have these options
  • Style - lets you choose whether to show individual markers, or a sequence of letters/colours
  • Table - Edit the list of placemarkers and lines - giving each a name or description
  • Labels - lets you choose whether to show marker labels on the map or not - and whether to use the name or description field.


Sharing maps you have made

The map can be shared using the green Share button in the top right corner, via gmail, G+, Facebook, Twitter or anything else which lets you use a link like this:


Putting Custom Maps on your website or blog


In Maps Engine Lite, the "embed on my website" option is available under the Save icon (currently at the top left, with options New map, Open and  Embed)

This gives you a simple iframe statement like this:
<iframe height="480" src="http://mapsengine.google.com/map/view?mid=zV9FBQ3J7L1o.kzRGlAso0tmU" width="640"></iframe>
You can easily change the size via the height and width options, but there is no zoom level option - and I assume that the centre of the displayed map is represented in the coding  (this doesn't always work so well for Custom Maps - I usually recommend that people use the customization option).

And once you have the code, you can put it into your blog in the same way you would add any other 3rd party HTML.   The code above gives a map like this:


Notice that the map itself tells you that it was made with Maps Engine, and that it says it is for non-commercial use:   commercial users can buy access to a far more powerful version of the Maps Engine.


Advantages and disadvantages of Maps Engine Lite


So far I've only done a quick test, but initial impressions are:

Advantages:


Richer interface than custom maps - you can do more things.

Layers are a particularly good addition - it would be great if individual layers could be turned on/off from embedded version of the map.

Alternative colour scheme - will make it easier to create maps that are more suitable for certain circumstances, eg with a faded background.

Sequential markers - I don't have to use my own set of custom markers any more.

Uses the same base data as regular Google Maps - so the Follow Your World service can be used to get you updates about changes to the image-data.


Disadvantages:


No access to Google Streetview while you are editing the map.

Currently if you choose sequential markers, the labels and colours in the key on the left are not always the same as the ones used inside the map.

No Snap-to-roads option for lines

No custom map markers:  if you import a map from My Maps (aka Google Custom Maps), then any custom markers that you have are retained, and you can choose to use them again, but there is no way to add new custom markers.


What else have you found?


Related Articles:


Creating a Google Custom Map

Adding a Google Custom Map to your blog

Adding 3rd party HTML to your blog
Read more > Introducing Maps Engine Lite - a better tool for customizing maps

Thursday, June 14, 2012

Knowing about better pictures Google Maps & Earth

If you blog about geographic locations, or add Google custom maps to your blog, then it can be very helpful to know when the satellite photos for a certain area are updated. Among other things, this is a reminder to check your map for any details that have changed.

Google's new Follow Your World service tells you just that.

In short, you sign up with your google account, and register to get email alerts when new images for a specific point are availabe in Google Maps or Earth.

Unfortunately you need to select on specific point, not an area, so there's a risk that you might miss updated if you're just a few metres out. But it's beta at the moment, so this may change in future

I haven't seen an official announcement, but it's mentioned in this post on the latLong blog
Read more > Knowing about better pictures Google Maps & Earth

Wednesday, May 2, 2012

Becoming a Google Trusted Photographer

Previously I described Google's Trusted Photographer's programme, which could be a nice business opportunity for serious photo-bloggers.

At that time, Google were selling business-owners the idea of using a TP to take photos of your business and upload them to Places/Maps. But they were pretty vague about how to become a TP.

Today, they've given links to far more info about how it works and how to to sign up as a Google trusted photographer.
Read more > Becoming a Google Trusted Photographer

Friday, January 27, 2012

An opportunity for blogger photographers

Bloggers who are also photographers may want to check out Google's Trusted Photographers programme.  The message announcing this to businesses says:
"It’s simple. Visit our new website and search for a Google Trusted Photographer in your area. ... schedule a time and agree on a price that you will pay the photographer for a photoshoot of your business. ... During the hour it should take for the shoot, you can collaborate ... about how best to display and capture your business. ... the photographer will upload the images to Google, and ..  you’ll see ... views of your business on [your local Google search site], Google Maps and on your Google Places listing. "
So for a photographer, it looks like the process is:

  • You get approved as a GTP (does being a long-standing photo blogger help with this?).
  • Google advertise that you're available
  • Businesses and organisations that want official photos in Google contact you, and negotiate times/prices.
  • You visit, take the photos, and do any post-processing
  • You load them to Google on behalf of your customer.


Google have provided a Service Agreement that you must use - as a commissioned job, the ownership of the copyright of the photos passes to the person or organisation who pays.  So you'll need their permission if you want to put the photos onto your blog.

Final thought:
I wonder if there's any way to embed a Google Places listing, including the official photos, in a blog - the same way we can embed a custom map.


How to become a Google Trusted Photographer
I didn't a quick search, but couldn't find definitive answers.    I did find some info about what sort of things they are expected to do:
Trusted Photographers are trained to take high quality photos of building interiors, accommodating for common challenges such as low lighting and tight spaces. The photographers are also certified to take pictures using fisheye lenses and rotating camera turrets (mounted on tripods)

And this link, where you can enquire about the program:   http://maps.google.com/help/maps/businessphotos/interested-photographer.html
Read more > An opportunity for blogger photographers

Tuesday, September 28, 2010

Showing a Google Custom-Map on your Blog

This article is about embedding custom maps made with Google maps into blogs made with Blogger.  However similar principles also apply to putting Google custom maps into other types of website.


Overview:

Previously I've described how to make a custom-map in Google Maps.

Not only does this add a visual dimension to your blog, it can also be an excellent way of showing your progress on a journey, or describing your neighbourhood or the area that you blog about.

That said, you should also use the Location tags in posts, so that the posts themselves as well as the map shows your status.


If you are using Google custom maps, then once you have created a map, you can:
  • Email a link to the map to other people:  when they click on the link, their web-browser opens Google Maps, and shows them them map
  • Put a link to the map on a website:  when a viewer click on the link, their web-browser opens  Google Maps and show them them map
  • Embed the map into a website:  when the web-page loads, the map (including zoom-tools, scrolling, etc) is displayed.

How to to link or embed a Google custom map:

Log in to Google maps using the Google account that you used to create the map.

Make a new map, or click "My Places" to see the list of maps you have made.

Select the map you want to link to.

Click the "Link" item:  it's at the top of the left-hand sidebar, beside the print icon.

A new panel opens just underneath the Link button.:


If you want to share the map by email, or by linking to it on a website, then copy the code from the top entry in the panel, which is labelled "Paste link in email or IM".

However if you want to put the map itself into your blog, then DON'T just copy the code from the item labelled "Paste HTML to embed in website".

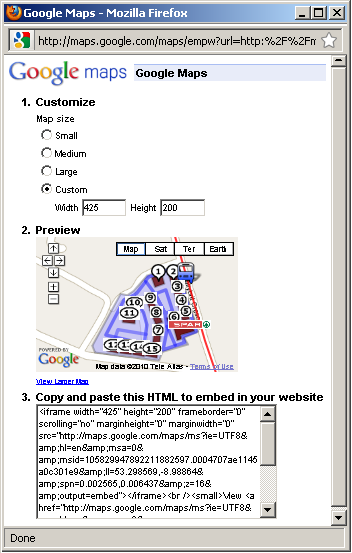
Instead, click Customize and preview embedded map.

This opens the map in a new window, where you can preview the actual zoom-level that will be used, and also pick a standard map size of a custom one.

Choose the settings that you want - including scrolling up and down slightly, so that the correct area is shown.

Copy the HTML from the window at bottom of the screen.  (Make sure you select ALL the code that's in the box: on many systems with happens if you put the cursor in the box and press Ctrl/A)

Put the copied HTML into your blog -  you have several options for doing this.


Related Articles: 


Making a custom-map in Google Maps

Putting 3rd party HTML into your blog

Copyright, Blogs and Bloggers
Read more > Showing a Google Custom-Map on your Blog

Saturday, March 27, 2010

Making a Custom Map in Google Maps

This article is about creating custom maps using Google maps.  It supports another article about putting maps into Blogger.  But the techniques apply whenever you want to generate a Google map of your own, and embed it into a web-site etc.


Custom Maps vs regular Google Maps:

Google Maps already lists vast numbers of road, rivers, buildings, businesses etc.  And these are being added to all the time.

Very often, you can simply search for what you want, and Google Maps will show it to you.  For example, searching for "Empire State Building" shows a map, with links to the building itself, and several surrounding businesses - like this.


But sometimes, the location you want is not already be in Google Maps.

If the place is "yours" then you can either register it through the Local Business Centre.  But if it's not appropriate for you to own the Google Places listing, or if you want to show multiple places on the same picture, it may be better to create a Custom Map.

Also, Custom Maps are the tool to use if you want to show routes:  for example, one of my blog-sites has about 30 custom maps that show the routes taken by local bus services.


How to create a Google custom map:


1  Go to Google maps (http://maps.google.com/)


2  Sign in
The same google account that you use for blogger is probably the best one to use.  And if you've already signed in to blogger, you may find that you're already signed in.


3  Make a new map
Go to My Maps (link on the left, near the top), and then Create a New Map.


4  Add your content
Put in placemarks, shapes and lines - both along roads and not.   You may like to use different colours for places that you have been to, vis places you're still planning to visit.

This page is good for learning how to edit maps:   http://maps.google.com/support/bin/answer.py?hl=en&answer=62843


Tip:   If you're putting in lines along roads, don't do one long line that shows the whole route.   If you do, and something goes wrong with it, then you have to delete the whole line and start again.   Instead, draw smaller parts of the line, and make up the overall route from them.


5  Save your map
Your map will auto-save as you make editing changes.  Beware of this - it means that mistakes you make get saved quite quickly, too).  When you have finished, press Save or Done one last time, just to be sure.


6  Exit and re-start Google Maps
In the same browser window, go into another google application (I usually use News, because the link is right beside Maps in the very top left of the screen).  Then go back into Maps.


7  Check your map
Open My-Maps, and then the map that you just created.   Check it's ok.

I've added this step from bitter experience!   Sometimes, especially with lines drawn along roads, Google Maps seems to add some extra bits that you didn't put in, and which don't show on the map when you're editing it initially.


What next:

After you have created a custom map, you may want to share it by putting it into a blog (or other website).

Or you may just use it for yourself, or send links of it to other people.


Related Articles: 


Putting a custom Google Map into your blog

Adding a Picasa slideshow to Blogger

HTML commands to put a picture and text side-by-side
Read more > Making a Custom Map in Google Maps
 
 
Copyright © blog
Blogger Theme by Blogger Designed and Optimized by Tipseo