Ternak bebek kering maksudnya adalah kita memelihara bebek dalam kandang tanpa menyediakan kolam untuk bebek berenang. Pada umumnya bebek memang lebih menyukai lahan basah sebagai tempat mencari makan namun itu semua bisa dimodifikasi menjadi beternak bebek full di lahan kering atau kandang kering. Beternak bebek secara kering ini banyak diaplikasikan untuk beternak bebek petelur, yang
Read more > Ternak Bebek Kering

Sunday, March 31, 2013
Related Posts Widget with Thumbnails and Summary for Blogger
There are several tutorials quite old which have explained different methods for displaying related posts in Blogger [1] [2] but in this tutorial, I will show you how to implement a very beautiful Related Posts widget that comes along with Thumbnails and Posts Snippets, as well. If you want to add it, follow the next steps below:
How to Add Related Posts Widget with Summary to Blogger

Step 1. From your Blogger Dashboard, go to Template and click on Edit HTML

Step 2. Tick the "Expand Widget Templates" checkbox:
 Step 3. Find (CTRL + F) this tag:
...and paste the following code just above it:
Note:
Step 4. Search (CTRL + F) for the following fragment:
... and add this code just below it:
The entire fragment should look like this:
Step 5. Find this fragment of code:
Note: if you can't find it, then search only for the code in red
...add just ABOVE it, add the following:
Step 6. Let's go ahead and add some styles to our CSS... search for this tag:
...and paste the below code just ABOVE it:
Note:
Step 7. Save your Template... and hopefully we're done...
Enjoy!
Read more > Related Posts Widget with Thumbnails and Summary for Blogger
How to Add Related Posts Widget with Summary to Blogger
Step 1. From your Blogger Dashboard, go to Template and click on Edit HTML
Step 2. Tick the "Expand Widget Templates" checkbox:
</head>
...and paste the following code just above it:
<script type='text/javascript'>
//<![CDATA[
var relatedTitles = new Array();
var relatedUrls = new Array();
var relatedpSummary = new Array();
var relatedThumb = new Array();
var relatedTitlesNum = 0;
var relatedPostsNum = 4; // number of entries to be shown
var relatedmaxnum = 75; // the number of characters of summary
var relatednoimage = "https://blogger.googleusercontent.com/img/b/R29vZ2xl/AVvXsEiu-voVTGTUn6_9mB-6ZKCCm7FZZZ0H_Tk01SY_73YpZ1CMVwyvOQixi1nJFxEiJOyuNQkez8JGi0dTI3DCQb8z8pDBflP1WZFYj32nfuJwKKeNcY2XrHqowIc1rXySdo84__UjCPuvdwDD/s1600/no_image.jpg"; // default picture for entries with no image
function readpostlabels(json) {
var entry, postimg, postcontent, cat;
for (var i = 0; i < json.feed.entry.length; i++) {
entry = json.feed.entry[i];
if (i==json.feed.entry.length) { break; }
relatedTitles[relatedTitlesNum] = entry.title.$t;
postcontent = "";
if ("content" in entry) {
postcontent = entry.content.$t;
} else if ("summary" in entry) {
postcontent = entry.summary.$t;
}
relatedpSummary[relatedTitlesNum] = removetags(postcontent,relatedmaxnum);
if ("media$thumbnail" in entry) {
postimg = entry.media$thumbnail.url;
} else {
postimg = relatednoimage;
}
relatedThumb[relatedTitlesNum] = postimg;
for (var k = 0; k < entry.link.length; k++) {
if (entry.link[k].rel == 'alternate') {
relatedUrls[relatedTitlesNum] = entry.link[k].href;
break;
}
}
relatedTitlesNum++;
}
}
function showrelated() {
var tmp = new Array(0);
var tmp2 = new Array(0);
var tmp3 = new Array(0);
var tmp4 = new Array(0);
for(var i = 0; i < relatedUrls.length; i++) {
if(!contains(tmp, relatedUrls[i])) {
tmp.length += 1; tmp[tmp.length - 1] = relatedUrls[i];
tmp2.length += 1; tmp2[tmp2.length - 1] = relatedTitles[i];
tmp3.length += 1; tmp3[tmp3.length - 1] = relatedpSummary[i];
tmp4.length += 1; tmp4[tmp4.length - 1] = relatedThumb[i];
}
}
relatedTitles = tmp2; relatedUrls = tmp; relatedpSummary = tmp3; relatedThumb = tmp4;
for(var i = 0; i < relatedTitles.length; i++){
var index = Math.floor((relatedTitles.length - 1) * Math.random());
var tempTitle = relatedTitles[i]; var tempUrls = relatedUrls[i];
var tempResum = relatedpSummary[i]; var tempImage = relatedThumb[i];
relatedTitles[i] = relatedTitles[index]; relatedUrls[i] = relatedUrls[index];
relatedpSummary[i] = relatedpSummary[index]; relatedThumb[i] = relatedThumb[index];
relatedTitles[index] = tempTitle; relatedUrls[index] = tempUrls;
relatedpSummary[index] = tempResum; relatedThumb[index] = tempImage;
}
var somePosts = 0;
var r = Math.floor((relatedTitles.length - 1) * Math.random());
var relsump = r;
var output;
var dirURL = document.URL;
while (somePosts < relatedPostsNum) {
if (relatedUrls[r] != dirURL) {
output = "<div class='relatedsumposts'>";
output += "<a href='" + relatedUrls[r] + "' rel='nofollow' target='_self' title='" + relatedTitles[r] + "'><img src='" + relatedThumb[r] + "' /></a>";
output += "<h6><a href='" + relatedUrls[r] + "' target='_self'>" + relatedTitles[r] + "</a></h6>";
output += "<p>" + relatedpSummary[r] + " ... </p>";
output += "</div>";
document.write(output);
somePosts++;
if (somePosts == relatedPostsNum) { break; }
}
if (r < relatedTitles.length - 1) {
r++;
} else {
r = 0;
}
if(r==relsump) { break; }
}
}
function removetags(text,length){
var pSummary = text.split("<");
for(var i=0;i<pSummary.length;i++){
if(pSummary[i].indexOf(">")!=-1){
pSummary[i] = pSummary[i].substring(pSummary[i].indexOf(">")+1,pSummary[i].length);
}
}
pSummary = pSummary.join("");
pSummary = pSummary.substring(0,length-1);
return pSummary;
}
function contains(a, e) {
for(var j = 0; j < a.length; j++) if (a[j]==e) return true;
return false;
}
//]]>
</script>
Note:
- To change the number of posts that are being displayed, modify the value in red (4)
- To change the number of characters to be shown in posts summary, modify the value in green (75)
- To change the default pic for posts with no images, add your URL instead of the one marked in blue
Step 4. Search (CTRL + F) for the following fragment:
<a expr:href='data:label.url' rel='tag'><data:label.name/></a><b:if cond='data:label.isLast != "true"'>,</b:if>
... and add this code just below it:
<b:if cond='data:blog.pageType == "item"'>
<script expr:src='"/feeds/posts/default/-/" + data:label.name + "?alt=json-in-script&callback=readpostlabels&max-results=50"' type='text/javascript'/>
</b:if>
The entire fragment should look like this:
<b:loop values='data:post.labels' var='label'>
<a expr:href='data:label.url' rel='tag'><data:label.name/></a><b:if cond='data:label.isLast != "true"'>,</b:if>
<b:if cond='data:blog.pageType == "item"'>
<script expr:src='"/feeds/posts/default/-/" + data:label.name + "?alt=json-in-script&callback=readpostlabels&max-results=50"' type='text/javascript'/>
</b:if>
</b:loop>
Step 5. Find this fragment of code:
</b:includable>
<b:includable id='postQuickEdit' var='post'>
Note: if you can't find it, then search only for the code in red
| ! Click on the sideways arrow to expand the code, then scroll down until you reach to the highlighted line ! |
...add just ABOVE it, add the following:
<b:if cond='data:blog.pageType == "item"'>
<div class='post-footer-line post-footer-line-4'>
<div id='relatedpostssum'><div style='text-align: left; font-size: 15px; margin-bottom: 10px; font-weight: bold;'>RELATED POSTS</div>
<script type='text/javascript'>showrelated();</script>
</div>
<div style='clear:both;'/>
</div>
</b:if>
 |
| Screenshot |
Step 6. Let's go ahead and add some styles to our CSS... search for this tag:
]]></b:skin>
...and paste the below code just ABOVE it:
.relatedsumposts {
float: left;
margin: 0px 5px;
overflow: hidden;
text-align: center;
/* width and height of the related posts area */
width: 120px;
height: 210px;
}
.relatedsumposts:hover {
background-color: #F3F3F3; -webkit-border-radius: 10px;
-moz-border-radius: 10px;
border-radius: 10px;
}
.relatedsumposts img:hover {
-khtml-opacity:0.4;
-moz-opacity:0.4;
opacity:0.4;
}
.relatedsumposts a {
/* link properties */
color: #linkcolor;
display: inline;
font-size: 10px;
line-height: 1;
}
.relatedsumposts img {
/* thumbnail properties */
margin-top: 2px;
height: 82px;
padding: 5px;
width: 82px;
border: 1px solid #fff;
-webkit-border-radius: 100px;
-moz-border-radius: 100px;
border-radius: 100px;
-webkit-box-shadow: 0 1px 2px rgba(0, 0, 0, .4);
-moz-box-shadow: 0 1px 2px rgba(0, 0, 0, .4);
box-shadow: 0 1px 2px rgba(0, 0, 0, .4);
}
.relatedsumposts h6 {
/* title properties */
display: table-cell;
height: 5em;
margin: 5px 0 0;
overflow: hidden;
padding-bottom: 2px;
vertical-align: middle;
width: 130px;
}
.relatedsumposts p {
/* summary properties */
border-top: 1px dotted #777777;
border-bottom: 1px dotted #777777;
color: #summarycolor;
font-size: 10px;
height: 4em;
line-height: 1;
margin: 5px 0 0;
overflow: hidden;
padding: 5px 0 15px 0;
text-align: left;
}
Note:
- Modify the values in red to adjust the width (120) and height (210) of the widget area
- Replace #linkcolor with the hex value of your color to change the color of post titles
- To change the size of thumbnails, modify the values marked in violet (82)
- To determine the border roundness, modify the values in orange (100)
- To change the color of the post snippet, change #summarycolor with color hex value
Step 7. Save your Template... and hopefully we're done...
Enjoy!
Saturday, March 30, 2013
RESEP CARA MEMBUAT EMPEK-EMPEK PALEMBANG ASLI

Ternyata, Cara membuat empek-empek yang lezat itu sangat mudah, Jika anda ingin mencobanya dirumah silahkan ikuti Resep Cara Membuat Empek-empek Palembang yang Lezat berikut ini, Gampang Koq..!!
Bahan :
- 600 gram ikan tenggiri segar
- 300 gram sagu putih
- 3/4 gelas air
- Garam secukupnya
- Bersihkan ikan tenggiri segar dari sisik dan isi perutnya.
- Belah Ikan menjadi 2 bagian, buang tulangnya.
- Setelah ikan bersih dari sisik dan durinya, kemudian daging ikan di cincang sampai halus.
- Campur sedikit air, garam dan daging ikan yang sudah di haluskan tadi hingga rata.
- Masukkan tepung sagu sedikit demi sedikit sambil di aduk.
- Bentuk adonan seperti bola lalu kukus dengan jumlah air yang banyak.
- Setelah itu, goreng adonan yang telah di kukus tadi hinga berwarna kecoklatan.
- Angkat dan tiriskan.
- Empek-empek sudah selesai kita buat, Hidangkan dengan saos cuka
Nah, Mudah bukan..?? Ikuti terus Kumpulan resep Masakan Nusantara di website kesayangan anda ini, dan kami akan selalu berbagi resep-resep menarik yang kami update setiap hari.
Selamat Mencoba...!!
Thursday, March 28, 2013
Ternak Bebek Entok Manajemn Kandang dan Pakan
Entok adalah unggas yang termasuk jenis bebek, banyak nama yang diberikan untuk bebek ini diantaranya: entok (jawa), serati (sumatera), entong, bebek basur dan dalam bahasa Indonesia disebut Itik Manila. Ciri-ciri fisik bebek entok ini diantaranya bulu badan hitam kilau kebiruan biasanya bahagian leher berbulu putih dengan warna kulit siekitar mata berwarna merah tua, bebek entok lebnih besar
Read more > Ternak Bebek Entok Manajemn Kandang dan Pakan
Wednesday, March 27, 2013
Proposal Ternak Bebek Untuk Program Pemerintah
Membuat sebuah proposal ternak bebek biasanya akan ditujukan untuk program pemerintah yang ada, saat ini ada beberapa program pemerintah untuk bantuan ternak sapi, kambing / domba, unggas yang termasuk didalamnya ternak bebek. program bantuan ternak dari depertemen pertanian saat ini diantaranya: SMD (Sarjana Membangun Desa), LM3, INKA, dan untuk bebek dapat diajukan proposal terkait program
Read more > Proposal Ternak Bebek Untuk Program Pemerintah
Comments I'm never going to publish
The "best" of the comments I'm never going to publish.
 [Public domain or Public domain], via Wikimedia Commons") Like many bloggers, I've noticed an increase in spam-comments over the last few months. And as a blog gets more popular, I guess it's naturally going to be found by more and more "comment marketers" (sic).
Like many bloggers, I've noticed an increase in spam-comments over the last few months. And as a blog gets more popular, I guess it's naturally going to be found by more and more "comment marketers" (sic).
This was the person's second insightful comment within a few seconds. I suspect he doesn't like my moderation policies :-)
Ahh, really? I don't recall saying that ...
Really? What "thing" is that? While dynamic templates are pretty, I don't think they do that much for blog-marketing.
Read more > Comments I'm never going to publish
 [Public domain or Public domain], via Wikimedia Commons")
Unluckily for them, I always moderate comments on my blogs. I even wrote a comments policy for Blogger-hints-and-tips to help me think through what I would and wouldn't publish.
But occasionally I get the urge to reply to a comment-er, even though I'm never to approve their comments. Here are a few recent gems (with embedded links removed).
But occasionally I get the urge to reply to a comment-er, even though I'm never to approve their comments. Here are a few recent gems (with embedded links removed).
Don't call me "dear"
Left on "Getting started with SEO, for Bloggers":"hi dear,Even without the embedded link, any comment that calls me "dear" isn't going anywhere except the rubbish bin.
this is very informative info for a seo friendly work and helpful to writte a good blog.you explain it very well..good job dear...thanks for sharing informative info with us.....:)"
Copyright isn't an "executive"!
Left on Tools for applying copyright protection to your blog":Wow thanks for this. I was wondering if any one would know about executive protection companies [link removed]? If you know more about this please let me know. Thanks for any help.Cute, but no dice: this has a hidden link, and it's pretty clear that corporate hit-men and blogs don't have that much in common.
A prize-winner in the sheer cheek department
Left on "How to put put Posts into your Pages in Blogger":Create Bootable USB Pen Drive for Windows 7
Windows 7- Hard Drive Partition
HTML5 Inline SVG
Fibonacci numbers in Basic
How to Make an Invisible Folder, Tips, Tricks
Changing Table Background Colors on Mouseover
What is HTML5? HTML5 Introduction.
Illusions - An erroneous perception of reality
Windows Run Commands, Shortcut Collections
HTML5 Canvas
Collection: Business Card Designed By JCT Students
Warm boot & Cold boot (Differences between Cold and Warm Booting)
Hidden files in your Pendrive (How to show the hidden files in pendrive? )
HTML5 Geolocation
Flash Analog Clock Script (as2)
HTML5 - Drag and Drop
Facebook Page Cover has been changed (2013-02-08))
On the day of CTEVT, ANNEX, JCT Building Enauguration ( 2069-08-30 )
VB6 Start Button Control, Customize Start Menu
Each and every line was a separate link. I'm sure they're all fascinating - but really, that many links in one comment. No one's going to fall for that.
"Thanks for the memories"
This whole post was sparked by a comment, since dispatched to the great bit-bucket in the sky, which told me that while what I had written was "very nice", I would "simply have to try harder".
I can't find the exact phrases any more - but thanks to whoever wrote it and inspired this occasional "Tower of Babel" post-series.
I can't find the exact phrases any more - but thanks to whoever wrote it and inspired this occasional "Tower of Babel" post-series.
Swear-words need not apply
On "How to put put Posts into your Pages in Blogger":Your comment will be visible after approval.
So f*** you
This was the person's second insightful comment within a few seconds. I suspect he doesn't like my moderation policies :-)
No need to read a post before commenting
On "Putting a Facebook "like", "send" or "share" button into your blog"Thanks you for sharing this good post.I agree with you that today social media is most important part of Internet.
Ahh, really? I don't recall saying that ...
Dynamic template: the new wonder-tool for blog engagement?
On "Adding a gadget to a blog with a dynamic-view template":Same thing happened to me. I'm thrilled though. I averaged about 50/60 pageviews for most of the 3 1/2 years I've maintained my blog. I just it 500 yesterday after only a couple of weeks with the dynamic view.
Really? What "thing" is that? While dynamic templates are pretty, I don't think they do that much for blog-marketing.
My best friend is an iPad!
On "Adding a gadget to your blog, using Blogger's WYSI...":
This man needs some new friends!
Thank you: I try to write long posts that actually cover the issues and options, rather than short ones that leave out key details.
iPad is the best friend I've ever got just Hold it in your hand and you are hooked by its size, feather weight and sheer quality. Apple was late with the iPad mini but in my view they really have hit the spot.
iPad 3 Keyboard (link removed :-) )
This man needs some new friends!
Finally found after 10 years of searching!
On "Putting Adsense ads inside Blogger posts":Hi,Pity he didn't learn to use Google a little sooner.
I find many useful things herewith. It is really amazing for us. Where ever we are, just click on the website and Take advantages regarding Place your ads [link removed :-)] .Your article impressed me very heartily. From a last decade I was searching such type of web site. Thanks for giving me a space in your blog. I refer this to my close friends who are already seeking for the same.
A back-handed compliment? O just plain rude?
On "Putting a Facebook "like", "send" or "share" butt...":you talk a lot!!!
Thank you: I try to write long posts that actually cover the issues and options, rather than short ones that leave out key details.
Tuesday, March 26, 2013
Cara Memasak Udang Saus Tiram Pedas
 Resep Masakan Hari Ini -
Bahan :
- 200 gr Udang segar
- 1 genggam Kacang Kapri muda
- 1/4 siung Bawang Bombay, iris tipis
- 80 ml Air
- Minyak untuk menumis
- 1 ruas Jahe, memarkan
- 1 sdm Saus Tomat
- 2 sdm Saus Sambal
- 3 sdm Saus Tiram
- Merica secukupnya
- Garam secukupnya
- Goreng Bawang bombay hingga layu.
- Tambahkan jahe, kemudian tumis sampai harum.
- Masukkan kacang kapri dan 2 sdm air, masak sampai matang.
- Tambahkan udang segar, masak sampai berubah warna.
- Masukkan saus tomat, saus sambal, saus tiram, merica, garam dan sisa air.
- Masak hingga bumbu merasuk dan agak kental.
- Angkat dan sajikan hangat.
Monday, March 25, 2013
Resep Rahasia Bistik Daging Sapi

Penasaran kan bagaimana cara membuatnya, dan Apa resepnya? Baiklah, silahkan simak Resep Rahasia Bistik Daging Sapi Spesial berikut ini.
Bahan :
- 1/4 kg Daging sapi
- 3 sendok makan Mentega
- 5 buah Tomat
- Lada, pala, garam, kecap, gula pasir secukupnya.
Cara Membuat Bistik Daging Sapi :
- Bumbu : Haluskan lada, pala dan garam.
- Cuci daging hingga bersih, beri bumbu dan tusuk - tusuk dengan garpu, biarkan selama ± 2 jam.
- Goreng daging dengan mentega 1 sdm.
- Masak dengan api agak besar, jangan dibalik bila belum kelihatan kuning.
- Rebus tomat, lalu disaring
- Campurkan airnya dengan gula dan sedikit garam.
- Cairkan mentega sisanya tadi, tambahkan kecap, masukkan air tomat kedalamnya.
- Masukkan daging yang sudah digoreng, panaskan hingga kental.
- Angkat dan sajikan.
SELAMAT MENCOBA...!!
Cara Membuat Roti Sandwich

Bahan :
- 4 lembar roti tawar putih
- 2 lembar daging asap, iris tipis
- 50 gram mentega
- 2 lembar keju
- 50 gram daun selada
- 1 tomat merah, iris tipis
- saus tomat
Cara Membuat Roti Sandwich :
- Panggang roti tawar hingga berwarna kecoklatan
- Olesi roti tawar tersebut dengan mentega
- Taruh daun selada, daging asap, keju dan tomat secara berurutan
- Siram dengan saus tomat secukupnya
- Tutup kembali dengan roti tawar yang lain.
- Angkat dan Sajikan
Sangat Mudah bukan? Selamat mencoba ya...?
Resep Nusantara - Tumis Kangkung Pedas

Resep Hari Ini- Kangkung merupakan jenis sayuran merambat dan memiliki nama latin Ipomoea reptans Poir1. Sayuran kangkung ini banyak kita jumpai baik di pasar-pasar tradisional maupun pasar Modern, sehingga tidak menyulitkan bagi anda untuk memulai mencoba Tips dan resep tumis kangkung pedas yang akan kami bagikan untuk anda.
Bahan-bahan:
- 2 ikat kangkung segar
- 100 gr udang kecil kupas
- 1/2 buah tomat dipotong panjang
- 2 buah cabai merah dipotong serong
- 4 buah Cabai rawit
- 3 siung bawang putih, iris
- 4 butir bawang merah, iris
- 4 sdm air
- 3 sdm minyak goreng
- Ebi secukupnya
- 1/2 sdt gula pasir
- Garam secukupnya
Cara Memasak Tumis kangkung Pedas:
- Tumis bawang putih dan bawang merah hingga harum
- Tambahkan udang, kemudian masak hingga berubah warna
- Tambahkan cabai
- Masukkan kangkung, ebi, gula, garam dan air secukupnya.
- Lalu tambahkan tomat, kemudian masak dengan api besar selama 1 menit hingga layu.
- Angkat dan sajikan
Sunday, March 24, 2013
Pakan Ternak Bebek Petelur dan Pedaging
Pakan ternak bebek sudah banyak dijual dalam bentuk pelet yang diproduksi oleh perusahaan terkenal seperti CPI, Japfa, GC dan lainnya. Pakan bebek dari beberapa merk tersebut hampir memiliki kandungan zat makanan yang sama. Jika anda melihat produk CPI (Charoen Pokphan Indonesia) maka dari label kandungan pakan itik tersebut anda sudah bisa membuat sebuh ransum pakan ternak untuk bebek petelur
Read more > Pakan Ternak Bebek Petelur dan Pedaging
Thursday, March 21, 2013
Peluang Bisnis Kemitraan Ternak Bebek
Banyak jenis usaha peternakan yang memiliki prospek dan peluang bisnis menjanjikan sekarang dan masa depan, peluang bisnis kemitraan ternak bebek misalnya, samapai saat ini belum ada perusahaan besar yang focus menjalankan kemitraan ternak bebek. Berbeda dengan ternak ayam broiler, ada beberapa perusahaan besar yang serius menangani kemitraan ternak ayam pedaging ini sebut saja salah satu anak
Read more > Peluang Bisnis Kemitraan Ternak Bebek
Wednesday, March 20, 2013
Resep Cara Membuat Cumi Bakar Khas Masakan Jepang
 |
| Cumi Bakar Khas Masakan Jepang |
Memasak masakan Cumi bakar ala Jepang ternyata tidak sulit, bahan-bahanya pun mudah ditemukan di sekitar kita. Nah, Resep Hari Ini akan berbagi Resep Cara Membuat Cumi Bakar Khas Masakan Jepang untuk anda, silahkan simak Resep-resep dan cara membuatnya berikut ini.
Bahan-bahan:
- 500 gram cumi-cumi, dibersihkan
- 2 sdm saus tomat
- 1 sdm kecap jamur
- 3 siung bawang putih, kupas kulitnya
- 3 buah bawang merah, kupas kulitnya
- 1 sdt air jeruk nipis
- 1 sdt garam
- 1/2 sdt merica bubuk
- Haluskan bawang putih dan bawang merah, kemudian tambahkan kecap jamur, saus tomat, merica bubuk, garam, dan air jeruk nipis, aduk hingga merata.
- Mauskkan cumi-cumi, aduk hingga bumbu merata, kemudian simpan dalam kulkas selama 1 jam.
- Setelah 1 jam, masukkan campuran cumi ke dalam wajan, masak hingga setengah matang, angkat
- Panggang cumi hingga matang dan berwarna kuning kecoklatan, angkat.
Ukuran porsi: 3 orang
Demikian resep cumi bakar jepang ala Resep Hari Ini, Semoga menambah nuansa masakan anda lebih bervariatif.
SELAMAT MENCOBA...!!
Cara Ternak Bebek Pedaging Dan Petelur
Cara beternak bebek ditulis dihalaman ini secara garis besar saja, untuk detail dan simpelnya silahkan berimprofisasi. Bebek petelur dan pedaging tidak berbeda cara perawatannya, perbedaan cara beternak bebek pedaging dengan petelur hanya pada pemberian pakan saja, dimana untuk bebek petelur diberikan pakan mineral yang lebih banyak dibanding dengan pakan ternak bebek pedaging. Berikut ini garis
Read more > Cara Ternak Bebek Pedaging Dan Petelur
Manfaat Pare Sebagi Pembunuh Sel Kanker
Pare adalah jenis tanaman sayuran yang merambat, bentuk buah yang memanjang dan kulit luar memiliki bentuk yang tidak rata, serta rasa buah yang pahit. Namun tahukah anda? Ternyata pare memiliki segudang manfaat bagi kesehatan tubuh lho..! Diantaranya sebagi obat pembasmi kanker dan masih banyak lagi manfaat-manfaat yang lain.
Di negara-negara Asia Timur, seperti Jepang, Korea, dan Cina, pere dimanfaatkan untuk pengobatan, antara lain sebagai obat gangguan pencernaan, minuman penambah semangat, obat pencahar dan perangsang muntah, bahkan telah diekstrak dan dikemas dalam kapsul sebagai obat herbal/jamu.
Buah pare mengandung albuminoid, karbohidrat, dan pigmen. Daun pare mengandung momordisina, momordina, carantina, resin, dan minyak. Sementara itu, akar pare juga mengandung asam momordial dan asam oleanolat. Sedangkan bijinya mengandung saponin, alkaloid, triterprenoid, dan asam momordial.
 |
| Pare adalah jenis sayuran yang kaya manfaat |
Pare juga dapat merangsang nafsu makan, menyembuhkan penyakit kuning, memperlancar pencernaan, dan sebagai obat malaria. Selain itu, pare juga mengandung beta-karotena dua kali lebih besar daripada brokoli sehingga berpotensi mampu mencegah timbulnya penyakit kanker dan mengurangi risiko terkena serangan jantung ataupun infeksi virus.
Daun pare juga memiliki manfaat untuk menyembuhkan penyakit mencret pada bayi, membersihkan darah bagi wanita yang baru saja melahirkan, menurunkan demam, mengeluarkan cacing kremi, serta dapat menyembuhkan batuk. Buahnya yang memiliki rasa pahit ini biasanya oleh masyarakat diolah sebagai sayur, misalnya Diolah menjadi oseng pare teri pedas, pecel campur pare, rendang pare, atau Pare gulai pedas.
Di Cina pare biasa diolah dengan tausi, tauco, daging sapi, dan cabai sehingga pare yang memiliki citarasa pahit ini menjadi nikmat dan tidak terasa pahit, namun tidak mengurangi segi kualitas dan manfaat pare itu sendiri. Sedangkan di Jepang pare menjadi primadona masyarakat sebagai makanan sehat karena diolah menjadi sup, tempura, atau asinan sayuran.
Ekstrak dari biji pare selain digunakan sebagai bahan obat-obatan, ternyata dapat digunakan sebagai pembasmi larva alami yang merugikan seperti larva Aedes aegypti yang menyebarkan penyakit DBD ( Demam Berdarah Dengue ).
Nah, sudah taukan manfaat dari buah pare? Bagi anda yang awalnya gak suka dengan sayur pare, mulai sekarang biasain deh untuk makan pare, agar tubuh selalu sehat dan terhindar dari namanya gangguan penyakit yang berbahaya.
Jadi, mulai hidup sehatmu dengan mengonsumsi makanan-makanan alami dan sehat.
Salam...!!
Tuesday, March 19, 2013
CSS Basics. How to Apply Rounded Corners On Images #2
 In the previous post I have mentioned that we will learn to round images using CSS, without needing to edit them one by one using a program. Now that we have seen the basics of CSS, let's try to apply to some images.
What we will do is to upload an image as normal (HTML) and then add some rules in our style sheet that will transform the outer shape as a circle... or at least to appear round. This will depend on the proportions of image that we use.
In fact, we can apply this effect to any image, to all of an area or to all in our blog. That depends on your tastes.
Marking up HTML
Obviously the first thing we need for in order to round an image is an idem. The code could be more complicated, but an image is built within the img tag and basically looks like this:
<img src="image_URL"/>
Screenshot:


But if we want to modify this image using CSS, we need to incorporate a class selector. We can add it in two ways: within the img tag or to a parent box. The name that I have chosen for the selector is roundedcorners:
<img class="roundedcorners" src="image_URL"/>

<div class="roundedcorners">
<img src="image_URL"/>
</div>
Applying style to all homogeneous elements
But that selector alone will do nothing. It needs to be linked to a style rule that tells what to do with it. As much as we add classes, if these are not defined in the CSS, the appearance of the image (or a certain element) will not change.
To change the shape of all the images on our blog, this would be what we should add to our CSS:
img {
border: 2px solid #BADA55;
margin: 0;
padding: 0;
border-radius: 900px;
-moz-border-radius: 900px;
}
And how it translates to your browser? As follows:
Search for images by name tag (img) and apply the following style:
- a solid green border of 2 pixels
- margins (space outside the border) and padding (space inside the border) is set to zero
- the image is round at the four corners
 Now that we have this rule in our style sheet itself, we can see the picture as we wanted - see the example on the right.
To declare a property correctly, we need to know what it does and how to write and you can find more info in many places, although W3C is the authority in this.
For example border-radius requires initially 4 values reading from left to right that represent the roundness of the upper-left, upper-right, lower-right and lower-left corner. If you put a single value is understood that all four will be equal to that.
You should also know that when the value of the border exceeds the dimensions of the box, this border is adapted to form a circle.
How to Apply Style to the Elements of the Same Block
But surely we do not want all the blog images to be round, but only those that we choose, otherwise adding the above style in the head tag will make all of our blog images to take this shape. Before we used an HTML tag (img) and not a selector and that is why the style will affect all images.
To avoid this, we can do one of the things we saw at the beginning and that was to put the image inside a div with the roundedcorners class. In this way, only the images that are in a box with that class will be affected by the rule that will make them round.
<div class="roundedcorners"><img src="image_URL"/></div>
But the rule then should not attack the img tag directly, but the roundedcorners selector. In this case, you should write it like this:
.roundedcorners img {
border: 2px solid #BADA55;
....
}
This means that this style applies only to images that are in a box with roundedcorners class.
Epilogue
To close the subtopic of rounding images, you have to keep in mind that if these are not square, instead of becoming circular, they will look oval.

To fix this we should add the width and height with the same measure (value in pixels), that is to force the image cropping and to make it appear perfectly circular. That was all!
If you enjoy reading this blog, please share and subscribe. For any questions, drop a comment below ;)
Monday, March 18, 2013
Resep Rahasia Cara Membuat Mie Aceh Spesial

Anda pernah mencoba menu yang satu ini? Jika anda belum pernah mencoba pasti nyesel deh..!! :D
Citarasa Mie Aceh sangat menggugah selera bagi pecinta kuliner masakan Nusantara, komposisi bahan dan bumbu begitu pas, sehingga memperoleh Aroma dan citarasa yang nikmat.
Nah, jika anda tertarik untuk membuat Mie Aceh dirumah, berikut akan saya bagikan Resep Mie Goreng Aceh Spesial untuk Anda :
Bahan-bahan Mie Aceh:
- 400 gram mie basah / kuning
- 750 ml kaldu sapi
- 150 gram udang basah, bersihkan, buang kulitnya.
- 150 gram daging kambing / sapi, potong dadu
- 1 buah tomat, potong dadu
- 4 siung bawang putih, iris tipis.
- 3 siung bawang merah, iris tipis.
- 60 gram tauge, siangi, buang buntutnya.
- 100 gram kol, iris tipis.
- 1 sdt cuka
- 2 sdm kecap manis
- 1 batang daun bawang, iris halus.
- 1 sdm sledri, iris halus.
- 2 sdt garam.
- 3 sdm makan minyak goring.
Bumbu halus Mie Aceh:
- 5 buah bawang merah.
- 3 siung bawang putih.
- 4 buah cabai merah, buang bijinya.
- ½ sdmbubuk kunyit.
- 4 butir kapulaga.
- 1 sdt jinten, sangrai.
- 1 sdt lada butir.
Pelengkap Mie Aceh:
- Kerupuk Udang / Kerupuk Emping.
- Acar mentimun.
Cara Membuat Mie Aceh :
- Tumis irisan bawang merah, irisan bawang putih dan bumbu halus hingga harum.
- Masukkan daging kambing / sapi, aduk dan masak hingga berubah warna.
- Kemudian tambahkan udang dan tomat, aduk rata.
- Masukkan kaldu, sledri, daun bawang, garam dan cuka.
- Masak hingga daging matang dan air berkurang sambil sesekali diaduk.
- Masukkan kol dan tauge, aduk rata.
- Kemudian tambahkan mie dan kecap manis.
- Aduk sampai semua bahan tercamppur rata dan matang. Angkat.
- Sajikan panas-panas dengan acar mentimun dan emping goreng.
SELAMAT MENCOBA...!!!
Accessing Pinterest Analytics, and verifying your website with Pinterest
This Quick-tip is about how you can verify the website (or blog) associated with your Pinterest account - and solving a small problem with the meta-tag that Pinterest give you.
 Pinterest have recently announced Pinterest Web Analytics, which will show you "how many people have pinned content from your site, what content is most popular with pinners, and more." (From their announcement email.
To register to Pinterest Web Analytics, you need to
After your website is verified, there will be an Analytics option on the top-right menu whenever you are using Pinterest.
The meta-tag that Pinterest gives you looks like this
If you see a message like this when you try to Preview or Save the change:
After the tag is added and you have saved your template, click the Complete Verification button in the Pinterest window, to tell Pinterest to look at your website and make the connection.
Read more > Accessing Pinterest Analytics, and verifying your website with Pinterest
To register to Pinterest Web Analytics, you need to
- Get early access to Pinterest’s new look.
- Verify your website, using the tools listed here.
After your website is verified, there will be an Analytics option on the top-right menu whenever you are using Pinterest.
Verifying your blog with Pinterest:
There is one slight twitch to the verification process: As I've explained previously, Bloggers don't have access to load files to their site's root directory. Instead we need to use the meta-tag option, currently on the bottom left of the box which opens when you choose "Verify your website" from Pinterest's settings.The meta-tag that Pinterest gives you looks like this
<meta name="p:domain_verify" content="a-weird-collection-of-letters-and-numbers" >Add it to your blog's template the same way you would add any other meta-tag.
If you see a message like this when you try to Preview or Save the change:
Your template could not be parsed as it is not well-formed. Please make sure that all XML elements are closed properly. <br/> XML error message: The element type "meta" must be terminated by the matching end-tag "</meta>".then it means is that the meta tag that Pinterest gave you has not been closed properly. To fix it, you just need to add a "close tag" command ( </meta> ), so that the code looks like:
Error 500
<meta name="p:domain_verify" content="a-weird-collection-of-letters-and-numbers" >
</meta>
After the tag is added and you have saved your template, click the Complete Verification button in the Pinterest window, to tell Pinterest to look at your website and make the connection.
CSS Basics. How to Apply Rounded Corners On Images #1
This tutorial will explain how to change the outside border of any image using some simple CSS rules to make it round, but this is so easy to do, that I'm finally going to make this entry for other purposes.

The trick today that I'm going to publish in two parts is to help to understand at least a little of what CSS (Cascading Style Sheets) is. But very briefly that I'm not able to do a good comprehensive manual on the subject. For those who want to see a bit more, take a look at this link and for those who really want to learn thoroughly, I recommend to visit this site.
Introduction and terminology
Style sheets aim to help sort out what is the structure of a website and which is its format, its appearance. Thus, the CSS box model is essentially a box that wraps around HTML elements, and it dictates how those boxes are presented in terms of colors, fonts, width, backgrounds etc.
The advantage is that if in the future we decide to change something, we don't have to change all the pages one by one, but simply change the properties of one kind or another box from the style sheet and these changes will automatically apply in all the pages.
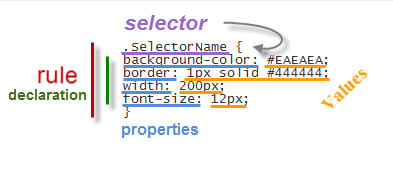
The style sheet is a set of rules, in turn composed of selectors and declarations. The selector is to be used as a nickname or name of what you want to configure from the sheet and apply to the HTML and declarations are properties that are assigned to the desired values (more information on CSS syntax)
 Adding the CSS selector
Once we put for example the one above in our style sheet, we see that in our website... nothing happens. I said that the selector is what relates HTML and CSS so that if we want a box to take these values for width, background color, border and font size (that's what we defined earlier), we need to include the selector, thus:
What we have added is a rule that tells the browser to interpret that this box has to be of a certain type or class. A class that was mentioned earlier is called selector having some specific properties and values defined in the style sheet.
Now we'll see how this will change the look of the box, while all others that don't have the SelectorName name will follow the standard appearance.
Therefore, when we include a rule in a style sheet, or modify an existing one, what happens is that all boxes marked with that selector will change their appearance according to the properties-values that we have defined.
On the contrary, if we want that an unmarked box to change its appearance with the CSS rules defined, we'll add the appropriate selector.
Where to add the CSS style
The style can be put in a CSS file. The file is created with all the rules, you get the address and then include the following line in the header of your template. For Blogger, you can add it between <head> and <b:skin><![CDATA[/*:
Note: in blue is where the address of your CSS file should be added.
You can also add the style directly mixed with HTML, inserted between the style tags:
It can be inserted into a particular box, as well. In this case, you do not need to add any selector to indicate where the CSS style is:
In Blogger the rules are between the skin tags, which means they are between <b:skin><![CDATA[/* and ]]></b:skin>. If you edit the template, will find that there are many things in between. All this is CSS that marks the appearance of your blog.
In case we want to see the effect after changing the value of some propriety, we can click on the Preview button. We can also remove anytime a declaration or add another to the desired selector.
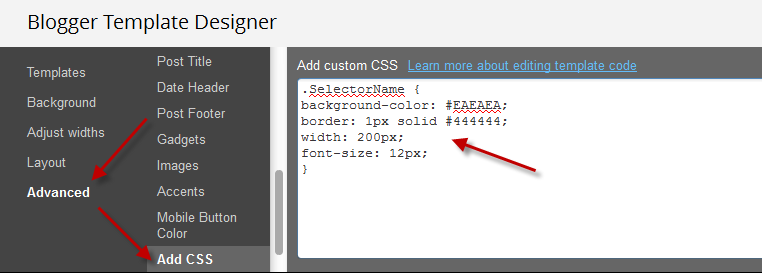
For those who don't want to touch the template, you can add the CSS directly by going to the Advanced section > Add CSS of your Template Designer.
That's enough for today. The next tutorial will discuss in more detail about how to add rounded corners to our images using CSS.
Read more > CSS Basics. How to Apply Rounded Corners On Images #1
The trick today that I'm going to publish in two parts is to help to understand at least a little of what CSS (Cascading Style Sheets) is. But very briefly that I'm not able to do a good comprehensive manual on the subject. For those who want to see a bit more, take a look at this link and for those who really want to learn thoroughly, I recommend to visit this site.
Introduction and terminology
Style sheets aim to help sort out what is the structure of a website and which is its format, its appearance. Thus, the CSS box model is essentially a box that wraps around HTML elements, and it dictates how those boxes are presented in terms of colors, fonts, width, backgrounds etc.
The advantage is that if in the future we decide to change something, we don't have to change all the pages one by one, but simply change the properties of one kind or another box from the style sheet and these changes will automatically apply in all the pages.
The style sheet is a set of rules, in turn composed of selectors and declarations. The selector is to be used as a nickname or name of what you want to configure from the sheet and apply to the HTML and declarations are properties that are assigned to the desired values (more information on CSS syntax)
Once we put for example the one above in our style sheet, we see that in our website... nothing happens. I said that the selector is what relates HTML and CSS so that if we want a box to take these values for width, background color, border and font size (that's what we defined earlier), we need to include the selector, thus:
<div class="SelectorName">Text here</div>
What we have added is a rule that tells the browser to interpret that this box has to be of a certain type or class. A class that was mentioned earlier is called selector having some specific properties and values defined in the style sheet.
Now we'll see how this will change the look of the box, while all others that don't have the SelectorName name will follow the standard appearance.
Therefore, when we include a rule in a style sheet, or modify an existing one, what happens is that all boxes marked with that selector will change their appearance according to the properties-values that we have defined.
On the contrary, if we want that an unmarked box to change its appearance with the CSS rules defined, we'll add the appropriate selector.
Where to add the CSS style
The style can be put in a CSS file. The file is created with all the rules, you get the address and then include the following line in the header of your template. For Blogger, you can add it between <head> and <b:skin><![CDATA[/*:
<link href="syle.css" rel="stylesheet" type="text/css"/>
Note: in blue is where the address of your CSS file should be added.
You can also add the style directly mixed with HTML, inserted between the style tags:
<style>
.SelectorName {
background-color: #EAEAEA;
border: 1px solid #444444;
width: 200px;
font-size: 12px;
}
</style>
It can be inserted into a particular box, as well. In this case, you do not need to add any selector to indicate where the CSS style is:
<div style="background-color: #EAEAEA; border: 1px solid #444444; width: 200px; font-size: 12px;">Text here</div>
In Blogger the rules are between the skin tags, which means they are between <b:skin><![CDATA[/* and ]]></b:skin>. If you edit the template, will find that there are many things in between. All this is CSS that marks the appearance of your blog.
In case we want to see the effect after changing the value of some propriety, we can click on the Preview button. We can also remove anytime a declaration or add another to the desired selector.
For those who don't want to touch the template, you can add the CSS directly by going to the Advanced section > Add CSS of your Template Designer.
That's enough for today. The next tutorial will discuss in more detail about how to add rounded corners to our images using CSS.
Budidaya Ternak Bebek Skala Kecil Dan Menengah
Budidaya adalah unit usaha peternakan di bidang produksi ternak, budidaya ternak bebek berarti usaha peternakan bidang produksi ternak bebek, dalam budidaya perlu diperhatikan aspek skala yang akan kita buat apakah usaha ternak sekala kecil, menangah atau besar. landasan dalam menantukan skala usaha adalah faktor bisnis dan juga analisa secara cermat tentang resiko dan peluang pada ternak bebek.
Read more > Budidaya Ternak Bebek Skala Kecil Dan Menengah
Sunday, March 17, 2013
Resep Cara Membuat Kwetiau

Bahan:
- 700 gr kwetiau basah, rendam dengan air panas, tiriskan
- 2 butir telor, kocok lepas, campur 50 ml air, aduk rata lalu buat 2 dadar tipis, kemudian iris-iris
- 5 butir bakso sapi, iris tipis
- 5 siung bawang putih, cincang halus
- 1 buah bawang bombay ukuran sedang, iris
- 150 gr daging ayam, potong kotak
- 200 gr udang kupas
- 2 batang daun bawang, iris tipis
- 1 ikat coysum, potong 5 cm
- 4 sdm minyak goreng untuk menumis
- 100 gr toge
- 1 sdt merica bubuk
- 3 sdm saos tiram
- 5 sdm kecap manis
- 4 sdm kecap asin
- 3 sdm minyak wijen
- 1 sdt garam
- Panaskan minyak lalu tumis bawang putih dan bawang bombay hingga harum.
- Masukkan daging ayam, udang dan baso sapi. Aduk sampai matang.
- Masukkan bahan saos, aduk sebentar.
- Tambahkan kwetiau, daun bawang dan coysum. Masak sampai seluruhnya tercampur rata.
- Kemudian tambahkan toge dan telor dadar iris. Aduk sebentar lalu angkat.
- Letakkan dalam wadah, Sajikan.
Untuk 5 porsi
SELAMAT MENCOBA..!!!
Baca Juga :
- Resep Cara Membuat Nugget Ikan Bandeng
- Cara Membuat Sate Kambing Kecap Pedas
- Resep Kepiting Saos Pedas
- Cara Membuat Tape Ketan
10 Places to put Adsense ads in Blogger
This article will discuss about the more common 10 places on our blog where we can place ads and about how to implement them and also which are the most suitable formats based on those available in our AdSense account.
Advertisements
In the Sidebar

How to implement.
This is one of the easiest places to place AdSense. Just go to the page elements (layout), click on the "Add a Gadget" link and add an HTML/Javascript widget with your ad code inside it or add directly an AdSense widget.
Recommended formats: 125 × 125, 120 × 600 and 160 × 600
Between posts

Implementation. You can implement AdSense ads between your posts: go to Layout, click on the "Edit" link below the Blog Posts section, then check the "Show Ads Between Posts" option.
Recommended formats: 468 × 60, 300 × 250 and 336 × 280
Under the header

Implementation:
Firstly, convert your AdSense ad code. You can use this converter here:
AdSense Ad Converter
Then, go to your Blogger Template (from your Dashboard, click on Template and press the Edit HTML button) and search for:
Then paste the converted code right after it.
Recommended formats: 728 × 90 and 728 × 15
Above the blog posts

Implementation:
Convert your ad code and search for <div id='main-wrapper'> in your template.
Paste the converted code right after it.
Recommended formats: 460 × 68, 468 × 15 and 336 × 280
Under the title of the post (this will be visible on all the pages)
 Implementation:
Convert your AdSense ad code and then go to your Template, Expand Widget Templates and look for:
Note: if you can't find it, search it without the ending slash /
Paste the converted code right after it.
Recommended formats: 468 × 68 and 468 × 15
Under the post title (visible only on the posts pages)
Implementation:
Convert your ad code and then go to your Template, Expand Widget Templates and look for:
Note: if you can't find it, search it without the trailing slash /
Paste the converted code, following this example:
Recommended formats: 468x68 and 468x15
In the posts' footer

Implementation:
Convert your ad code and then go to your Template, Expand Widget Templates and look for:
Note: if you can't find it, search it without the trailing slash /
Paste the converted code right after this line.
Recommended formats: 468x68 and 468x15
In the post's body (it will be visible on all pages)

Implementation:
Convert your ad code and then go to your Template, Expand Widget Templates and look for:
Note: in case you don't fint this code, search only for <div class='post-body'>
And paste the converted code, following this example:
Recommended formats: 125x125, 180x150, 120x240 and 200x200
In the post's body (visible only in post pages)
Convert your ad code and then go to your Template, Expand Widget Templates and look for:
Note: in case you don't fint this code, search only for <div class='post-body'>
And paste the converted code, following this example:
Recommended formats: 125x125, 180x150, 120x240 and 200x200
Between post and comments (visible only on posts pages)

Implementation:
Convert your ad code and then go to your Template, Expand Widget Templates and look for:
Paste the converted code just above it, following this example:
Recommended formats: 468x60, 300x250 and 336x280
In the blog's footer

Implementation:
Convert your ad code and then go to your Template, Expand Widget Templates and look for:
Paste the converted code right after it.
Recommended formats: 728x90 and 728x15
FAQ
I anticipated some questions likely to arise:
I can't find the codes, what should I do?
Always check the "Expand Widget Templates" checkbox. These are the default codes of Blogger and should be found in all the templates unless they have been changed by a hack or the template designer.
Why should I convert my AdSense code?
The Blogger's Template reads it as text and not as code and it is good to avoid any errors when trying to save it.
The ads are not displaying properly, why is that?
The ads could be affected by the styles (CSS) selectors (divs) containing them and some templates could be wrong designed, then you should consider modifying these styles, look for another relevant place or in extreme cases, change the template.
Can I put the all 10 codes on my blog?
No, you should choose just one of the places where you want to put the ads considering that AdSense have some limits on the number of ads that could be displayed. Try to make a balance with your content.
Why we there should be only 3 ads displayed on the main page?
Is due to the limit set by the AdSense. Combine the type of ads (text, rich media ads and link units) to be able to show the number of ads you want.
Hopefully, this will be useful to those of you wanting to display AdSense ads on your blog.
Read more > 10 Places to put Adsense ads in Blogger
Advertisements
In the Sidebar
How to implement.
This is one of the easiest places to place AdSense. Just go to the page elements (layout), click on the "Add a Gadget" link and add an HTML/Javascript widget with your ad code inside it or add directly an AdSense widget.
Recommended formats: 125 × 125, 120 × 600 and 160 × 600
Between posts
Implementation. You can implement AdSense ads between your posts: go to Layout, click on the "Edit" link below the Blog Posts section, then check the "Show Ads Between Posts" option.
Recommended formats: 468 × 60, 300 × 250 and 336 × 280
Under the header
Implementation:
Firstly, convert your AdSense ad code. You can use this converter here:
AdSense Ad Converter
Then, go to your Blogger Template (from your Dashboard, click on Template and press the Edit HTML button) and search for:
<div id='header-wrapper'>
Then paste the converted code right after it.
Recommended formats: 728 × 90 and 728 × 15
Above the blog posts
Implementation:
Convert your ad code and search for <div id='main-wrapper'> in your template.
Paste the converted code right after it.
Recommended formats: 460 × 68, 468 × 15 and 336 × 280
Under the title of the post (this will be visible on all the pages)
Convert your AdSense ad code and then go to your Template, Expand Widget Templates and look for:
<div class='post-header-line-1'/>
Note: if you can't find it, search it without the ending slash /
Paste the converted code right after it.
Recommended formats: 468 × 68 and 468 × 15
Under the post title (visible only on the posts pages)
Implementation:
Convert your ad code and then go to your Template, Expand Widget Templates and look for:
<div class='post-header-line-1'/>
Note: if you can't find it, search it without the trailing slash /
Paste the converted code, following this example:
<b:if cond='data:blog.pageType == "item"'>
<!-- Here your ad code -->
</b:if>
Recommended formats: 468x68 and 468x15
In the posts' footer
Implementation:
Convert your ad code and then go to your Template, Expand Widget Templates and look for:
<p class='post-footer-line post-footer-line-3'/>
Note: if you can't find it, search it without the trailing slash /
Paste the converted code right after this line.
Recommended formats: 468x68 and 468x15
In the post's body (it will be visible on all pages)
Implementation:
Convert your ad code and then go to your Template, Expand Widget Templates and look for:
<div class='post-body entry-content'>
Note: in case you don't fint this code, search only for <div class='post-body'>
And paste the converted code, following this example:
<div style='float:right'>
<!-- Here ad code -->
</div>
Recommended formats: 125x125, 180x150, 120x240 and 200x200
In the post's body (visible only in post pages)
Convert your ad code and then go to your Template, Expand Widget Templates and look for:
<div class='post-body entry-content'>
Note: in case you don't fint this code, search only for <div class='post-body'>
And paste the converted code, following this example:
<b:if cond='data:blog.pageType == "item"'>
<div style='float:right'>
<!-- Here your ad code -->
</div>
</b:if>
Recommended formats: 125x125, 180x150, 120x240 and 200x200
Between post and comments (visible only on posts pages)
Implementation:
Convert your ad code and then go to your Template, Expand Widget Templates and look for:
</b:includable>
<b:includable id='commentDeleteIcon' var='comment'>
Paste the converted code just above it, following this example:
<b:if cond='data:blog.pageType == "item"'>
<!-- Here comes your ad code -->
</b:if>
Recommended formats: 468x60, 300x250 and 336x280
In the blog's footer
Implementation:
Convert your ad code and then go to your Template, Expand Widget Templates and look for:
<div id='footer-wrapper'>
Paste the converted code right after it.
Recommended formats: 728x90 and 728x15
FAQ
I anticipated some questions likely to arise:
I can't find the codes, what should I do?
Always check the "Expand Widget Templates" checkbox. These are the default codes of Blogger and should be found in all the templates unless they have been changed by a hack or the template designer.
Why should I convert my AdSense code?
The Blogger's Template reads it as text and not as code and it is good to avoid any errors when trying to save it.
The ads are not displaying properly, why is that?
The ads could be affected by the styles (CSS) selectors (divs) containing them and some templates could be wrong designed, then you should consider modifying these styles, look for another relevant place or in extreme cases, change the template.
Can I put the all 10 codes on my blog?
No, you should choose just one of the places where you want to put the ads considering that AdSense have some limits on the number of ads that could be displayed. Try to make a balance with your content.
Why we there should be only 3 ads displayed on the main page?
Is due to the limit set by the AdSense. Combine the type of ads (text, rich media ads and link units) to be able to show the number of ads you want.
Hopefully, this will be useful to those of you wanting to display AdSense ads on your blog.
Prospek Bisnis Ternak Bebek
Kalau kita berbicara tentang prospek bisnis ternak bebek maka kita harus mengkaitkannya dengan keadaan demografi Indonesia berkaitan dengan peningkatan angka nilai konsumsi protein hewani perkapita dan analisa ternak bebek. Setiap tahun angka konsumsi protein hewani semakin meningkat. Coba kita perhatikan kasus impor daging sapi yang melibatkan petinggi PKS, nah ini sebuah pertanda besar bahwa di
Read more > Prospek Bisnis Ternak Bebek
Saturday, March 16, 2013
Analisa Laba Rugi Ternak Bebek
Analisa ternak bebek banyak bisa anda temukan referensinya di toko buku, atau beberapa tulisan secara online. Disini untung rugi ternak bebek hanya akan dibahas inti pokoknya saja. Dalam usaha ternak bebek, baik peking, petelur, entok bebek potong dan entok semua dasarnya sama, yakni biaya terbesar dikeluarkan pada pakan dan bibit. Pakan ternak bebek saat ini lebih mahal daripada pakan ayam
Read more > Analisa Laba Rugi Ternak Bebek
Getting started with SEO, for Bloggers
This article introduces Google Webmaster central's first-steps-SEO cheatsheat, and explains how the points in it apply to Blogger.
 Google have produced a "first steps cheat sheet" for people who've got a blog or website, "but never gave search much thought". They describe it as a "short how-to list with basic tips on search engine-friendly design".
It lists things you can do which may "help Google and others better understand the content and increase your site’s visibility".
You can find it here. (It's a one-page PDF file, ).
The Webmaster Central post where it was announced said to "read it, print it, share it, copy and distribute it" ... so I'm going to tell you how the points listed apply to Blogger users.
One caveat: I've explained previously, SEO (aka search engine-friendly design) is totally irrelevant for some bloggers. Unless you know that being found in search-engines is important for your blog, then please don't waste any more time on this.
But if you do depend on Google (or Yahoo, Bing, etc) to bring visitors to your blog, read on, then these are the first things that Google suggest you should think about:
The URL is the blog's website address: you choose it when you first set the blog up, but you can change it again later if you need to, using Settings > Basic > Publishing in the Blogger dashboard
Many people recommend using a custom domain because it look more professional and like a real website. But the same "descriptive and easy to read" guideline matters even if you use a blogspot.com address.
Your blog's Description should "Describe your ... [blog] in a concise, informative phrase."
You can edit these under Settings > Basic > Basic in the Blogger dashboard.
I usually make the title match the blog's URL (viz http://blogger-hints-and-tips.blogspot.com/ / Blogger-hints-and-tips) - but it can be a little longer, maybe about five words.
Blogger lets you make the description up to 500 characters long, but I usually recommend less than this - a maximum of 160 is better.
You set the title in the Post-editor, when you are first writing a post. And you can change then later by editing the post again after it has been published.
Some people suggest using a catchy phrase that people are likely to share on Facebook, Twitter etc for the first week after you publish a post, and then changing it to a more descriptive phrase (which looks better in search results) after that.
 Turn on descriptions in Blogger by
Once Descriptions are turned on, there will be a Search Description entry in the right-hand Post-settings area each time you edit a post. Write a short (160 characters or less) unique description for each post into this.
For example, I just made the screen shot that I used in the previous section, and called the file "seo-basics-meta-description-field-blogger-post-editor.png"
You can also use the "add caption" feature (on the tool-bar when you hover over the picture in the post-editor) to add a short caption describing the picture.
So I made sure that the 160-character advice was in the text, as well as in the picture.
Lots of people start a blog, and then get discouraged because it's not successful straight away.
This is a mistake: "domain age", AKA how long you have had the website address for, is one of the factors that search-engines take account of. Even if you don't get many visitors in the first year, the fact that your blog has been going for a year and you are still posting to it makes it attractive to Google.
So Google's final piece of advice is to keep going, and to publish new posts on your blog on an on-going basis.
These resources are all good - but they aren't targeted to Blogger users, so sometimes they recommend changes to things we cannot change (eg URL-structrue), or they simply explain things in non-Blogger ways.
There are about a zillion websites offering SEO advice too - just google and you will find them.
In particular, you may see lots of SEO advice about keyword research etc - but my advice is to ignore this for a very long time in your blogging: focus on writing content that your blog-visitors will want to read, describe it in interesting ways, and the keywords will look after themselves.
Telling Google, and visually impaired people, about your pictures
Using Blogger to make a real website
Editing a blog-post that you have already published
How to put a picture into a blog-post
Introduction to Picasa and Picasa-web-albums
Read more > Getting started with SEO, for Bloggers
 Google have produced a "first steps cheat sheet" for people who've got a blog or website, "but never gave search much thought". They describe it as a "short how-to list with basic tips on search engine-friendly design".
It lists things you can do which may "help Google and others better understand the content and increase your site’s visibility".
You can find it here. (It's a one-page PDF file, ).
The Webmaster Central post where it was announced said to "read it, print it, share it, copy and distribute it" ... so I'm going to tell you how the points listed apply to Blogger users.
One caveat: I've explained previously, SEO (aka search engine-friendly design) is totally irrelevant for some bloggers. Unless you know that being found in search-engines is important for your blog, then please don't waste any more time on this.
But if you do depend on Google (or Yahoo, Bing, etc) to bring visitors to your blog, read on, then these are the first things that Google suggest you should think about:
Looking good in the search results
Blog address
Make sure that your blog's URL is "descriptive and easy-to-read".The URL is the blog's website address: you choose it when you first set the blog up, but you can change it again later if you need to, using Settings > Basic > Publishing in the Blogger dashboard
Many people recommend using a custom domain because it look more professional and like a real website. But the same "descriptive and easy to read" guideline matters even if you use a blogspot.com address.
 |
| An example search-engine results page |
Overall blog title and description
Your blog Title should "Describe your ... [blog very] concise[ly]."Your blog's Description should "Describe your ... [blog] in a concise, informative phrase."
You can edit these under Settings > Basic > Basic in the Blogger dashboard.
I usually make the title match the blog's URL (viz http://blogger-hints-and-tips.blogspot.com/ / Blogger-hints-and-tips) - but it can be a little longer, maybe about five words.
Blogger lets you make the description up to 500 characters long, but I usually recommend less than this - a maximum of 160 is better.
Post title and descriptions
Each post and page needs a title that is concise and informative.
You set the title in the Post-editor, when you are first writing a post. And you can change then later by editing the post again after it has been published.
Some people suggest using a catchy phrase that people are likely to share on Facebook, Twitter etc for the first week after you publish a post, and then changing it to a more descriptive phrase (which looks better in search results) after that.
Post descriptions
Meta descriptions are page summaries which are often used by search engines to describe your blog on the search-result listings.
- Going to Settings > Search preferences > Meta-tags in the blogger dashboard.
- Choosing the choosing "yes" radio button
- Putting the overall summary for the whole blog into the text field. (I recommend the same one from Settings > Basic > Basic) into the text field
- Clicking Save changes
Once Descriptions are turned on, there will be a Search Description entry in the right-hand Post-settings area each time you edit a post. Write a short (160 characters or less) unique description for each post into this.
Help Google understand images
File names
Before you load a picture to your blog (or to a photo-hosting service like Picasa-web-albums or Google+ Photos), give it a short, descriptive file name.For example, I just made the screen shot that I used in the previous section, and called the file "seo-basics-meta-description-field-blogger-post-editor.png"
Tagging
Google's sheet just says to Use an “alt” and "title" tag to describes the picture. I've described this in detail previously - see Telling Google, and visually impaired people, about your picturesYou can also use the "add caption" feature (on the tool-bar when you hover over the picture in the post-editor) to add a short caption describing the picture.
Put information in text, not just pictures
Look again at the picture that I used in the previous section. When I was making it, I put the 160-characters-long suggestion right inside the picture. This is useful for readers who see more detail in the photos than the text. But it's no good for search engines: Google is clever, but it's still not clever enough to extract reliably the meaning from text you have photographed.So I made sure that the 160-character advice was in the text, as well as in the picture.
Update and keep going
Lots of people start a blog, and then get discouraged because it's not successful straight away.
This is a mistake: "domain age", AKA how long you have had the website address for, is one of the factors that search-engines take account of. Even if you don't get many visitors in the first year, the fact that your blog has been going for a year and you are still posting to it makes it attractive to Google.
So Google's final piece of advice is to keep going, and to publish new posts on your blog on an on-going basis.
A final word from me
Google's advice is a good starting point. The bottom of their cheat-sheet links to various other good sources too:- Google SEO Getting Started guide (a much longer and more detailed version of the cheatsheet)
- Webmaster Academy (a series of instructional videos)
- Webmaster Tools - an online utility that you can use to measure and diagnose SEO issues with your site.
These resources are all good - but they aren't targeted to Blogger users, so sometimes they recommend changes to things we cannot change (eg URL-structrue), or they simply explain things in non-Blogger ways.
There are about a zillion websites offering SEO advice too - just google and you will find them.
In particular, you may see lots of SEO advice about keyword research etc - but my advice is to ignore this for a very long time in your blogging: focus on writing content that your blog-visitors will want to read, describe it in interesting ways, and the keywords will look after themselves.
Related Articles:
Telling Google, and visually impaired people, about your pictures
Using Blogger to make a real website
Editing a blog-post that you have already published
How to put a picture into a blog-post
Introduction to Picasa and Picasa-web-albums
Subscribe to:
Comments (Atom)