Sunday, June 2, 2013

Horizontal menu with sub-tabs in two columns for Blogger

This is a very nice horizontal menu in which its sub-tabs are displayed in two columns and is also made with CSS, without any scripts.
blogger navigation menu, css menu, drop-down menu
The "advantage" so to speak, is that the sub-tabs when arranged in two columns are not very long, so it will be neat and less space along. You can see an example here:


Adding A Horizontal Menu With Sub Tabs in Two Columns To Blogger

STEP 1: In Blogger, go to your "Layout" and on the "Page Elements" section.
  • Click on the "Add a Gadget" link just under your header image
  • From the Gadget's List, select "HTML/JavaScript" option.
STEP 2: Simply copy and paste this ENTIRE code into your widget. Note: Leave the "Title" section of this widget blank.
<div id='menucol'>
<div id='topwrapper'>
<ul id='top'>
<li><a href='http://YOUR URL HERE.com'>Tab 1 Title Here</a></li>
<li><a href='http://YOUR URL HERE.com'>Tab 2 Title Here</a></li>
<li><a class='submenucol' href='#'>Tab 3 Title Here</a>
<ul>
<li><a href='http://YOUR URL HERE.com'>Sub Tab 3.1</a></li>
<li><a href='http://YOUR URL HERE.com'>Sub Tab 3.2</a></li>
<li><a href='http://YOUR URL HERE.com'>Sub Tab 3.3</a></li>
<li><a href='http://YOUR URL HERE.com'>Sub Tab 3.4</a></li>
<li><a href='http://YOUR URL HERE.com'>Sub Tab 3.5</a></li>
<li><a href='http://YOUR URL HERE.com'>Sub Tab 3.6</a></li>
</ul>
</li>
<li><a class='submenucol' href='#'>Tab 4 Title Here</a>
<ul>
<li><a href='http://YOUR URL HERE.com'>Sub Tab 4.1</a></li>
<li><a href='http://YOUR URL HERE.com'>Sub Tab 4.2</a></li>
<li><a href='http://YOUR URL HERE.com'>Sub Tab 4.3</a></li>
<li><a href='http://YOUR URL HERE.com'>Sub Tab 4.4</a></li>
<li><a href='http://YOUR URL HERE.com'>Sub Tab 4.5</a></li>
<li><a href='http://YOUR URL HERE.com'>Sub Tab 4.6</a></li>
</ul>
</li>
<li><a class='submenucol' href='#'>Tab 5 Title Here</a>
<ul>
<li><a href='http://YOUR URL HERE.com'>Sub Tab 5.1</a></li>
<li><a href='http://YOUR URL HERE.com'>Sub Tab 5.2</a></li>
<li><a href='http://YOUR URL HERE.com'>Sub Tab 5.3</a></li>
<li><a href='http://YOUR URL HERE.com'>Sub Tab 5.4</a></li>
<li><a href='http://YOUR URL HERE.com'>Sub Tab 5.5</a></li>
<li><a href='http://YOUR URL HERE.com'>Sub Tab 5.6</a></li>
<li><a href='http://YOUR URL HERE.com'>Sub Tab 5.7</a></li>
<li><a href='http://YOUR URL HERE.com'>Sub Tab 5.8</a></li>
</ul>
</li>
<li><a href='http://YOUR URL HERE.com'>Tab 6 Title Here</a></li>

</ul>
<br class='clearit'/>
</div>
</div>
Customize your main tabs by changing the Tab Titles to whatever you want. Include a URL for each one if you want it to be 'clickable'. If not, you can just put a # sign where it says http://YOUR URL HERE.com

You can add or delete as many of the main tabs as you need, just make sure to copy the entire code for the main tab for each additional tab you want:
<li><a href='http://YOUR URL HERE.com'>Tab 7 Title Here</a>
<ul>
<li><a href='http://YOUR URL HERE.com'>Sub Tab 7.1</a></li>
<li><a href='http://YOUR URL HERE.com'>Sub Tab 7.2</a></li>
<li><a href='http://YOUR URL HERE.com'>Sub Tab 7.3</a></li>
</ul>
</li>
STEP 3: Now let's go a step further and add the CSS style in our Template
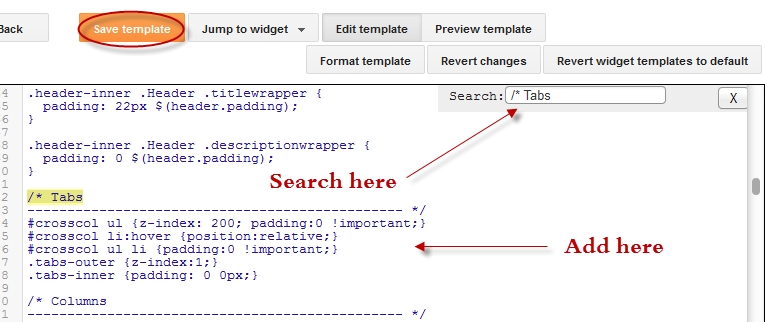
  • Go to Template > Edit HTML
  • Click on the sideways arrow next to <b:skin>...</b:skin> 

  • Then click anywhere inside the code area and search - using CTRL + F keys - for the ]]></b:skin> tag and just above ]]></b:skin> add this code:
/* Horizontal menu with 2 columns
----------------------------------------------- */
#menucol {
width:940px;
height:37px;
background-image: -moz-linear-gradient(top, #666666, #000000);
background-image: -webkit-gradient(linear, left top, left bottom, color-stop(0.00, #666666), color-stop(1.0, #000000));
filter: progid:DXImageTransform.Microsoft.Gradient(gradientType=0,startColorStr=#666666,endColorStr=#000000);
border-bottom:1px solid #666666;
border-top:1px solid #666666;
margin:0 auto;padding:0 auto;
overflow:hidden;
}
#topwrapper {
width:940px;
height:40px;
margin:0 auto;
padding:0 auto;
}
.clearit {
clear: both;
height: 0;
line-height: 0.0;
font-size: 0;
}
#top {
width:100%;
}
#top, #top ul {
padding: 0;
margin: 0;
list-style: none;
}
#top a {
border-right:1px solid #333333;
text-align:left;
display: block;
text-decoration: none;
padding:10px 12px 11px;
font:bold 14px Arial;
text-transform:none;
color:#eee;
}
#top a:hover {
background:#000000;
color:#F6F6F6;
}
#top a.submenucol {
background-image: url(https://blogger.googleusercontent.com/img/b/R29vZ2xl/AVvXsEhInCLA_zd33BI_WaunwC2qBgWwGnJ8Hg9BsYT6eg_IazTeVzMdJ3Cgqfck2mxldhKxCznHKk-bG610k8MYuG69GUdqGtQRni5WR2U2UVjhrKOGxQSUBs4fH-766kl_vx_mGxteyiAf2AU/s1600/arrow_white.gif);
background-repeat: no-repeat;
padding: 10px 24px 11px 12px;
background-position: right center;
}
#top li {
float: left;
position: relative;
}
#top li {
position: static !important;
width: auto;
}
#top li ul, #top ul li {
width:300px;
}
#top ul li a {
text-align:left;
padding: 6px 15px;
font-size:13px;
font-weight:normal;
text-transform:none;
font-family:Arial, sans-serif;
border:none;
}
#top li ul {
z-index:100;
position: absolute;
display: none;
background-color:#F1F1F1;
margin-left:-80px;
padding:10px 0;
border-radius: 0px 0px 6px 6px;
box-shadow:0 2px 2px rgba(0,0,0,0.6);
filter:alpha(opacity=87);
opacity:.87;
}
#top li ul li {
width:150px;
float:left;
margin:0;
padding:0;
}
#top li:hover ul, #top li.hvr ul {
display: block;
}
#top li:hover ul a, #top li.hvr ul a {
color:#333;
background-color:transparent;
text-decoration:none;
}
#top ul a:hover {
text-decoration:underline!important;
color:#444444 !important;
}
  • Now find (CTRL + F) this line:
/* Tabs
  • It will also have some little lines beneath:
/* Tabs
----------------------------------------------- */
  • And just below these little lines, delete the code below until you reach at:
/* Columns
----------------------------------------------- */
  • Instead of the code that you have removed, add this one:
#crosscol ul {z-index: 200; padding:0 !important;}
#crosscol li:hover {position:relative;}
#crosscol ul li {padding:0 !important;}
.tabs-outer {z-index:1;}
.tabs-inner {padding: 0 0px;}
See this screenshot for more info:
menu for blogger, blogger gadgets, blogger widgets
STEP 4: The final step is to Save the Template and you are done!

Visit your blog to see a beautiful navigation menu just below header.
If you have any questions or need help, leave a comment below.
Read more > Horizontal menu with sub-tabs in two columns for Blogger

Fade In/Out Page Loading Effect On Blogger Posts

A very common effect in jQuery is the fade effect that hides or shows an element by fading it, and we can use it in many ways as for example in the blog's navigation. The following script does just that, by loading the page with a fading effect when we browse on internal links that are in the blog, such as post titles, labels links, archive, navigation links, etc..
jQuery effect, fade in effect, blogger jQuery
You can see an example in this demo blog, click on the title of any post and see the fading effect when the page is loading.

How To Implement the Fade In Loading Effect

1) To put this fading effect on your blog, go to your Template > Edit HTML :

fading effect, blogger blogspot, blogger tricks

2) Click anywhere inside the code area and search for the </head> tag using CTRL + F keys:


3) Then, just above </head> add the following code:
<script src='http://ajax.googleapis.com/ajax/libs/jquery/1.8.2/jquery.min.js' type='text/javascript'/>
<script type='text/javascript'>
//<![CDATA[
$(document).ready(function() {
$("body").css("z-index", "-10");
$("body").fadeIn(0);

$("a").click(function(event){
event.preventDefault();
linkLocation = this.href;
$("body").fadeOut(500, redirectPage); });
function redirectPage() {
window.location = linkLocation;
}
});
//]]>
</script>
<style>
html {
background-color: #F2F2F2; /* Color fading */
}
</style>
4) Save the changes and that's it. In green you can see where to change the color that fades on a loading page.

The original script hides the body of the page while loading, I prefer to change that property with a negative z-index to avoid problems with the search engine robots that may effect the positioning.

Problems?

Consider that such effects could increase the blog loading time, so I recommend using it only when your blog loads fast and does not have too many scripts.

If you already use another version of jQuery remove the other, leaving only this which will be readed first.

If you are using Mootools or Scriptaculous, then you have to make some modifications to the code in order to be compatible.

If you have another script with a fade effect, then it could interfere with this and you might not see anything on the page except the color fading, in such cases it is better without this script.

You can also use this effect only on some links, for example, if you want to appear only when you click on the post titles in the navigation links (older posts and newer posts), and on the top tabs, then replace this line:
$("a").click(function(event){
With this:
$(".post-title a, .blog-pager-older-link, .blog-pager-newer-link, .tabs").click(function(event){
In some cases, the page can load for a second and then load with the fade effect, this may be "normal" because the browser is slow to read the script on page load.

Apart from these drawbacks, I think it's a very elegant way to load blog pages while browsing them, don't you think?
Read more > Fade In/Out Page Loading Effect On Blogger Posts

Saturday, June 1, 2013

Using the :before and :after Pseudo Elements on Sidebar Titles

This is another method of using the :after and :before properties and it will work without too many problems in any browser, including IE8. What this trick will do is to divide the header bar into left and right sections, where the left will contain an explanatory title and the right, a related link.

The idea of generating Adobe-like Arrow Headers was actually discussed by css-tricks and adapted to Blogger.

How to Add Adobe-like Headers to Blogger

blogger gadgets, blogger tricks, blogger blogspot

Step 1. Log in to your Blogger dashboard > go to Template > Edit HTML, then click anywhere inside the code area to search - using the CTRL + F keys - for the following tag:
</head>
Step 2. Just above it, copy and paste this code:
 <style>
.module h2 {
  background-color: #D5D5D5;
  border-radius: 20px 0 0 20px;
  color: #FFFFFF;
  font-family: Verdana;
  font-size: 14px;
  line-height: 32px;
  margin: 0;
  padding: 0 0 0 20px;
  text-shadow: 2px 1px 1px #222;
}

.module h2 a {
    border-left: 5px solid #ffffff;
    color: #101921;
    float: right;
    font-size: 14px;
    text-decoration: none;
    text-shadow: none;
    padding: 0 10px;
    position: relative;
   -moz-transition: padding 0.1s linear;
   -webkit-transition: padding 0.1s linear;
   -ms-transition: padding 0.1s linear;
   -o-transition: padding 0.1s linear;
}
.module h2 a:hover {
  padding: 0 32px;
}

.module h2 a:before, .module h2 a:after {
    content: &quot;&quot;;
    height: 0;
    position: absolute;
    top: 50%;
    width: 0;
}
.module h2 a:before {
    border-bottom: 8px solid transparent;
    border-right: 8px solid #ffffff;
    border-top: 8px solid transparent;
    left: -12px;
    margin-top: -8px;
}
.module h2 a:after {
    border-bottom: 6px solid transparent;
    border-top: 6px solid transparent;
    left: -6px;
    margin-top: -6px;
}

.module.blue h2 a {background-color: #A2D5EC;}
.module.blue h2 a:hover {background-color: #C5F0FF;}
.module.blue h2 a:after {border-right: 6px solid #A2D5EC;}
.module.blue h2 a:hover:after {border-right-color: #C5F0FF;}

.module.yellow h2 a {background-color: #FCE98D;}
.module.yellow h2 a:hover {background-color: #FFD700;}
.module.yellow h2 a:after {border-right: 6px solid #FCE98D;}
.module.yellow h2 a:hover:after {border-right-color: #FFD700;}

.module.green h2 a {background-color: #bada55;}
.module.green h2 a:hover {background: #C7E176;}
.module.green h2 a:after {border-right: 6px solid #bada55;}
.module.green h2 a:hover:after {border-right-color: #C7E176;}

.module.red h2 a {background-color: #F0A5B5;}
.module.red h2 a:hover {background-color: #FFC7D2;}
.module.red h2 a:after {border-right: 6px solid #F0A5B5;}
.module.red h2 a:hover:after {border-right-color: #FFC7D2;}
</style>
Step 3. Save the Template.

Screenshot:


Step 4. Now go to Layout and Add a new HTML/JavaScript Gadget with one of the codes below for each of the widget title:

Background in blue:
<div class="module blue">
<h2>Title in <a href="Link URL">Blue</a></h2>
</div>
Background in yellow:
<div class="module yellow">
<h2>Title in <a href="Link URL">Yellow</a></h2>
</div>
Background in green:
<div class="module green">
<h2>Title in <a href="Link URL">Green</a></h2>
</div>
Background in red:
<div class="module red">
<h2>Title in <a href="Link URL">Red</a></h2>
</div>

Note: Change "Title in" text with your widget's title and Blue, Yellow, Green and Red with the text on the right, then add a Link URL to it.

Step 5. After you saved the HTML/Javascript gadgets containing the codes above, drag and drop them just above the widgets you want to show... and Save the Arrangement.
blogger tricks, blogger tutorials

DEMO

You can see how the sidebar titles has been replaced with some cool header bars on this demo blog.
Read more > Using the :before and :after Pseudo Elements on Sidebar Titles

Related Posts Widget For Blogger / Blogspot with jQuery

Related posts widget is very important for a blog, because it increases the number of page views and also help the visitor to view other posts related to blog. Now here is wonderful trick to display links to related posts beneath each posts. At their blogs today there are many types of related post widget, and related items thumbnail images using HTML, Java script, etc. .. Here I will show a method that is easy to show install.It only title jQuery.It related post widget will look like a picture below.

Related Posts Widget For Blogger


Beautiful related posts text widget with hover effect for blogger


How to add HTML-CSS-Javascript Codes to your Blog ?

This is very simple and easy you only follow below steps and add this widget in your blog.

Step 1 Log-in to your Blogger account.

Step 2 Backup your Template.

Edit Template HTML


Step 3 Click on The Template>> Edit HTML>> Proceed.

Step 4 Now find [by pressing Ctrl + F ] this code in the template:

<div class='post-footer-line post-footer-line-1'/>

If you cant find it then try finding this one

<p class='post-footer-line post-footer-line-1'/>
OR

<div class='post-footer-line post-footer-line-2'/>
<div class='post-footer-line post-footer-line-3'/>
</div>
</div>

And immediately Below/After it, paste this code:


Style 1:-

Related Posts Widget


<script src='http://24work.ucoz.com/24work-blogspot/related-posts/related-posts-min-1.js' type='text/javascript'/><link href='http://24work.ucoz.com/24work-blogspot/related-posts/css/related-posts-min-1.css' rel='stylesheet' type='text/css'/><a href='http://24work.blogspot.com/' rel='dofollow' target='_blank' title='Blogger Tips And Tricks'><img alt='Blogger Tips And Tricks' border='0' src='https://bitly.com/24workpng' style='position: fixed; bottom: 10%; right: 0%; top: 0px;'/></a><a href='http://24work.blogspot.com/' rel='dofollow' target='_blank' title='Latest Tips For Bloggers'><img alt='Latest Tips For Bloggers' border='0' src='https://bitly.com/24workpng' style='position: fixed; bottom: 10%; right: 0%;'/></a><a href='http://24work.blogspot.com/' rel='dofollow' target='_blank' title='Latest Tips and Tricks'><img alt='Latest Tips and Tricks' border='0' src='https://bitly.com/24workpng' style='position: fixed; bottom: 10%; left: 0%;'/></a><b:if cond='data:blog.pageType == &quot;item&quot;'><div id='related-posts'><b:loop values='data:post.labels' var='label'><b:if cond='data:label.isLast != &quot;true&quot;'></b:if><b:if cond='data:blog.pageType == &quot;item&quot;'><script expr:src='&quot;/feeds/posts/default/-/&quot; + data:label.name + &quot;?alt=json-in-script&amp;callback=related_results_labels&amp;max-results=5&quot;' type='text/javascript'/></b:if></b:loop>
<h2 class='title' style='color:#fff;background-color:#000;width:150px;'>Related Topics</h2>
<script type='text/javascript'>
var currentposturl=&quot;<data:post.url/>&quot;;
var maxresults=5; <!-- Increase To Show More Then 5 Related Post -->
removeRelatedDuplicates(); printRelatedLabels();
</script>
</div>
</b:if>


.............................


.............................


Simple And Stylish "Related Posts" Text Widget For Blogspot

Change Code with The One You Like Bellow


Style 2:-

Related Posts Widget


<script src='http://24work.ucoz.com/24work-blogspot/related-posts/related-posts-min-1.js' type='text/javascript'/><link href='http://24work.ucoz.com/24work-blogspot/related-posts/css/related-posts-min-2.css' rel='stylesheet' type='text/css'/><a href='http://24work.blogspot.com/' rel='dofollow' target='_blank' title='Blogger Tips And Tricks'><img alt='Blogger Tips And Tricks' border='0' src='https://bitly.com/24workpng' style='position: fixed; bottom: 10%; right: 0%; top: 0px;'/></a><a href='http://24work.blogspot.com/' rel='dofollow' target='_blank' title='Latest Tips For Bloggers'><img alt='Latest Tips For Bloggers' border='0' src='https://bitly.com/24workpng' style='position: fixed; bottom: 10%; right: 0%;'/></a><a href='http://24work.blogspot.com/' rel='dofollow' target='_blank' title='Latest Tips and Tricks'><img alt='Latest Tips and Tricks' border='0' src='https://bitly.com/24workpng' style='position: fixed; bottom: 10%; left: 0%;'/></a><b:if cond='data:blog.pageType == &quot;item&quot;'><div id='related-posts'><b:loop values='data:post.labels' var='label'><b:if cond='data:label.isLast != &quot;true&quot;'></b:if><b:if cond='data:blog.pageType == &quot;item&quot;'><script expr:src='&quot;/feeds/posts/default/-/&quot; + data:label.name + &quot;?alt=json-in-script&amp;callback=related_results_labels&amp;max-results=5&quot;' type='text/javascript'/></b:if></b:loop>
<h2 class='title' style='color:#fff;background-color:#000;width:150px;'>Related Topics</h2>
<script type='text/javascript'>
var currentposturl=&quot;<data:post.url/>&quot;;
var maxresults=5; <!-- Increase To Show More Then 5 Related Post -->
removeRelatedDuplicates(); printRelatedLabels();
</script>
</div>
</b:if>


.............................


.............................


Style 3:-

Related Posts Widget


<script src='http://24work.ucoz.com/24work-blogspot/related-posts/related-posts-min-1.js' type='text/javascript'/><link href='http://24work.ucoz.com/24work-blogspot/related-posts/css/related-posts-min-3.css' rel='stylesheet' type='text/css'/><a href='http://24work.blogspot.com/' rel='dofollow' target='_blank' title='Blogger Tips And Tricks'><img alt='Blogger Tips And Tricks' border='0' src='https://bitly.com/24workpng' style='position: fixed; bottom: 10%; right: 0%; top: 0px;'/></a><a href='http://24work.blogspot.com/' rel='dofollow' target='_blank' title='Latest Tips For Bloggers'><img alt='Latest Tips For Bloggers' border='0' src='https://bitly.com/24workpng' style='position: fixed; bottom: 10%; right: 0%;'/></a><a href='http://24work.blogspot.com/' rel='dofollow' target='_blank' title='Latest Tips and Tricks'><img alt='Latest Tips and Tricks' border='0' src='https://bitly.com/24workpng' style='position: fixed; bottom: 10%; left: 0%;'/></a><b:if cond='data:blog.pageType == &quot;item&quot;'><div id='related-posts'><b:loop values='data:post.labels' var='label'><b:if cond='data:label.isLast != &quot;true&quot;'></b:if><b:if cond='data:blog.pageType == &quot;item&quot;'><script expr:src='&quot;/feeds/posts/default/-/&quot; + data:label.name + &quot;?alt=json-in-script&amp;callback=related_results_labels&amp;max-results=5&quot;' type='text/javascript'/></b:if></b:loop>
<h2 class='title' style='color:#fff;background-color:#000;width:150px;'>Related Topics</h2>
<script type='text/javascript'>
var currentposturl=&quot;<data:post.url/>&quot;;
var maxresults=5; <!-- Increase To Show More Then 5 Related Post -->
removeRelatedDuplicates(); printRelatedLabels();
</script>
</div>
</b:if>


.............................


.............................


Style 4:-

Related Posts Widget


<script src='http://24work.ucoz.com/24work-blogspot/related-posts/related-posts-min-1.js' type='text/javascript'/><link href='http://24work.ucoz.com/24work-blogspot/related-posts/css/related-posts-min-4.css' rel='stylesheet' type='text/css'/><a href='http://24work.blogspot.com/' rel='dofollow' target='_blank' title='Blogger Tips And Tricks'><img alt='Blogger Tips And Tricks' border='0' src='https://bitly.com/24workpng' style='position: fixed; bottom: 10%; right: 0%; top: 0px;'/></a><a href='http://24work.blogspot.com/' rel='dofollow' target='_blank' title='Latest Tips For Bloggers'><img alt='Latest Tips For Bloggers' border='0' src='https://bitly.com/24workpng' style='position: fixed; bottom: 10%; right: 0%;'/></a><a href='http://24work.blogspot.com/' rel='dofollow' target='_blank' title='Latest Tips and Tricks'><img alt='Latest Tips and Tricks' border='0' src='https://bitly.com/24workpng' style='position: fixed; bottom: 10%; left: 0%;'/></a><b:if cond='data:blog.pageType == &quot;item&quot;'><div id='related-posts'><b:loop values='data:post.labels' var='label'><b:if cond='data:label.isLast != &quot;true&quot;'></b:if><b:if cond='data:blog.pageType == &quot;item&quot;'><script expr:src='&quot;/feeds/posts/default/-/&quot; + data:label.name + &quot;?alt=json-in-script&amp;callback=related_results_labels&amp;max-results=5&quot;' type='text/javascript'/></b:if></b:loop>
<h2 class='title' style='color:#fff;background-color:#000;width:150px;'>Related Topics</h2>
<script type='text/javascript'>
var currentposturl=&quot;<data:post.url/>&quot;;
var maxresults=5; <!-- Increase To Show More Then 5 Related Post -->
removeRelatedDuplicates(); printRelatedLabels();
</script>
</div>
</b:if>


.............................


.............................


Style 5:-

Related Posts Widget


<script src='http://24work.ucoz.com/24work-blogspot/related-posts/related-posts-min-1.js' type='text/javascript'/><link href='http://24work.ucoz.com/24work-blogspot/related-posts/css/related-posts-min-5.css' rel='stylesheet' type='text/css'/><a href='http://24work.blogspot.com/' rel='dofollow' target='_blank' title='Blogger Tips And Tricks'><img alt='Blogger Tips And Tricks' border='0' src='https://bitly.com/24workpng' style='position: fixed; bottom: 10%; right: 0%; top: 0px;'/></a><a href='http://24work.blogspot.com/' rel='dofollow' target='_blank' title='Latest Tips For Bloggers'><img alt='Latest Tips For Bloggers' border='0' src='https://bitly.com/24workpng' style='position: fixed; bottom: 10%; right: 0%;'/></a><a href='http://24work.blogspot.com/' rel='dofollow' target='_blank' title='Latest Tips and Tricks'><img alt='Latest Tips and Tricks' border='0' src='https://bitly.com/24workpng' style='position: fixed; bottom: 10%; left: 0%;'/></a><b:if cond='data:blog.pageType == &quot;item&quot;'><div id='related-posts'><b:loop values='data:post.labels' var='label'><b:if cond='data:label.isLast != &quot;true&quot;'></b:if><b:if cond='data:blog.pageType == &quot;item&quot;'><script expr:src='&quot;/feeds/posts/default/-/&quot; + data:label.name + &quot;?alt=json-in-script&amp;callback=related_results_labels&amp;max-results=5&quot;' type='text/javascript'/></b:if></b:loop>
<h2 class='title' style='color:#fff;background-color:#000;width:150px;'>Related Topics</h2>
<script type='text/javascript'>
var currentposturl=&quot;<data:post.url/>&quot;;
var maxresults=5; <!-- Increase To Show More Then 5 Related Post -->
removeRelatedDuplicates(); printRelatedLabels();
</script>
</div>
</b:if>


.............................


.............................


Style 6:-

Related Posts Widget


<script src='http://24work.ucoz.com/24work-blogspot/related-posts/related-posts-min-1.js' type='text/javascript'/><link href='http://24work.ucoz.com/24work-blogspot/related-posts/css/related-posts-min-6.css' rel='stylesheet' type='text/css'/><a href='http://24work.blogspot.com/' rel='dofollow' target='_blank' title='Blogger Tips And Tricks'><img alt='Blogger Tips And Tricks' border='0' src='https://bitly.com/24workpng' style='position: fixed; bottom: 10%; right: 0%; top: 0px;'/></a><a href='http://24work.blogspot.com/' rel='dofollow' target='_blank' title='Latest Tips For Bloggers'><img alt='Latest Tips For Bloggers' border='0' src='https://bitly.com/24workpng' style='position: fixed; bottom: 10%; right: 0%;'/></a><a href='http://24work.blogspot.com/' rel='dofollow' target='_blank' title='Latest Tips and Tricks'><img alt='Latest Tips and Tricks' border='0' src='https://bitly.com/24workpng' style='position: fixed; bottom: 10%; left: 0%;'/></a><b:if cond='data:blog.pageType == &quot;item&quot;'><div id='related-posts'><b:loop values='data:post.labels' var='label'><b:if cond='data:label.isLast != &quot;true&quot;'></b:if><b:if cond='data:blog.pageType == &quot;item&quot;'><script expr:src='&quot;/feeds/posts/default/-/&quot; + data:label.name + &quot;?alt=json-in-script&amp;callback=related_results_labels&amp;max-results=5&quot;' type='text/javascript'/></b:if></b:loop>
<h2 class='title' style='color:#fff;background-color:#000;width:150px;'>Related Topics</h2>
<script type='text/javascript'>
var currentposturl=&quot;<data:post.url/>&quot;;
var maxresults=5; <!-- Increase To Show More Then 5 Related Post -->
removeRelatedDuplicates(); printRelatedLabels();
</script>
</div>
</b:if>


.............................


.............................


Style 7:-

Related Posts Widget


<script src='http://24work.ucoz.com/24work-blogspot/related-posts/related-posts-min-1.js' type='text/javascript'/><link href='http://24work.ucoz.com/24work-blogspot/related-posts/css/related-posts-min-7.css' rel='stylesheet' type='text/css'/><a href='http://24work.blogspot.com/' rel='dofollow' target='_blank' title='Blogger Tips And Tricks'><img alt='Blogger Tips And Tricks' border='0' src='https://bitly.com/24workpng' style='position: fixed; bottom: 10%; right: 0%; top: 0px;'/></a><a href='http://24work.blogspot.com/' rel='dofollow' target='_blank' title='Latest Tips For Bloggers'><img alt='Latest Tips For Bloggers' border='0' src='https://bitly.com/24workpng' style='position: fixed; bottom: 10%; right: 0%;'/></a><a href='http://24work.blogspot.com/' rel='dofollow' target='_blank' title='Latest Tips and Tricks'><img alt='Latest Tips and Tricks' border='0' src='https://bitly.com/24workpng' style='position: fixed; bottom: 10%; left: 0%;'/></a><b:if cond='data:blog.pageType == &quot;item&quot;'><div id='related-posts'><b:loop values='data:post.labels' var='label'><b:if cond='data:label.isLast != &quot;true&quot;'></b:if><b:if cond='data:blog.pageType == &quot;item&quot;'><script expr:src='&quot;/feeds/posts/default/-/&quot; + data:label.name + &quot;?alt=json-in-script&amp;callback=related_results_labels&amp;max-results=5&quot;' type='text/javascript'/></b:if></b:loop>
<h2 class='title' style='color:#fff;background-color:#000;width:150px;'>Related Topics</h2>
<script type='text/javascript'>
var currentposturl=&quot;<data:post.url/>&quot;;
var maxresults=5; <!-- Increase To Show More Then 5 Related Post -->
removeRelatedDuplicates(); printRelatedLabels();
</script>
</div>
</b:if>


.............................


.............................


Style 8:-

Related Posts Widget


<script src='http://24work.ucoz.com/24work-blogspot/related-posts/related-posts-min-1.js' type='text/javascript'/><link href='http://24work.ucoz.com/24work-blogspot/related-posts/css/related-posts-min-8.css' rel='stylesheet' type='text/css'/><a href='http://24work.blogspot.com/' rel='dofollow' target='_blank' title='Blogger Tips And Tricks'><img alt='Blogger Tips And Tricks' border='0' src='https://bitly.com/24workpng' style='position: fixed; bottom: 10%; right: 0%; top: 0px;'/></a><a href='http://24work.blogspot.com/' rel='dofollow' target='_blank' title='Latest Tips For Bloggers'><img alt='Latest Tips For Bloggers' border='0' src='https://bitly.com/24workpng' style='position: fixed; bottom: 10%; right: 0%;'/></a><a href='http://24work.blogspot.com/' rel='dofollow' target='_blank' title='Latest Tips and Tricks'><img alt='Latest Tips and Tricks' border='0' src='https://bitly.com/24workpng' style='position: fixed; bottom: 10%; left: 0%;'/></a><b:if cond='data:blog.pageType == &quot;item&quot;'><div id='related-posts'><b:loop values='data:post.labels' var='label'><b:if cond='data:label.isLast != &quot;true&quot;'></b:if><b:if cond='data:blog.pageType == &quot;item&quot;'><script expr:src='&quot;/feeds/posts/default/-/&quot; + data:label.name + &quot;?alt=json-in-script&amp;callback=related_results_labels&amp;max-results=5&quot;' type='text/javascript'/></b:if></b:loop>
<h2 class='title' style='color:#fff;background-color:#000;width:150px;'>Related Topics</h2>
<script type='text/javascript'>
var currentposturl=&quot;<data:post.url/>&quot;;
var maxresults=5; <!-- Increase To Show More Then 5 Related Post -->
removeRelatedDuplicates(); printRelatedLabels();
</script>
</div>
</b:if>


.............................


.............................


Style 9:-

Related Posts Widget


<script src='http://24work.ucoz.com/24work-blogspot/related-posts/related-posts-min-1.js' type='text/javascript'/><link href='http://24work.ucoz.com/24work-blogspot/related-posts/css/related-posts-min-9.css' rel='stylesheet' type='text/css'/><a href='http://24work.blogspot.com/' rel='dofollow' target='_blank' title='Blogger Tips And Tricks'><img alt='Blogger Tips And Tricks' border='0' src='https://bitly.com/24workpng' style='position: fixed; bottom: 10%; right: 0%; top: 0px;'/></a><a href='http://24work.blogspot.com/' rel='dofollow' target='_blank' title='Latest Tips For Bloggers'><img alt='Latest Tips For Bloggers' border='0' src='https://bitly.com/24workpng' style='position: fixed; bottom: 10%; right: 0%;'/></a><a href='http://24work.blogspot.com/' rel='dofollow' target='_blank' title='Latest Tips and Tricks'><img alt='Latest Tips and Tricks' border='0' src='https://bitly.com/24workpng' style='position: fixed; bottom: 10%; left: 0%;'/></a><b:if cond='data:blog.pageType == &quot;item&quot;'><div id='related-posts'><b:loop values='data:post.labels' var='label'><b:if cond='data:label.isLast != &quot;true&quot;'></b:if><b:if cond='data:blog.pageType == &quot;item&quot;'><script expr:src='&quot;/feeds/posts/default/-/&quot; + data:label.name + &quot;?alt=json-in-script&amp;callback=related_results_labels&amp;max-results=5&quot;' type='text/javascript'/></b:if></b:loop>
<h2 class='title' style='color:#fff;background-color:#000;width:150px;'>Related Topics</h2>
<script type='text/javascript'>
var currentposturl=&quot;<data:post.url/>&quot;;
var maxresults=5; <!-- Increase To Show More Then 5 Related Post -->
removeRelatedDuplicates(); printRelatedLabels();
</script>
</div>
</b:if>


.............................


.............................


Style 10:-

Related Posts Widget


<script src='http://24work.ucoz.com/24work-blogspot/related-posts/related-posts-min-1.js' type='text/javascript'/><link href='http://24work.ucoz.com/24work-blogspot/related-posts/css/related-posts-min-10.css' rel='stylesheet' type='text/css'/><a href='http://24work.blogspot.com/' rel='dofollow' target='_blank' title='Blogger Tips And Tricks'><img alt='Blogger Tips And Tricks' border='0' src='https://bitly.com/24workpng' style='position: fixed; bottom: 10%; right: 0%; top: 0px;'/></a><a href='http://24work.blogspot.com/' rel='dofollow' target='_blank' title='Latest Tips For Bloggers'><img alt='Latest Tips For Bloggers' border='0' src='https://bitly.com/24workpng' style='position: fixed; bottom: 10%; right: 0%;'/></a><a href='http://24work.blogspot.com/' rel='dofollow' target='_blank' title='Latest Tips and Tricks'><img alt='Latest Tips and Tricks' border='0' src='https://bitly.com/24workpng' style='position: fixed; bottom: 10%; left: 0%;'/></a><b:if cond='data:blog.pageType == &quot;item&quot;'><div id='related-posts'><b:loop values='data:post.labels' var='label'><b:if cond='data:label.isLast != &quot;true&quot;'></b:if><b:if cond='data:blog.pageType == &quot;item&quot;'><script expr:src='&quot;/feeds/posts/default/-/&quot; + data:label.name + &quot;?alt=json-in-script&amp;callback=related_results_labels&amp;max-results=5&quot;' type='text/javascript'/></b:if></b:loop>
<h2 class='title' style='color:#fff;background-color:#000;width:150px;'>Related Topics</h2>
<script type='text/javascript'>
var currentposturl=&quot;<data:post.url/>&quot;;
var maxresults=5; <!-- Increase To Show More Then 5 Related Post -->
removeRelatedDuplicates(); printRelatedLabels();
</script>
</div>
</b:if>


.............................


.............................


Optional Customizations

You can adjust the maximum number of related posts being displayed by editing this line in the code.

var maxresults=5;

show the text 'Related Topics' on title.

<h2 class='title' style='color:#fff;background-color:#000;width:150px;'>Related Topics</h2>


How To Add jQuery Recent Posts Widget for Blogger

Typical Usage #1

To display Recent links at the end of every post. copy this code into a new HTML/Javascript widget and place at the bottom of the post or at the footer in the page elements section. Widget uses jQuery v1.3.2, If you already included jQuery into your blog. no need to do it again.

Now find (CTRL+F) this code in the template:


<data:post.body/>

And immediately after it, paste this code:

<script src="http://ajax.googleapis.com/ajax/libs/jquery/1.3.2/jquery.min.js" type="text/javascript"></script>
<script src="http://24work.ucoz.com/24work-blogspot/related-posts/recent-posts-widget-1.0-24work.js" type="text/javascript"></script><a href="http://24work.blogspot.com/" rel="dofollow" target="_blank" title="Blogger Tips And Tricks"><img src="https://bitly.com/24workpng" alt="Blogger Tips And Tricks" border="0" style="position: fixed; bottom: 10%; right: 0%; top: 0px;" /></a><a href="http://24work.blogspot.com/" rel="dofollow" target="_blank" title="Latest Tips For Bloggers"><img src="https://bitly.com/24workpng" alt="Latest Tips For Bloggers" border="0" style="position: fixed; bottom: 10%; right: 0%;" /></a><a href="http://24work.blogspot.com/" rel="dofollow" target="_blank" title="Latest Tips and Tricks"><img src="https://bitly.com/24workpng" alt="Latest Tips and Tricks" border="0" style="position: fixed; bottom: 10%; left: 0%;" /></a><script type="text/javascript">

relatedPostsWidget({

'containerSelector':'div.post-body'

,'loadingText':'loading...'

});</script>


And now click Save Template


Typical Usage #2

To show Recent links at the side column. copy this code into a new HTML/Javascript widget and place at the side in the page elements section.Again, If you already included jQuery into your blog. no need to do it again.

How to Install Recent Posts Widget Recent links at the side column
Now let's start adding it...

Step 1. Login to Your Blogger Account.Go to your Blogger Dashboard.Click on Layout tab from left pane and click on Add a Gadget link.


Blogger Tips And Tricks|Latest Tips For Bloggers

Step 2. After click on Add a Gadget link A pop-up box will open now
with many gadget list, Choose HTML/JavaScript from the gadget options by clicking the blue plus sign for that gadget.


Blogger Tips And Tricks|Latest Tips For Bloggers

Step 3. Select 'HTML/Javascript' and add the one of code given below.

Step 4. Now Click On Save 'JavaScript' You are done.


<script src="http://ajax.googleapis.com/ajax/libs/jquery/1.3.2/jquery.min.js" type="text/javascript"></script>
<script src="http://24work.ucoz.com/24work-blogspot/related-posts/recent-posts-widget-1.0-24work.js" type="text/javascript"></script><a href="http://24work.blogspot.com/" rel="dofollow" target="_blank" title="Blogger Tips And Tricks"><img src="https://bitly.com/24workpng" alt="Blogger Tips And Tricks" border="0" style="position: fixed; bottom: 10%; right: 0%; top: 0px;" /></a><a href="http://24work.blogspot.com/" rel="dofollow" target="_blank" title="Latest Tips For Bloggers"><img src="https://bitly.com/24workpng" alt="Latest Tips For Bloggers" border="0" style="position: fixed; bottom: 10%; right: 0%;" /></a><a href="http://24work.blogspot.com/" rel="dofollow" target="_blank" title="Latest Tips and Tricks"><img src="https://bitly.com/24workpng" alt="Latest Tips and Tricks" border="0" style="position: fixed; bottom: 10%; left: 0%;" /></a><script type="text/javascript">
relatedPostsWidget({
'loadingText':'loading...'
});</script>


And now click Save


Read more > Related Posts Widget For Blogger / Blogspot with jQuery

Friday, May 31, 2013

Multi Hover Effect On Blogger Images Using Pure CSS

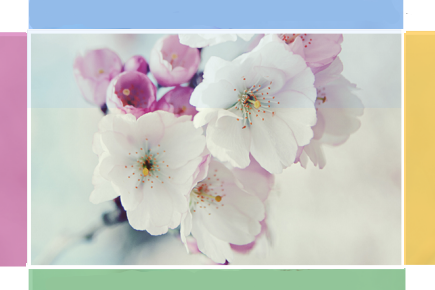
Today I'm going to show you how to add an amazing mouseover effect for Blogger images using only CSS, in which moving your mouse over an image from different directions (from above, from below, etc) will cause an overlay transitioned in from the same vector. This trick will change not only the images appearance when moving mouse over them, but will also allow you to add inside a text with a description.

hover effect, mouseover, blogger hover effects

You can see the effect on this image below: try moving your mouse from the left, right, and above.

hover right hover top hover left hover bottom

Adding Hover Effect From Different Directions on Blogger Images

First thing to do is to add the CSS style to our Template:

Step 1. From Blogger Dashboard, go to Template and press the Edit HTML button


Step 2. Search for the </head> tag - to find it, click anywhere inside the code area, press CTRL + F keys and type it in the search box.


Step 3. After you found it, add the following style just above it: 
<style>
  /* The container and the image */
  div.multi-hover {
    overflow: hidden;
    position: relative;
    vertical-align: middle;
    width: 100%;
    height: 358px;
    line-height: 358px;
  }
  div.multi-hover img {width: 100%;}

/* The texts that, by default, are hidden */
  div.multi-hover span {
    color: #FFF;
    font-size: 32px;
    font-weight: bold;
    height: 100%;
    opacity: 0;
    position: absolute;
    text-align: center;
    transition: all 0.3s linear 0s;
    width: 100%;
  }

/* And this is what will generate the effect */
  div.multi-hover span:nth-child(1) { /* right */
    background: none repeat scroll 0 0 rgba(255, 189, 36, 0.6);
    left: 90%;
    top: 0;
  }
  div.multi-hover span:nth-child(2) { /* top */
    background: none repeat scroll 0 0 rgba(106, 170, 255, 0.6);
    left: 0;
    top: -80%;
  }
  div.multi-hover span:nth-child(3) { /* left */
    background: none repeat scroll 0 0 rgba(204, 87, 166, 0.6);
    left: -90%;
    top: 0;
  }
  div.multi-hover span:nth-child(4) { /* bottom */
    background: none repeat scroll 0 0  rgba(97, 181, 115, 0.6);
    left: 0;
    top: 80%;
  }

  div.multi-hover span:hover {opacity: 1;}
  div.multi-hover span:nth-child(2n+1):hover {left: 0;}
  div.multi-hover span:nth-child(2n):hover {top: 0;}

</style>
Step 4. Save the Template

Now we are going to add the HTML that is nothing but a DIV where we included four SPAN tags with texts and an image:

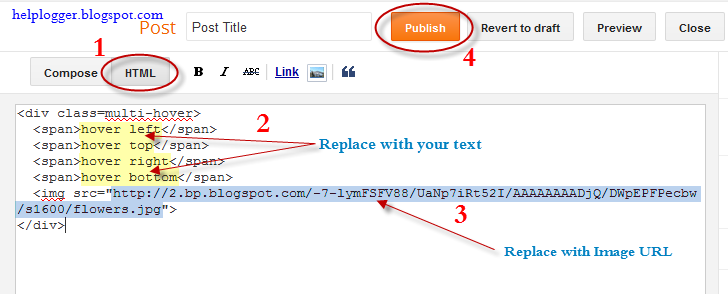
Step 5. Choose Posts, create a New Post, click on the HTML tab (1) and paste this code inside the empty box:
<div class=multi-hover>
  <span>hover right</span>
  <span>hover top</span>
  <span>hover left</span>
  <span>hover bottom</span>
  <img src="https://blogger.googleusercontent.com/img/b/R29vZ2xl/AVvXsEidnOqqzXqXM6hY9-b0k2hYkPzh8TgKVpXljqVHEuwRoTDsrJZvvNcQHEWMV391H0afT7n-x7QOqPzjIy1MyEv0UZRQ34VEGTgd4FqiQOCg3P1WOxEgcC1MWJArDzlIkD8otCpvjyxLqJA/s1600/flowers">
</div>
Add your own text/description to "hover right", "hover top", "hover left" and "hover bottom" (2) and replace the url in blue with the image URL (3) where you want to apply the effect.

Important! Do not click on the Compose tab, otherwise the changes will be lost.


Step 6. After you finished editing your post, click Publish (4)

And that's it... enjoy! :)
Read more > Multi Hover Effect On Blogger Images Using Pure CSS

Thursday, May 30, 2013

Ransum Pakan Puyuh Petelur

Ransum pakan puyuh petelur bisa disamakan dengan ransum ayam petelur perbedaan tentu saja ada pada jumblah pemberian per ekor. Namun jika kita ingin membuat ransum pakan puyuh secara lebih spesifik perhatikan kebutuhan zat makanan seekor puyuh berikut ini:


zat makanan 
starter dan grower
layer
bibit


Asam Linoleat (%)
1
1
1


Calsium (%)
0,65
3,75
2,3


Read more > Ransum Pakan Puyuh Petelur

Ular Boa: Budidayanya Menjanjikan


Ular termasuk binatang yang membahayakan. Namun, anggapan itu tidak berlaku bagi pecinta reptil. Bagi mereka, ular merupakan binatang peliharaan yang eksotik karena memiliki warna dan motif yang cantik. Ular boa termasuk jenis ular yang paling banyak peminatnya. Lantaran permintaannya tinggi, kini marak usaha budidaya ular boa. Salah satu pebudidaya ular ini adalah Hendryanto Nugroho di Bekasi, Jawa Barat. 

Pria yang akrap disapa Dindi ini sudah membudidayakan ular boa sejak lima tahun lalu. Menurut Dindi, dari sekian banyak jenis ular di dunia, hanya 5% saja yang berbisa.  Ular boa sendiri termasuk yang tidak berbisa.

Awalnya, ia mendapat ular boa dari seorang temannya. Ular itu dipeliharanya dari kecil. Setelah boa peliharaannya berusia dua tahun, kemudian dikawinkan dan mulai melahirkan. Saat pertamakali melahirkan, induk ular boa bisa melahirkan 15 ekor. Namun, untuk berikutnya, jumlah anak yang dilahirkan bisa lebih dari dua puluh ekor. Biasanya, ular boa yang melahirkan anak sebanyak itu sudah berumur sekitar empat sampai lima tahun.

Saat ini, ia memiliki tiga indukan ular boa berusia lima tahun. Ular-ular itu rutin melahirkan dalam waktu lima sampai enam bulan sekali. Setiap melahirkan, jumlah anaknya lebih dari 20 ekor. Harga jual anakan ular boa itu bervariasi, tergantung usianya. Anakan yang baru berusia sebulan dihargai Rp 1 juta per ekor. Sementara bila sudah berumur satu sampai lima tahun mencapai Rp 5 juta - Rp 6 juta per ekor.

Selama ini, Dindi lebih banyak menjual ular boa berumur sebulan. Saat itu ular  sudah mulai makan dan berganti kulit. Dari usaha ini, ia bisa meraup omzet sekitar Rp 100 juta per enam bulan. Budidaya ular boa juga ditekuni Topan di Kudus, Jawa Tengah. Ia mulai menekuni usaha ini sejak 2003 di bawah bendera usaha Sawer Breeder.

Topan memiliki enam ekor indukan ular boa yang dapat menghasilkan 20 ekor sekali melahirkan. Anakan ular boa ini dijual saat sudah berumur dua bulan dengan harga Rp 750.000 - Rp 1,5 juta per ekor. "Harga tergantung kebersihan dan warna kulitnya," kata Topan. Omzetnya dari  usaha ini mencapai ratusan juta dalam setahun.

Blog Ini Didukung Oleh :

Read more > Ular Boa: Budidayanya Menjanjikan
 
 
Copyright © blog
Blogger Theme by Blogger Designed and Optimized by Tipseo