Tuesday, April 26, 2011

Centering gadgets on your blog

This article is about centering gadgets from 3rd parties that you install onto your blog.

Previously, I've described how to put HTML code from a 3rd party into your blog.

When code like this is put into a gadget, one common question is "how do I center it?"

There are (at least) three options for doing this.


Option 1:   Centre all the gadgets in your blog

To do this, add a CSS rule to your blog.  The rule to add is:
.widget {
  text-align: center;

This will centre the contents and title of every gadget on your blog.


Option 2:  Only center-align the specific gadget

Put the code from the 3rd party (eg PayPal, Amazon, etc) inside a centering statement, like this:
<div style="text-align: center;">

PUT THE CODE FROM THE 3RD PARTY HERE

</div>
Install the code into your blog the way you would usually install this 3rd party code.

This will centre-align the contents (not title) of the specific gadget that you add.

Note the American spelling of the word "center" - and don't forget to put the closing </div> statement at the end.

There may be some gadgets where it would be possible to add the centring statement to the gadget code itself, rather than putting it outside.    I don't recommend this (unless you're so comfortable with HTML and CSS that you don't need to be reading this article), because it introduces a risk that you will interfere with some other aspect, or that you will lose the centering if you ever need to refresh the code.


Option 3 - Make a new style rule just for the gadget

Define a new style that is to be used on specific gadgets:  put this new style into your template, and then apply it to the gadget like this.
<div class="YourNewSytle">

PUT THE CODE FROM THE 3RD PARTY HERE

</div>

This approach will only centre the gadget contents - not any header that you give to it.

There are lots of options that you could put into the new style rule, but at a minimum it needs to have
.YourNewStyle
{
  text-align: center;
}
Notice that there is a "." (ie a full-stop) before the name of your new style.

Also, it's best not to use a number as the style-name (eg "2nd-gadgetStyle"), because this doesn't work with some browsers.


Related Articles: 


Putting HTML code from a 3rd party into your blog

Adding a new CSS style into your template

Centering the header in your blog

Putting a gadget above your blog's header

Removing the attribution gadget from Designer-template blogs 

Read more > Centering gadgets on your blog

How to put put Posts into your Pages in Blogger

This article shows how to set up your blog, using Blogger, so that it looks like your posts are on separate web-pages.


Can you put Posts onto Pages in Blogger?

Ever since Google introduced "pages" into Blogger, people have complained that their posts all go onto the "home page", and asked how to put posts onto different pages in their blog.


The standard, but unsatisfactory, answer is
"Sorry, that's not how Blogger works.   So called "static" pages in Blogger are meant to be used for reference information that doesn't change often, which you don't want to be part of your regular post-feed, but which you do want users to have easy access to."

Basically, this is part of the difference between post and pages.

Luckily it's easy to set up your blog so that it looks like your posts are on different pages [tweet this],

.... even though you and I know that this isn't how Blogger works.

The only aspect that some people don't like is that their posts all show up on the "home page" was well as the topic pages, but even this can be worked around, at least sometimes.


Follow these steps:

1  Categorise your posts by adding Labels to them.


2  Make a "pages look alike" menu bar:  

There are (at least) are three ways of doing this - choose which ever one suits your blog best:
a)   With a Labels Gadget:    
Use the usual add-a-gadget approach to put a Labels gadget into the spot where you would put the Pages gadget if you wanted to make a horizontal menu bar with it.

If your blog has some Labels that you don't want to have "pages" for, then set it to show only some of your Labels:

         b)   With a Linked-list gadget:   
Use the usual add-a-gadget approach to put a Link-list gadget where you would put the Pages gadget if you wanted to make a horizontal menu bar with it.
Add a link to the list for each Label that you want a "page" for.   The HTML to use for each Label value is

http://YOUR-BLOGS-URL/search/label/THE-LABEL-NAME

You can also add other items (eg individual Posts, or even Bllogger's static "pages" if you really must have them - see why I don't like them!) - see the menu bar at the top of this site for an example of this.


c)   With a Pages gadget:   

Use the usual add-a-gadget approach to put a Pages gadget into the menu bar area.
Use Label-links described above the Linked-list gadget option, as website links to add to your Pages gadget.


3   If you don't want all posts to appear on the "home page" was well as the topic pages, set your home page to show zero posts, by setting  "Number of posts on main page:" = 0   on:

Post-Sept-2011-Blogger (aka the new interface)   Layout  > Blog Posts (edit),
Pre-Sept-2011-Blogger (aka the new interface)     Design > Page Elements > Blog Posts (edit)


Alternatively, you could use a technique similar to Showing a Gadget only on the Home Page  to not show the Blog Posts gadget on the home page.  the condition to use is !=  instead of ==)   If you do try this, then I strongly recommend that you consider the various options for giving your blog a home page, and make sure you accept the disadvantages of editing your template.


Job Done

It really is that simple.  Your readers can now click on the "pages" in your blog from a "menu" at the top, and see a list of posts for the Page that they chose.   Even better, if some posts relate to more than one topic, they show up on both of the relevant pages.

Don't forget to test your blog, to make sure that the menu bar is working how you expect it to and that it looks OK, in all the browsers that your readers are actually using.


I'm keen to hear if this approach works for you.
  • It is a "good enough" alternative to "real pages"?
  • Are there any other side-effects of using Labels to "pretend" to be web-page titles?
Please leave your thoughts in the comments box below.


Related Articles: 


Using Labels to group your Blogger Posts

Adding external and internal URLs to your pages-gadget / menu bar

Giving your blog a home page

The difference between posts and pages

Showing a Gadget only on the Home Page
Read more > How to put put Posts into your Pages in Blogger

Switching your blog from one custom domain to another

This article is about how you can change a Blogger blog to use a different custom domain.

Overiew

Previously, I've described how to use a domain that you bought from  Google / Blogger for something other than a Blogspot blog.  But sometimes, you may want to keep using the blog, but switch it between custom domains - ie give it a different URL.

Example:
Fred  started out with fred-goes-fishing.blogspot.com, and initially purchased fred-fish.com.   But after using that for a while, he found that it wasn't quite right, so he changed to  FredsFishyTales.com.

There are several ways to do this, but the simplest, and I believe most successful, is to:

1)  Switch the blog back to use Blogspot (for a short time), and then
2)  Repeat the custom domain purchase and switch process for the new domain, and
3)  Tidy up the old custom domain.

Switching the blog back to Blogspot:


Log in to Blogger with the account that owns the domain.

2  From the Dashboard,
In pre-Sept-2011-Blogger (the old interface):  choose    Settings > Publishing > Switch to:  blogspot.com 
In pre-Sept-2011-Blogger (the old interface):  choose    Settings > Basic, and in the Publishing area click on the cross to the right of the Edit link

This changes your blog back to be www.YOUR-BLOG-NAME.blogspot.com, and removes the DNS records that pointed your blog to the old custom-URL.

It may take a few hours (I've heard up to 72) for these changes to be applied to computers around the world, so people who go to the old custom domain may still get re-directed to your blog for a day or two. 

Apparently it can take some time for Comments to be switched back, so before doing the next step you may want to wait for a short while, a couple of hours or maybe even a couple of days.


Switching the blog to the new custom domain:

1)  Make sure that the Google account which you want to own the new domain has administrator rights to the blog.

(This isn't an issue if you only have one Google account, but may be worth thinking about if you plan to transfer the blog to someone else in future.)
 
2)  Log in to Blogger with that account

3)  From the Settings > Publishing tab, choose Switch to Custom Domain

4)  Use the standard blogger method of buying the new domain.

I very strongly recommend setting up an administrator account for the new domain so that you can manage this domain in the future

If you are asked if you want to enable Sites, answer NO.

If all goes well, your blog should now be pointing to the new web-site address that you have purchased.   If there's a problem, post a question in the Blogger Help Forum.  Include the URL of your blog and the domain name (aka URL, website-address) that you're trying to switch to.

Once the new custom domain is working, you way also want to change the source for any RSS feeds that were coming from the old domain.


Cleaning up the old custom domain:

Even if you don't want it any more, you still own the old custom domain for as long as you had purchased it for.   If you got it from Google, this will be until a year after your last purchase. The only exception is if you purchased from a registrar who allows refunds (most don't.)

You may want to sure that you're not going to automatically renew the old domain (make sure the box is un-ticked instead of ticked).  

In the meantime, though, your options for the old custom domain include:

  • Do nothing
Anyone who goes to it will just get a 404 / site not found error.

  • Use a blog to tell people about the redirect:
Create a new blog that just has one post explaining where your old blog has gone.

Set up this new blog to use the old custom domain from Settings > Publishing > Switch to Custom Domain > Switch to Advanced Settings.

I'm 99% certain that you don't need to worry about the set-up instructions, because they will have been done the first time around.

  • Use a domain re-direct
This means that anyone who goes to your old domain (either directly or by selecting it from Google search results) is automatically taken to your new domain.

There is a way to do it from Blogger - but it's a hack that tends to get your blog detected as spam.

The better way is to set up a re-direct with the domain registrar (ie whichever of GoDaddy and eNom the old domain was purchased through).  The directions for doing it are different for every domain registrar, so you need to read their help instuctions.  You do need to get into the domain control panel to get the access details.  If you don't have the details (ie domain administrator ID and password) for doing that, try using this help-process choosing:
- I never created an administrator account, then
- I signed up at Google.com/a and purchased a domain name at the same time

If you need help, check the support forums (etc) provided by the relevant domain registrar.

  • Use the old domain for something else
Previously this could include AdSense for parked domains (if you're already an AdSense publisher) - but that option has now been turned off>   So you may want to investigate other , or something totally different - see the second part of using a custom domain for something other than a Blogspot blog for help with this.

You may even want to sell the old domain to someone else, in which case you'll need to learn about the domain transfer process.


Related Articles: 


Using a custom domain for something other than a Blogspot blog

AdSense for parked domains

Setting up the domain administrator for your domain

Automatically renewing your custom domain

Understanding Google accounts

Transferring ownership of your blog to another Google account

Blogger and other Google products - an overview
Read more > Switching your blog from one custom domain to another

The Attribution gadget has a "Remove" button - for today anyway.

For now, you can manage the attribution gadget on your Blogger blog in much the same way as any other gadget.  Congratulations to Blogger for listening to what we wanted, and making this change.

What's this about

When Google introduced Designer Templates, they included a new Attribution gadget, which puts a line about "Powered by Blogger" at the bottom of each blog.  Bloggers could add extra information to this line, but couldn't change the core message.

Unlike most other gadgets, the Attribution gadget didn't have a Remove button.   So Blogger-users put a lot of effort into finding ways to remove the attribution, and Google put a lot of effort into detecting that it was removed and putting it back again - sometimes in the "right" place in the footer, sometimes at the bottom of the sidebar.  

Today, someone pointed out that the gadget now has a remove button, so you can remove it the "normal" way.


Does it work?

And when I tested it a few minutes, it the attribution gadget appeared to stay removed:  I couldn't see it back in the sidebar or anywhere in my blog's footer.

That doesn't guarantees that the button will stay there:  it could easily be a mistake that's been made.   And if it is, I'd expect that the Remove button will disappear again one day soon.

So if you want to use the Remove button instead of taking the risks involved in editing your template in order to get rid of the attribution, then I'd recommend acting quickly.


Getting the attribution back

The attribution gadget isn't in the list shown under Design > Page Elements > Add a Gadget at the moment.

So if you remove it, then you cannot add it back.

If you really want it back, you will either need to pick a new template or build your own attribution using a HTML or text-gadget


Related Articles: 


Removing your blog's attribution gadget

Making a credits / attribution link for your blog

Editing your template:  advantages and disadvantages.

Types of Blogger Template

Read more > The Attribution gadget has a "Remove" button - for today anyway.

Monday, April 25, 2011

Restricting your Blog's readers isn't as secure as you thought

This article explains some of the issues with restricting readership of your blogspot blog to just people who you choose, and why you can appear to have unexpected readers.

When you first set up a blog, anyone in the world can read it (if they can find it - how to get them to there is a different story!).

But some people want to keep their blog private, just for them and their friends (or teachers, students, other parent, classmates, etc).   This is fine, provided they don't mind that only up to 100 people - ever- can be invited to read the blog, and that it doesn't have an RSS feed so cannot offer email subscriptions.

Stopping everyone from reading your blog:

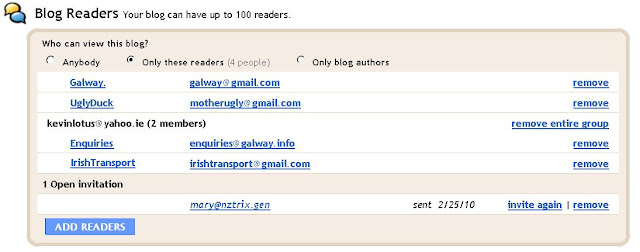
In the Settings / Permissions tab (old interface) or Settings > Basic:  Permissions tab (new interface), there is an area where Blogger lets you restrict the readers of your blog to anyone, selected people, or authors only.


(this picture is from the old interface - then new one is very similar)


Restricting access to readers only

If you tick "only people I choose", the screen lets you enter email addresses of people who you want to invite to read the blog.

When you email someone an invitation, they get a message like this:
"To view this blog, visit:


http://www.blogger.com/i.g?inviteID=someNumbersThatIdentifyYourBlogInvitation


You'll need to sign in with a Google Account to confirm the invitation. If you don't have a Google Account yet, we'll show you how to get one in minutes, or you can view the blog as a guest for up to 30 days."

When someone clicks the link in this email, they are asked which Google account they want to use to sign in to your blog, or given the opportunity to sign-up for a Google account if they don't have one already.

This is good, because it lets you invite people who don't, yet, have google accounts to view your blog. But it does mean that your blog may appear to have readers who you didn't invite.


Signing in with a different address

There is noting that forces the email address associated with that Google account that accepts your invitation to be the same as the one that you sent the invitation to.

Once someone has accepted an invitation, the list of readers just shows you the emails of the readers you have:  it doesn't show you the link between them and the person who you sent the invitation to.

For example, if you emailed an invitation to mary@gmail,com, but the Mary also has a Google account with manager@google.com as it's email, she could choose to reader your blog with the manager account - and you would see manager@google.com in your list of readers.


Exception:  Forwarded Invitations

People who you invite can forward the invitation-email to other people, and they too can sign into your blog.  (Each invitation can be used multiple times).

If this happens, the readers are put into a group, and the Permissions tab shows you the email address that you send the invitation to, and the emails of the people who've accepted the invitation.   And it lets you remove the permssions either from individuals, or from the whole group at once.


Guest sign-on:

If the person you invited wants to, they can choose to sign in as a guest for up 30 days. However Google bases this on the IP address they are using at the time.   This causes a couple of issues:
  • If they're on a shared computer, then anyone else who uses that computer can read your blog (if they can find it - for example, by looking in the browser history file).
  • If their internet service (ISP) uses dynamic IP addresses (ie you get a new one every time you connect) then the person who accepts the invitation will only be able to read the blog during their current internet connection.   And anyone else who gets the same IP address in the next 30 days will be able to read the blog (though it's unlikely that they will be able to find it).


    An Example


    (note to spammers:  using the wonders of MS Paint, I have changed every single email address to something invented - so don't bother!)

    In this example:

    An invitation was sent to Hazel@gmail.com, but she chose to sign in as UglyDuck with an email of motherUgly@gmail.com

    An invitation was sent to KevinLotus,
    • KevinLotus accepted it but signed in as Enquiries, 
    • He also forwareded it to IrishTransport who signed in as herself.
    An invitation was sent to mary@nxtrix.gen, but she chose to view the blog as a guest for 30 days, so it looks like her invitation is outstanding.


    Email isn't secure!

    Having said all the above - remember that email isn't really secure anyway.   Security experts usually say that email is just like a a post-card:  your messages can be read, in plain text, by every postal-worker whose hands they pass through.   Or in computer terms, by every server that that the pass through on the journey between you and the recipient.

    So, if someone really, really wants to read you blog, they may figure out how to "sniff" your email.   This isn't easy (and someone who can do it may be able to find easier ways to hack into your blog anyway), but is possible.

    If what's in your blog really is super-sensitive, you need to choose whether it's worth taking the risk of using tools like this (and I think it is, in many cases, because the risk is small-ish), or whether you need to look for a set of tools that is more secure.


    Related Articles: 


    Understanding Google accounts

    Transferring your blog to a new owner


    Posting by email - knowing who said what


    Read more > Restricting your Blog's readers isn't as secure as you thought

    Copying a post from one blog to another

    This article is about how to copy a post from one blog to another, using Blogger, while keeping all the formatting, pictures and layouts.

    There is a separate article about copying all, or most, posts from one blog to another.


    One way to move a post from one blog to another is by copying and pasting it into the post-editor in a new Post in the second blog.

    However sometimes this doesn't work:  formatting, picture positions or hyperlinks are lost.

    But behind every Blogger post is just HTLM:  So, you can can copy content from one Post to another by copying the HTML, and pasting it to the destination blog as HTML.

    This works even if the blogs belong to different Google accounts (although sometimes you may need to save the HTML in a text-editor (eg NotePad) while you log out and in again, or perhaps even email it (as a plain-text) message to someone else who has author rights in the second blog.


    Follow these steps to move a post to another blog:

    1  Log in to Blogger, and Edit the post you want to move.

    2  Click on HTML (or Edit HTML in the old Blogger), to see the code behind the post.


    Copy all the code 
    (put the cursor in the code, ad  press Ctrl / A to select it, then press Ctrl C to copy)

    Open the blog that you want to move the post to
    (You may need to log out and in again, or perhaps just switch to different browser or tab)

    5  Create a New Post


    6  Click on HTML or Edit HTML, so you can see the space where the code goes

    Paste all the code

    8  If necessary, click on Post Options and make any changes you need there (eg viewing or not viewing comments or back-links)

    9  Click Publish, and check that it looks ok


    This an easy way to move an individual post (or part of a post) - there are other easier ways to move all posts between blogs, and move some posts between blogs.


    Related Articles: 


    Moving all the posts from one blog to another

    Converting Posts into Pages

    Understanding Google accounts

    Options in Blogger's post editor
    Read more > Copying a post from one blog to another

    Removing the Attribution gadget from blogs that have Designer Templates

    This article is about how to change or delete the attribution that Google has added to add blogs which have a Designer template.    (Updated May 2011 with the latest status of the methods listed.)

    What is the attribution - and what's wrong with it.

    picture of Powered by Blogger being painted over, with a purple picture frame border
    If your blog has a Designer template (ref What sort of template do I have?) you may have noticed a gadget in the blog-footer called attribution.   This gives credit to:
    • The template designer
      (Even though s/he only designed the structure, not the colour, font and gadget layout combination that you're using - and readers who aren't familiar with Blogger probably won't understand the distinction between your work and the template-programmer)
    • The copyright owner of the background photo you're using
      (Even though s/he doesn't own any of the zillion other photos in your blog - and again, readers aren't going to understand what photographs are part of the template and what aren't)
    • Blogger for "powering" your blog
      (Even though they're hosting it, and the real power may be provided by other tools:  eg I have blogsites hosted by Blogger but whose real power comes from Google Maps, Google Custom Search, and Sites.)

    The gadget also has a field "Copyright (optional)".  Whatever you put into this is shown at the beginning of the attribution.  It will accept some simple HTML commands, for example a line break (<br />) as shown in the picture.   But I have a feeling that adding something more complex, eg an entire Creative Commons statement, won't work.


    How to remove the Attribution Gadget

    Removing this gadget has been troublesome since it was introduced.   Several times, we found a method to remove it, which worked for a while.   But then Blogger added a check for that method, and code to put the gadget back again each time the template was saved - so we had to find another approach..

    For a while they stopped putting the gadget back and the earlier, simpler methods of removing the gadget were working.  Then they stopped again.   So the complete list of removal methods that I've found, with notes about their current status, is below.

    WARNING:  

    I have not checked the Blogger Terms and Conditions to find out whether you are allowed to remove the Attribution.   Even if they don't mention it today, a requirement to keep the statement could be added tomorrow.   This advice does not mean that I, or Google/Blogger, are saying that you should/can/may/must remove the attribution statement.


    Methods that currently work:


    Techniques that used to work, but don't any more:
    • Unlocking and removing the gadget
      This worked initially, then stopped.   Most recently (Jan 2011), it was working again.    If you try it, and it doesn't work, please leave a comment below, and try one of the other methods.


    Advantages and Disadvantages:

    I'm not keen on methods that involve hiding things, because it may make search-engines think you're being sneaky.

    But changing the template-name may mean you don't get improvements that Google apply to the standard templates in future (eg support for new browser features, bug-fixes).

    It may also mean that you get less-sympathetic responses to future question in the Blogger Help Forum:  when people use 3rd party templates, one regular reply to, "how do I do XXXX to my template"  is "ask your template provider."

    To avoid this, you should at very least remember what template you were using, and possible even rename yours to something like "WHATEVER, based on Awesome".


    Give credit where it's due: 

    If you do remove the standard attribution gadget, it may be a good idea to replace it with a customised attribution that acknowledges any or all of your domain registrar, blog-host (Blogger, AKA Google), file host, template designer and customiser, graphic designer, content writer(s) - in short anyone whose efforts have contributed to your blog.


    Related Articles: 


    Giving your blog a customised attribution gadget

    Adding a CSS rule to hide the attribution gadget

    Changing your template name or designer-name

    Removing attribution from mobile-template blogs

    Deleting the attribution gadget by unlocking and removing it

    Deleting the attribution gadget by commenting out the code.  

    How the data in your Blogger blog is organised
    Read more > Removing the Attribution gadget from blogs that have Designer Templates
     
     
    Copyright © blog
    Blogger Theme by Blogger Designed and Optimized by Tipseo